I remember my friend Karen tossing that text at me just as I was prepping a late-night snack for a movie marathon. Honestly, I never gave much thought to pickles beyond the jar from the grocery store — you know, the usual dill spears that sit in the fridge forever and sometimes get that weird cloudy water thing going on. But that message nudged me to try making my own quick garlic dill refrigerator pickles, especially since I was craving something tangy and fresh to crunch on ASAP.
What’s wild is how just 24 hours later, I had these crunchy, garlicky pickles that tasted like something straight from a little deli stand, but without the long wait or fancy equipment. The smell of fresh dill combined with crushed garlic filled my kitchen, and the bright snap of the cucumbers was all the confirmation I needed that homemade pickles don’t have to be complicated or time-consuming. It’s like a little jar of magic that wakes up any sandwich or snack plate.
Making these quick garlic dill refrigerator pickles became a bit of a ritual for me — throwing together simple pantry staples and waiting just a day before the reward. I’ve since brought them to potlucks and tucked them alongside easy dinners like my sheet pan beef dinner, and every time, someone asks for the recipe.
There’s something about how this quick pickle recipe respects the humble cucumber while adding that perfect punch of garlic and dill. It feels honest and fresh, not fussy or overthought. And the best part? It’s ready in less than 24 hours, which means no more waiting weeks or fussing with canning. Just straightforward, delicious pickles you can trust will brighten up your fridge and your mood.
Honestly, it’s the kind of recipe that sticks around because it’s simple, reliable, and kind of addictive. Like a little crunchy secret you want to share but also keep for yourself.
Why You’ll Love This Quick Garlic Dill Refrigerator Pickles Recipe
Making your own pickles at home can feel intimidating, but this quick garlic dill refrigerator pickles recipe proves it doesn’t have to be. After a bunch of kitchen experiments (and a few too-sour batches), I landed on this easy, foolproof method that’s perfect for anyone who wants fresh, crisp pickles without the fuss.
- Quick & Easy: Ready in just 24 hours, these pickles are perfect if you forgot to grab a jar on your last grocery run.
- Simple Ingredients: No obscure spices or specialty vinegar needed — just pantry staples like white vinegar, garlic, and fresh dill.
- Perfect for Snacking & Meals: Whether you’re assembling sandwiches, spicing up a salad, or just craving a crunchy snack, these pickles fit right in.
- Crowd-Pleaser: I’ve made these for family gatherings and paired them with dishes like the one-pot salmon with quinoa, and they always disappear fast.
- Unbelievably Delicious: The garlic and dill hit just the right notes, balancing tang, herbaceousness, and a gentle bite.
What sets this recipe apart is the way it captures that fresh, crisp pickle crunch without needing to wait weeks or break out a canner. Instead of heavy spices or sugar overload, it focuses on the bright, clean flavors of fresh garlic and dill, which I’ve found make all the difference. Plus, using a quick refrigerator method means you can make small batches frequently — perfect for switching up your pickle game whenever you want.
It’s the kind of recipe that fits into a busy life but still feels like a treat — no stress, no long waits, just good, honest flavor you can rely on. It’s a simple pleasure that I keep coming back to, especially when I want to add a little zing to my meals without turning on the stove or oven for hours.
What Ingredients You Will Need for Quick Garlic Dill Refrigerator Pickles
This recipe uses simple, wholesome ingredients to deliver bold flavor and satisfying texture without the fuss. Most are kitchen staples, and the fresh garlic and dill really bring it home.
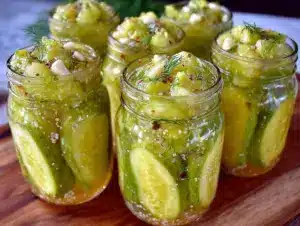
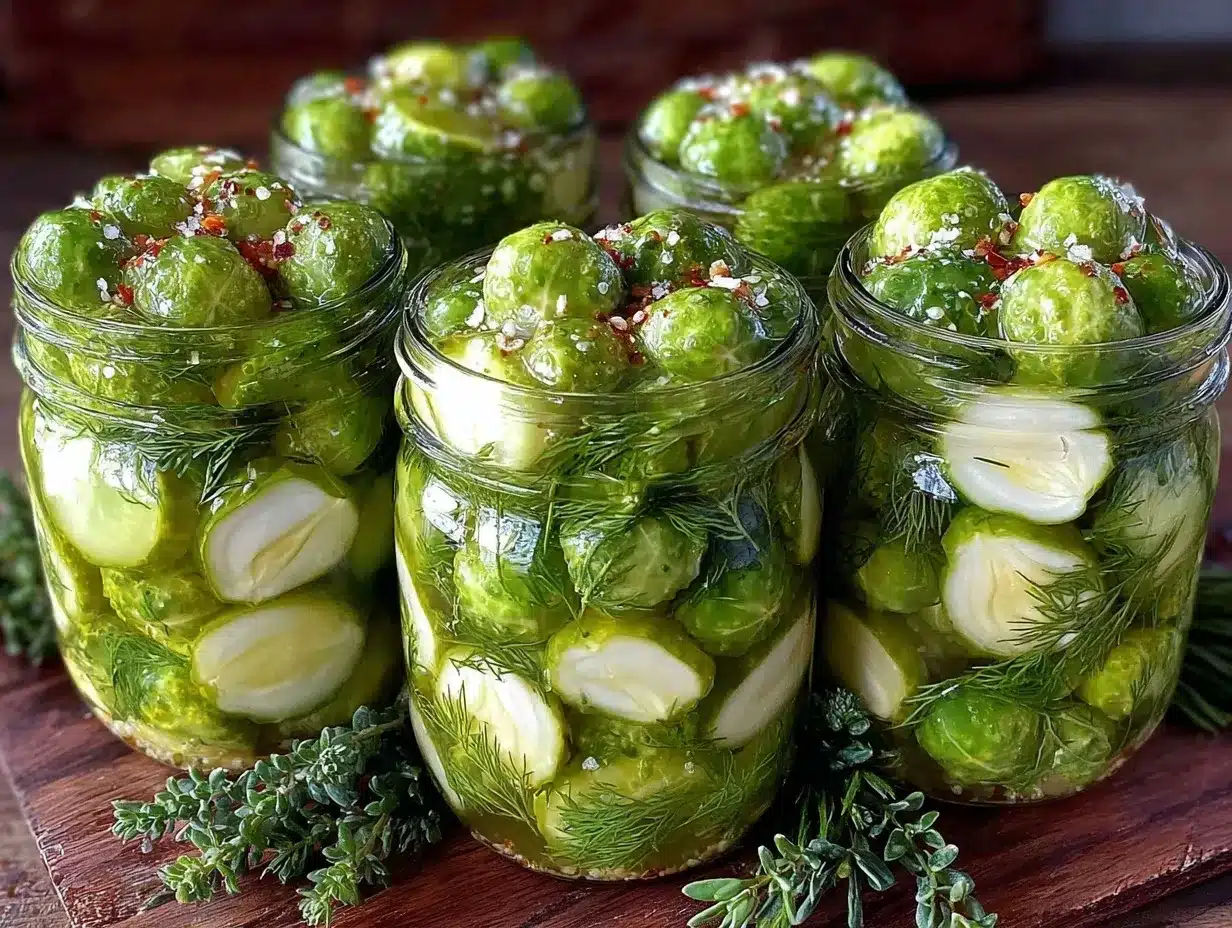
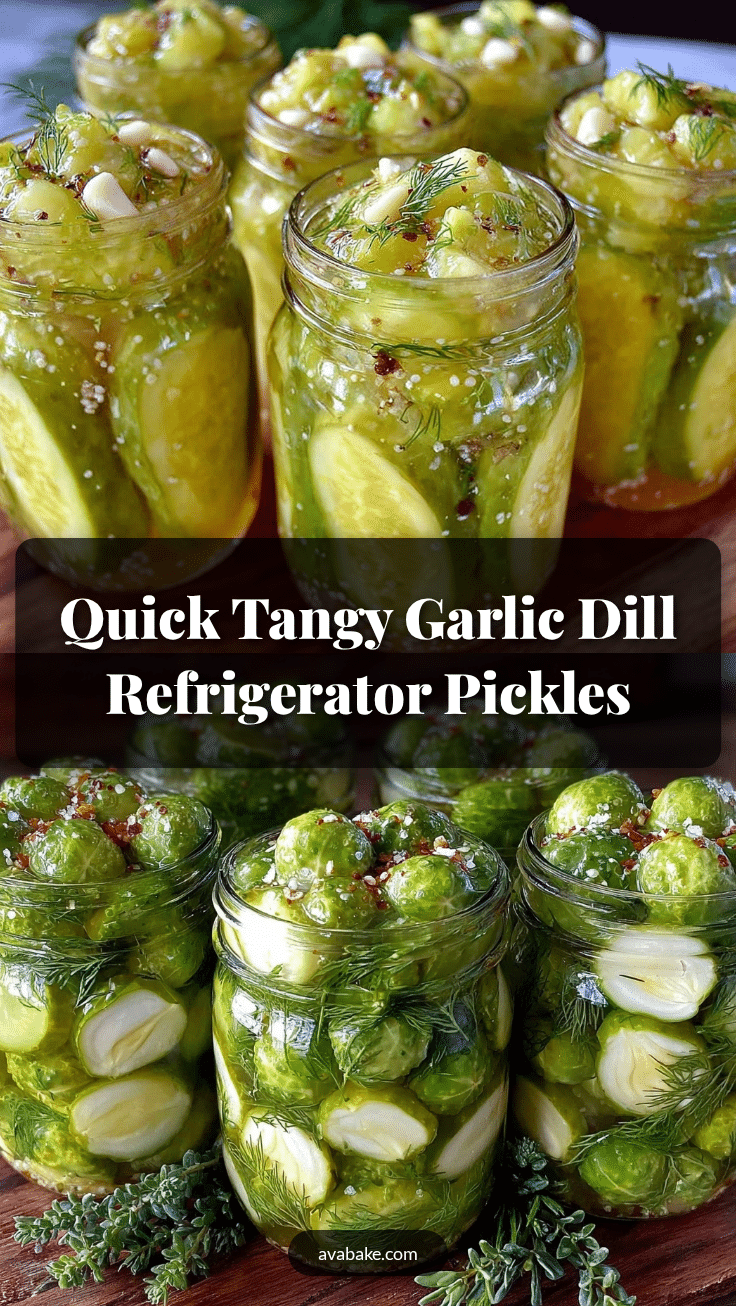
- Fresh cucumbers (about 4-5 small Kirby cucumbers or Persian cucumbers, 1 to 1.5 pounds / 450-700g) – I prefer these smaller cucumbers for their crisp texture and thin skin, which means no peeling needed.
- Fresh dill (3-4 large sprigs) – The star herb here; look for bright green, fragrant dill bunches at your market.
- Garlic cloves (3-4, smashed or thinly sliced) – Fresh garlic is essential for that punchy, savory flavor.
- White vinegar (1 cup / 240 ml) – The acid that gives pickles their classic tang; use distilled white vinegar for clarity and clean flavor.
- Water (1 cup / 240 ml) – Balances the vinegar to keep the pickles crisp and not too sour.
- Kosher salt (1 tablespoon) – Use a good-quality coarse salt without additives; I like Diamond Crystal for consistent results.
- Sugar (1 teaspoon) – Just a touch to balance acidity; optional but recommended.
- Black peppercorns (about 8-10) – Adds a subtle peppery warmth.
- Mustard seeds (1 teaspoon) – Adds a gentle, nutty bite that complements the garlic and dill beautifully.
- Red pepper flakes (optional, 1/4 teaspoon) – For a hint of heat if you like things with a little kick.
If you want to play around, swapping out white vinegar for apple cider vinegar adds a fruity tang, or adding a few slices of fresh jalapeño can bring some spice. But honestly, the classic garlic dill combo here is what makes this recipe a keeper.
Equipment Needed
- Glass jar with a tight-fitting lid (1-quart / 1-liter size) – Perfect for marinating and storing your pickles safely. Mason jars work great and are easy to clean.
- Measuring cups and spoons – For precise vinegar, water, and seasoning amounts.
- Sharp knife – For slicing cucumbers and garlic thinly.
- Cutting board – Preferably non-porous to keep flavors pure.
- Small saucepan (optional) – To warm the brine slightly if you want to dissolve salt and sugar faster, though room temperature works too.
If you don’t have a mason jar, a clean glass food storage container with a lid will do just fine. Just make sure it seals well to keep the pickles fresh in the fridge. And honestly, I’ve found that using glass is best because it doesn’t absorb flavors or stains like plastic might.
Preparation Method
- Wash and slice the cucumbers: Rinse your cucumbers under cold water and slice them into 1/4-inch (6 mm) thick rounds or spears, depending on your preference. I usually go for spears because they’re perfect for snacking and sandwiches. This step should take about 5 minutes.
- Prepare the brine: In a small bowl or saucepan, combine 1 cup (240 ml) white vinegar, 1 cup (240 ml) water, 1 tablespoon kosher salt, and 1 teaspoon sugar. If you want the salt and sugar to dissolve faster, warm the mixture gently over low heat for 2-3 minutes, then let it cool to room temperature. Otherwise, just stir vigorously until dissolved. This takes roughly 5-7 minutes.
- Pack the jar: Add the sliced cucumbers into your glass jar, then tuck in the 3-4 sprigs of fresh dill, the smashed or sliced garlic cloves, black peppercorns, mustard seeds, and red pepper flakes if using. Press gently to fit everything snugly without smashing the cucumbers.
- Pour in the brine: Pour the cooled (or room temp) brine over the cucumbers, making sure they’re completely submerged. You can use a small clean weight or a folded piece of parchment paper to keep cucumbers under the liquid if needed.
- Seal and refrigerate: Close the jar tightly and place it in the fridge. Let the pickles sit for at least 24 hours before tasting. The flavor improves the longer they sit (up to 1 week is great), but the 24-hour mark is when the garlic dill magic really shows up.
- Enjoy: After 24 hours, your quick garlic dill refrigerator pickles are ready to brighten up sandwiches, salads, or just snack on straight from the jar. Keep refrigerated and consume within 2-3 weeks for best freshness.
Tip: When slicing garlic, try not to crush it too much or it can turn bitter. Thin slices or gentle smashing release flavor without overdoing it. Also, fresh, firm cucumbers make all the difference — limp or overripe ones won’t give you that perfect crunch.
Cooking Tips & Techniques for Perfect Pickles
Let me share some hard-earned nuggets that saved me from soggy or bland pickles more than once:
- Choose the right cucumbers: Pick firm, small cucumbers like Kirby or Persian varieties. They hold their crunch better than large slicing cucumbers with thick skins.
- Don’t skip the salt: Kosher salt is best because it dissolves well without additives that can cloud your brine or alter flavor.
- Use fresh dill: Dried dill just can’t compete here. Fresh, fragrant dill sprigs give that unmistakable bright, herbal note.
- Keep cucumbers submerged: Exposure to air can make pickles mushy or moldy faster. Use a weight or a piece of clean parchment paper to keep them under the brine surface.
- Patience is key: Although you can eat these pickles after 24 hours, letting them rest for 2-3 days makes the flavor more balanced and deeper.
- Don’t overdo the garlic: Too much garlic can overpower the delicate cucumber flavor and make the brine bitter.
- Try warming the brine: This helps dissolve salt and sugar quickly but make sure it cools completely before pouring over cucumbers to avoid sogginess.
- Store properly: Always keep the jar sealed tightly and refrigerated to keep pickles fresh and crisp.
I’ve learned that a little care in these steps makes pickles that don’t just taste good but have that satisfying crunch you expect from a perfect bite. If you like, you can multitask by prepping this brine while chopping veggies for a quick dinner — maybe something like the salmon with quinoa, which pairs wonderfully with tangy pickles on the side.
Variations & Adaptations for Your Pickle Preferences
This recipe is flexible enough for you to make it your own, no matter your taste or dietary needs:
- Spice it up: Add fresh jalapeño slices or increase red pepper flakes for a hotter bite.
- Make it sweet and sour: Increase sugar to 2 tablespoons for a sweeter pickle reminiscent of bread-and-butter style.
- Low-sodium option: Reduce salt slightly, but keep in mind salt helps with crunch and preservation.
- Vinegar swap: Use apple cider vinegar for a fruitier tang or rice vinegar for a milder flavor.
- Herb twists: Try adding fresh tarragon or thyme along with dill for a different herbal note.
Personally, I sometimes toss in a few peppercorns and a bay leaf for a slightly deeper flavor, especially if I’m pairing the pickles with richer dishes. And if you’re interested in a fun twist, these quick pickles make a great side for a cozy meal like the honey garlic butter chicken sheet pan dinner — the tang cuts through the richness beautifully.
Serving & Storage Suggestions
Quick garlic dill refrigerator pickles are best served chilled straight from the jar. Their crisp texture and bright flavor make them a perfect sidekick to hearty meals or simple snacks.
- Serve alongside sandwiches, burgers, or charcuterie boards for a refreshing contrast.
- Add chopped pickles to potato salad or tuna salad for an extra tangy crunch.
- Use as a topping on tacos or hot dogs to brighten flavors.
- Store pickles tightly sealed in the fridge for up to 3 weeks. Always use a clean fork or tongs to avoid contamination.
- If pickles soften over time, they’re still safe to eat but best enjoyed within the first two weeks for crunch.
- Refrigerate after opening and avoid leaving them out at room temperature for long periods.
Nutritional Information & Benefits
These quick garlic dill refrigerator pickles are low in calories (about 10-15 calories per serving of 3-4 pickle slices), fat-free, and a good source of hydration thanks to the high water content of cucumbers.
The vinegar in the brine can aid digestion and support gut health, while fresh dill adds antioxidants and vitamins like A and C. Garlic brings immune-boosting properties and a subtle antibacterial effect.
This recipe is naturally gluten-free, vegan, and low-carb, making it suitable for a wide range of diets and lifestyles. Just watch the salt if you’re on a sodium-restricted diet.
Conclusion
If you’re looking for a simple, fast way to bring big flavor and crunch into your kitchen, these quick garlic dill refrigerator pickles are a winner. No canning, no long waits — just fresh, tangy pickles ready in 24 hours that make every meal a bit brighter.
I love how they transform plain sandwiches or salads into something special without any fuss. Plus, making these pickles feels like a little kitchen accomplishment that anyone can nail, even on a busy weeknight.
Give it a try, tweak it to your taste, and let me know how your batch turned out. Sharing these little jarred delights has become one of my favorite ways to add a fresh twist to everyday meals, and I hope they do the same for you.
Happy pickling!
FAQs about Quick Garlic Dill Refrigerator Pickles
How long do quick refrigerator pickles last?
They typically stay fresh and crunchy for up to 3 weeks when stored in a sealed jar in the refrigerator.
Can I use regular cucumbers instead of Kirby or Persian cucumbers?
You can, but regular slicing cucumbers may be less crunchy and have thicker skins. If using them, consider peeling for a better texture.
Do I need to boil the brine for this recipe?
Nope! You can simply stir the brine until salt and sugar dissolve, or warm it gently and cool before pouring over cucumbers. Boiling isn’t necessary here.
Can I make these pickles without garlic?
Yes, but garlic is a key flavor in this recipe. If you skip it, consider adding extra dill or spices to keep the flavor lively.
Are these pickles fermented?
No, these are quick refrigerator pickles made with vinegar brine and do not undergo fermentation. They’re fresh and tangy but not sour like fermented pickles.
Pin This Recipe!
Quick Garlic Dill Refrigerator Pickles Recipe Easy Homemade in 24 Hours

A simple and fast recipe for fresh, crunchy garlic dill pickles ready in just 24 hours using a quick refrigerator method without canning.
- Prep Time: 10 minutes
- Cook Time: 0 minutes
- Total Time: 24 hours
- Yield: 4 servings 1x
- Category: Side Dish
- Cuisine: American
Ingredients
- 4–5 small Kirby or Persian cucumbers (1 to 1.5 pounds / 450-700g)
- 3–4 large sprigs fresh dill
- 3–4 garlic cloves, smashed or thinly sliced
- 1 cup (240 ml) white vinegar
- 1 cup (240 ml) water
- 1 tablespoon kosher salt
- 1 teaspoon sugar (optional but recommended)
- 8–10 black peppercorns
- 1 teaspoon mustard seeds
- 1/4 teaspoon red pepper flakes (optional)
Instructions
- Wash and slice the cucumbers into 1/4-inch (6 mm) thick rounds or spears.
- Prepare the brine by combining white vinegar, water, kosher salt, and sugar in a bowl or saucepan. Warm gently for 2-3 minutes to dissolve salt and sugar if desired, then cool to room temperature.
- Pack the sliced cucumbers into a glass jar, adding fresh dill sprigs, smashed or sliced garlic cloves, black peppercorns, mustard seeds, and red pepper flakes if using.
- Pour the cooled brine over the cucumbers, ensuring they are fully submerged. Use a weight or parchment paper to keep cucumbers under the brine if needed.
- Seal the jar tightly and refrigerate for at least 24 hours before tasting. Flavor improves up to 1 week.
- Enjoy chilled straight from the jar. Keep refrigerated and consume within 2-3 weeks for best freshness.
Notes
Use fresh, firm small cucumbers like Kirby or Persian for best crunch. Keep cucumbers fully submerged in brine to avoid mushiness. Thinly slice or gently smash garlic to avoid bitterness. Warming the brine helps dissolve salt and sugar but ensure it cools before pouring. Store pickles refrigerated and consume within 2-3 weeks.
Nutrition
- Serving Size: 3-4 pickle slices
- Calories: 1015
- Sugar: 1
- Sodium: 400
- Carbohydrates: 2
- Fiber: 0.5
Keywords: quick pickles, garlic dill pickles, refrigerator pickles, easy pickles, homemade pickles, no canning, crunchy pickles