“Can you believe this cheesecake has no oven involved?” my friend whispered as she scooped up the last jar at our summer picnic. Honestly, I was skeptical at first. Cheesecake usually means hours in the oven, waiting and worrying about cracks or soggy crusts. But this easy no-bake strawberry cheesecake in a jar changed the game for me that afternoon. It started as a quick solution for a last-minute get-together when the oven was already crammed with other dishes (and the heat outside was relentless). I grabbed what I had—fresh strawberries, cream cheese, and graham crackers—and threw it all together in little jars. The vibrant red of the strawberries against the creamy filling looked so inviting, and the first bite was a quiet little victory: creamy, tangy, with just the right crunch and sweetness.
What really stuck with me is how this simple dessert feels special without making a fuss. No complicated steps, no baking disasters, just straightforward ingredients coming together in a way that feels like summer on a spoon. It’s become my go-to for when I want something sweet but don’t want my kitchen to feel like a sauna (especially compared to some of those busy weeknight meals that take over the stove).
Now, every time I make these strawberry cheesecakes in jars, I remember that slightly chaotic afternoon that turned into a surprisingly relaxing treat. It’s a recipe that’s as much about the moments around the table as it is about the flavors themselves. You’re going to love how easy it is to put together and how effortlessly it impresses, whether you’re hosting a potluck or craving a cool treat after a long day.
And if you’re curious about other no-bake delights, you might enjoy the creamy twist in my no-bake Oreo cheesecake recipe that’s equally fuss-free and crowd-pleasing.
Why You’ll Love This Recipe
This easy no-bake strawberry cheesecake in a jar is one of those recipes you’ll find yourself making again and again—and here’s why:
- Quick & Easy: Ready in just about 15 minutes, with no baking required. Perfect for those busy summer days when the last thing you want is to heat up the kitchen.
- Simple Ingredients: Nothing fancy or hard to find here. Most of the ingredients are pantry staples or fresh summer picks like ripe strawberries.
- Perfect for Summer Treats: These jars are ideal for picnics, barbecues, or casual get-togethers, making dessert portable and mess-free.
- Crowd-Pleaser: Kids, adults, and picky eaters alike often ask for seconds. The creamy texture with the fresh strawberry topping hits the spot every time.
- Unbelievably Delicious: The combination of tangy cream cheese, sweet strawberries, and crunchy graham crumbs is a classic that never gets old.
What sets this recipe apart? I blend the cream cheese just right for a silky smooth texture and use a quick strawberry sauce that’s bright but not overpowering. Plus, layering everything in jars adds a little charm and makes portioning effortless. I’ve tried many cheesecake recipes over the years, but this one strikes that perfect balance between simplicity and flavor that keeps people coming back.
This isn’t just a recipe; it’s the kind of dessert that makes you pause and appreciate the little joys of summer—warm sun, fresh fruit, and sweet moments with friends. It’s fuss-free but feels thoughtful, making it a recipe I trust to bring a little delight anytime I need it.
What Ingredients You Will Need
This recipe uses simple, wholesome ingredients to deliver bold flavor and satisfying texture without the fuss. Most of these are pantry staples, and the fresh strawberries really shine here. Feel free to swap in frozen berries if fresh ones aren’t in season, just thaw and drain them well.
- For the crust:
- 1 ½ cups (150g) graham cracker crumbs (I like using Nabisco for consistent texture)
- 5 tablespoons (70g) unsalted butter, melted (adds richness and helps bind the crust)
- 2 tablespoons (25g) granulated sugar (for a touch of sweetness)
- For the cheesecake filling:
- 16 oz (450g) cream cheese, softened (room temperature for smoothest results)
- ½ cup (120ml) heavy whipping cream (whipped to soft peaks)
- ⅔ cup (85g) powdered sugar (for just the right amount of sweetness without graininess)
- 1 teaspoon pure vanilla extract (quality matters here—go for pure for best flavor)
- 1 tablespoon fresh lemon juice (balances richness with a slight tang)
- For the strawberry topping:
- 2 cups (300g) fresh strawberries, hulled and chopped
- 2 tablespoons (25g) granulated sugar (or adjust to taste)
- 1 teaspoon fresh lemon juice (brightens the strawberry flavor)
If you’re looking for a dairy-free option, swapping cream cheese with a plant-based version and using coconut cream instead of heavy cream works well. For a gluten-free crust, almond flour or gluten-free graham crackers get the job done.
Equipment Needed
- Mixing bowls — a large one for the crust and one for the filling.
- Electric mixer or handheld mixer — crucial for whipping the cream and smoothing the cream cheese.
- Measuring cups and spoons — for precise ingredient amounts.
- Small jars or clear dessert cups — mason jars work perfectly for presentation and portion control.
- Spatula — for folding ingredients and layering the cheesecake.
- Food processor or rolling pin (optional) — to crush graham crackers finely if you don’t buy pre-made crumbs.
I’ve tried this recipe using both handheld and stand mixers. The handheld mixer is great for small batches and saves cleaning up a bulky machine. For the graham cracker crust, a food processor speeds things up, but if you don’t have one, a ziplock bag and rolling pin do just fine (just don’t let it get too chunky).
Preparation Method
- Prepare the crust: In a medium bowl, combine 1 ½ cups graham cracker crumbs, 5 tablespoons melted butter, and 2 tablespoons sugar. Mix until the crumbs are evenly coated and look like wet sand. This usually takes about 2-3 minutes.
- Assemble crust in jars: Spoon about 2 tablespoons (30g) of the crust mixture into each jar. Press down firmly with the back of a spoon or your fingers to create an even base layer. This step helps avoid a crumbly mess later. Chill the jars in the fridge while you make the filling (about 10 minutes).
- Make the strawberry topping: In a small bowl, combine the chopped strawberries with 2 tablespoons sugar and 1 teaspoon lemon juice. Let them macerate for at least 10 minutes, stirring occasionally. The strawberries will release their juices and become syrupy—this adds a fresh, tangy burst to the cheesecake.
- Prepare the cheesecake filling: In a large bowl, beat the softened cream cheese with ⅔ cup powdered sugar and 1 teaspoon vanilla extract until smooth and creamy (about 3-4 minutes). Add 1 tablespoon lemon juice and mix briefly.
- Whip the cream: In a separate bowl, whip the heavy cream until soft peaks form. Be careful not to overwhip; soft peaks mean the cream holds a peak but still folds gently.
- Combine filling: Gently fold the whipped cream into the cream cheese mixture using a spatula. Fold carefully to keep the mixture light and airy. This makes the cheesecake filling fluffy, not dense.
- Layer the jars: Remove the jars with the crust from the fridge. Spoon or pipe about 4 tablespoons of the cheesecake filling over the crust in each jar, smoothing the top gently.
- Add strawberry topping: Spoon a generous 2 tablespoons of the macerated strawberries (including syrup) over the cheesecake layer.
- Chill: Cover the jars with lids or plastic wrap and refrigerate for at least 2 hours, preferably overnight. This resting time allows the flavors to meld and the filling to set perfectly.
Pro tip: If your cream cheese isn’t fully softened, you’ll get lumps in the filling. To avoid this, let it sit at room temperature for at least 30 minutes before starting.
Cooking Tips & Techniques
One trick that took me a while to nail was folding the whipped cream into the cream cheese filling just right. You want to keep the airiness without deflating it, so gentle, slow folding with a spatula is key. Don’t rush this step!
A common mistake is using cold cream cheese straight from the fridge, which can lead to a lumpy texture. I learned the hard way and now always let it soften on the counter. If you’re in a rush, microwave it in 5-second bursts, checking frequently.
When pressing the crust into jars, firm and even pressure prevents it from falling apart when you eat it. I sometimes use the bottom of a small glass to press down for an even surface.
Timing-wise, you can prepare the crust and strawberry topping ahead of time and chill them while whipping up the filling. This helps keep things moving smoothly, especially if you’re juggling other dishes like the honey garlic butter chicken sheet pan dinner I often make alongside this dessert for a full meal.
Variations & Adaptations
- Berry Mix: Swap strawberries for blueberries, raspberries, or a mix for a different flavor profile. In fall, try spiced apple compote instead.
- Crust Alternatives: Use crushed digestive biscuits, vanilla wafers, or gluten-free graham crackers for dietary needs or flavor changes.
- Flavor Boost: Add a tablespoon of strawberry or raspberry jam swirled into the filling for extra fruitiness.
- Dairy-Free: Replace cream cheese with a vegan alternative and use coconut cream whipped until fluffy instead of heavy cream.
- Chocolate Twist: Sprinkle mini chocolate chips or add a thin layer of melted dark chocolate between the crust and filling for a decadent touch.
One time, I tried adding a hint of fresh mint to the strawberry topping, which gave it a refreshing lift that was surprisingly delightful on a hot day.
Serving & Storage Suggestions
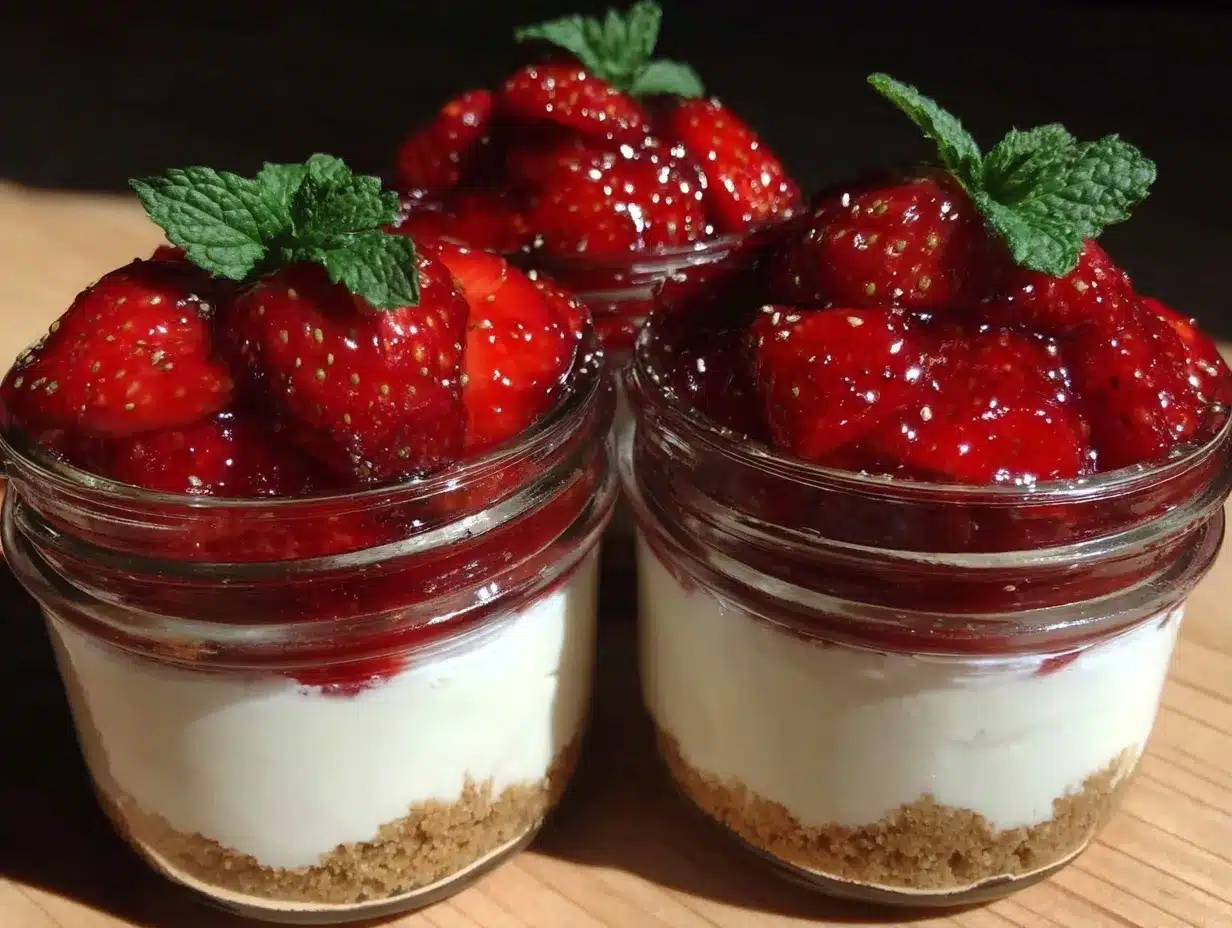
Serve these cheesecakes chilled straight from the fridge for the best texture and flavor. The jars make them perfect for individual servings at picnics or parties. Garnish with fresh strawberry slices or a small mint leaf on top for a pretty presentation.
If you have leftovers, keep the jars tightly sealed and refrigerated. They stay fresh for up to 3 days, though honestly, they rarely last that long! You can freeze them for up to a month, but the texture of the fresh strawberries might soften upon thawing.
To reheat (if you prefer it slightly softened), let the cheesecake sit at room temperature for 10-15 minutes before enjoying. Flavors tend to develop and meld even better after a few hours in the fridge, making this dessert great for prepping in advance.
Nutritional Information & Benefits
This easy no-bake strawberry cheesecake in a jar offers a balance of creamy indulgence and fresh fruit goodness. Each serving (about one 8-ounce jar) contains roughly:
| Nutrient | Amount |
|---|---|
| Calories | 350-400 kcal |
| Fat | 25g (mostly from cream cheese and butter) |
| Carbohydrates | 30g (includes natural sugars from strawberries) |
| Protein | 6g |
Strawberries are rich in vitamin C and antioxidants, which support immune health. Cream cheese provides calcium and protein, but keep in mind this dessert is most definitely a treat. For a lighter option, you can reduce sugar or swap heavy cream for Greek yogurt, though that changes the texture slightly.
Conclusion
This easy no-bake strawberry cheesecake in a jar has become a little summer staple around here. It’s straightforward enough to pull together on a whim but special enough to feel like a treat. What I love most is how it invites creativity—whether you’re mixing up the berries or changing the crust—and how it keeps dessert stress-free.
Give it a try and make it your own. Whether serving it at a casual barbecue or just satisfying a sweet craving, it’s a recipe that fits right into busy days and laid-back evenings. And if you want to keep the no-bake cheesecake vibes going, you might also appreciate the creamy simplicity of the no-bake Oreo cheesecake I put together recently.
Feel free to share your twists or questions below—let’s keep the conversation (and the cheesecakes!) flowing.
Frequently Asked Questions
Can I use frozen strawberries for the topping?
Yes, but make sure to thaw and drain them well to avoid excess liquid ruining the cheesecake texture.
How long can I store these cheesecakes in the fridge?
They keep well for up to 3 days in the refrigerator if sealed tightly.
Can I make these ahead of time for a party?
Absolutely! Prepare them the day before and keep refrigerated for the best flavor and texture.
Is it necessary to whip the cream separately?
Yes, whipping the cream separately and folding it in keeps the filling light and fluffy rather than dense.
Can I substitute the graham cracker crust with something else?
Sure! Crushed digestive biscuits, vanilla wafers, or gluten-free options all work well depending on your preference.
Pin This Recipe!
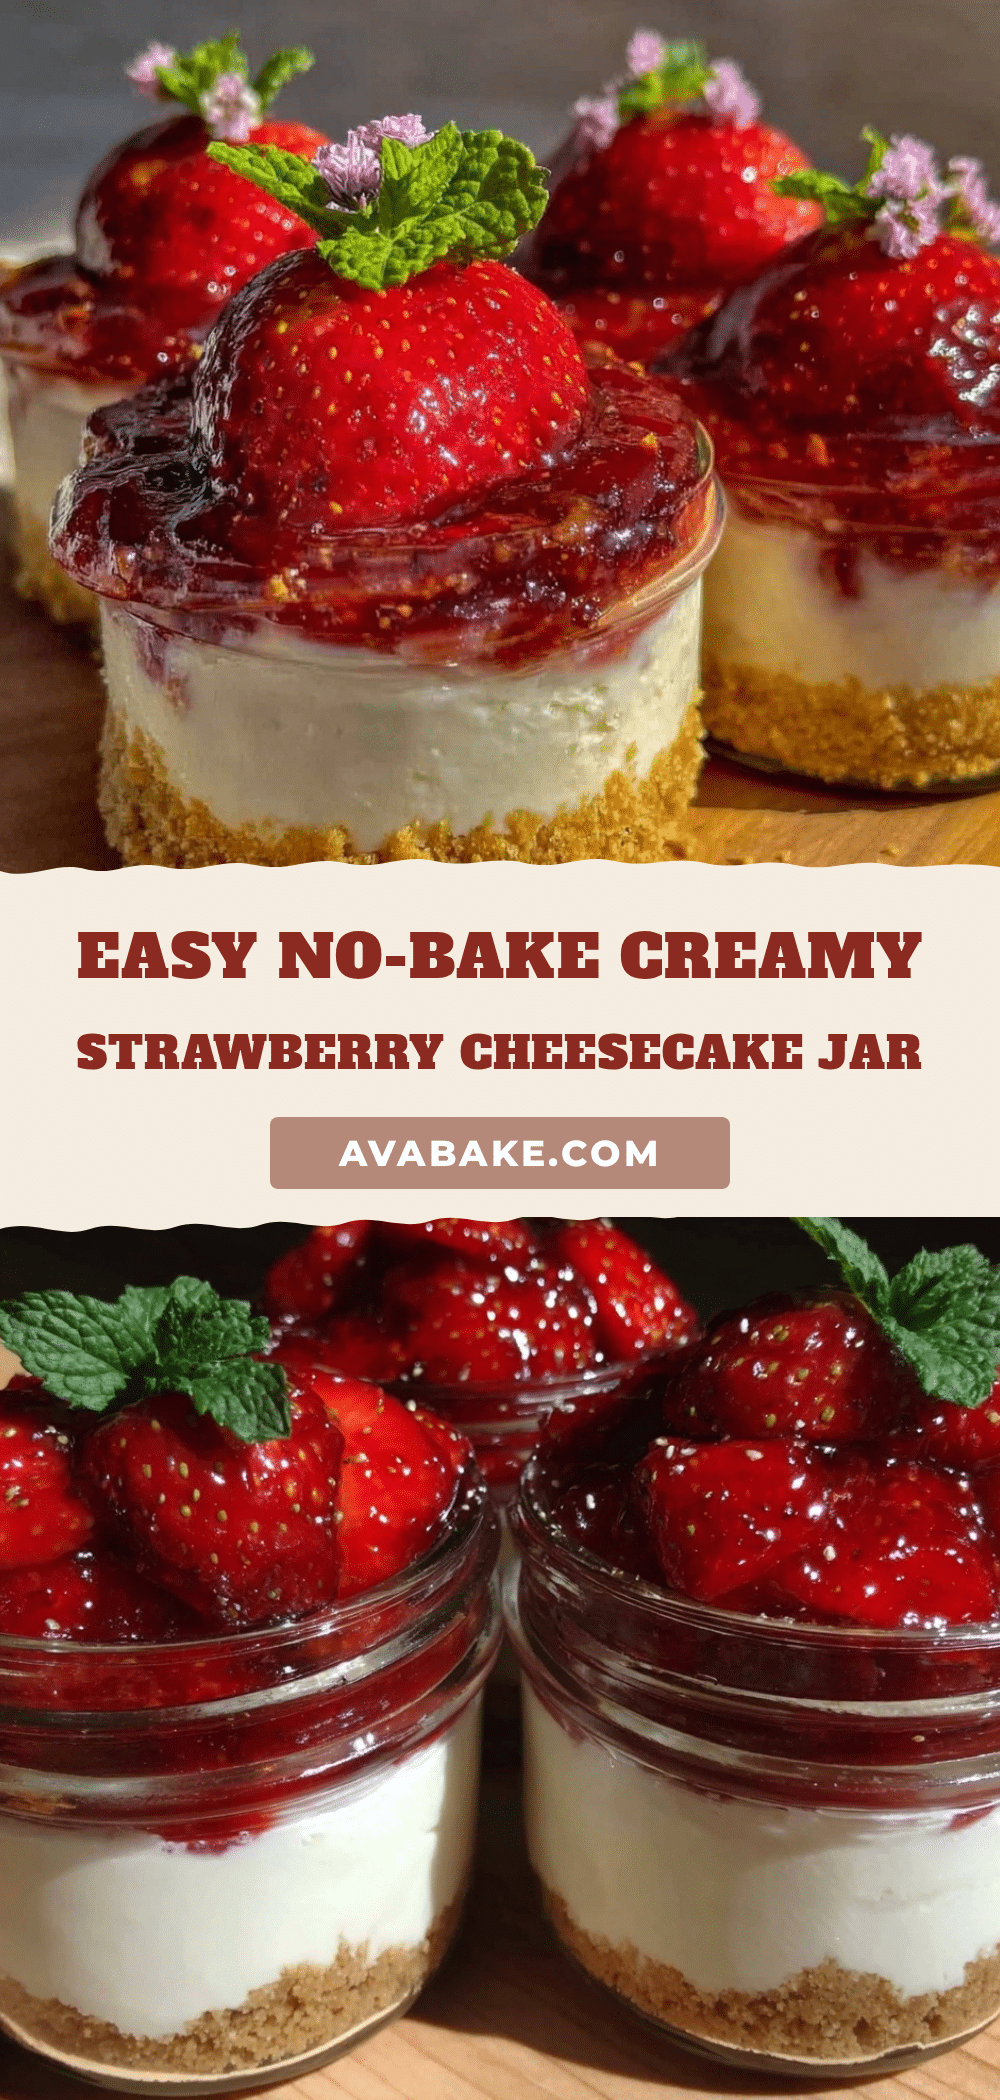
Easy No-Bake Strawberry Cheesecake in a Jar
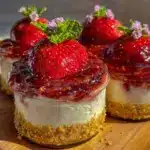
A quick and easy no-bake strawberry cheesecake layered in jars, perfect for summer treats and gatherings. This recipe combines creamy, tangy cheesecake filling with fresh strawberry topping and a crunchy graham cracker crust.
- Prep Time: 15 minutes
- Cook Time: 0 minutes
- Total Time: 2 hours 15 minutes
- Yield: 6 servings 1x
- Category: Dessert
- Cuisine: American
Ingredients
- 1 ½ cups (150g) graham cracker crumbs
- 5 tablespoons (70g) unsalted butter, melted
- 2 tablespoons (25g) granulated sugar
- 16 oz (450g) cream cheese, softened
- ½ cup (120ml) heavy whipping cream
- ⅔ cup (85g) powdered sugar
- 1 teaspoon pure vanilla extract
- 1 tablespoon fresh lemon juice
- 2 cups (300g) fresh strawberries, hulled and chopped
- 2 tablespoons (25g) granulated sugar
- 1 teaspoon fresh lemon juice
Instructions
- Prepare the crust: In a medium bowl, combine graham cracker crumbs, melted butter, and sugar. Mix until crumbs are evenly coated and look like wet sand (2-3 minutes).
- Assemble crust in jars: Spoon about 2 tablespoons (30g) of crust mixture into each jar. Press down firmly to create an even base layer. Chill jars in the fridge for about 10 minutes.
- Make the strawberry topping: In a small bowl, combine chopped strawberries with sugar and lemon juice. Let macerate for at least 10 minutes, stirring occasionally.
- Prepare the cheesecake filling: Beat softened cream cheese with powdered sugar and vanilla extract until smooth and creamy (3-4 minutes). Add lemon juice and mix briefly.
- Whip the cream: In a separate bowl, whip heavy cream until soft peaks form.
- Combine filling: Gently fold whipped cream into cream cheese mixture using a spatula to keep it light and airy.
- Layer the jars: Remove jars with crust from fridge. Spoon or pipe about 4 tablespoons of cheesecake filling over crust in each jar, smoothing the top.
- Add strawberry topping: Spoon 2 tablespoons of macerated strawberries (including syrup) over cheesecake layer.
- Chill: Cover jars with lids or plastic wrap and refrigerate for at least 2 hours, preferably overnight.
Notes
Let cream cheese soften at room temperature for at least 30 minutes to avoid lumps. Fold whipped cream gently into cream cheese mixture to keep filling light and airy. Press crust firmly into jars to prevent crumbling. Can prepare crust and strawberry topping ahead and chill while making filling. For dairy-free option, use plant-based cream cheese and coconut cream. For gluten-free crust, use almond flour or gluten-free graham crackers.
Nutrition
- Serving Size: One 8-ounce jar
- Calories: 375
- Sugar: 20
- Sodium: 250
- Fat: 25
- Saturated Fat: 15
- Carbohydrates: 30
- Fiber: 2
- Protein: 6
Keywords: no-bake cheesecake, strawberry cheesecake, summer dessert, cheesecake in a jar, easy dessert, no oven dessert, picnic dessert


