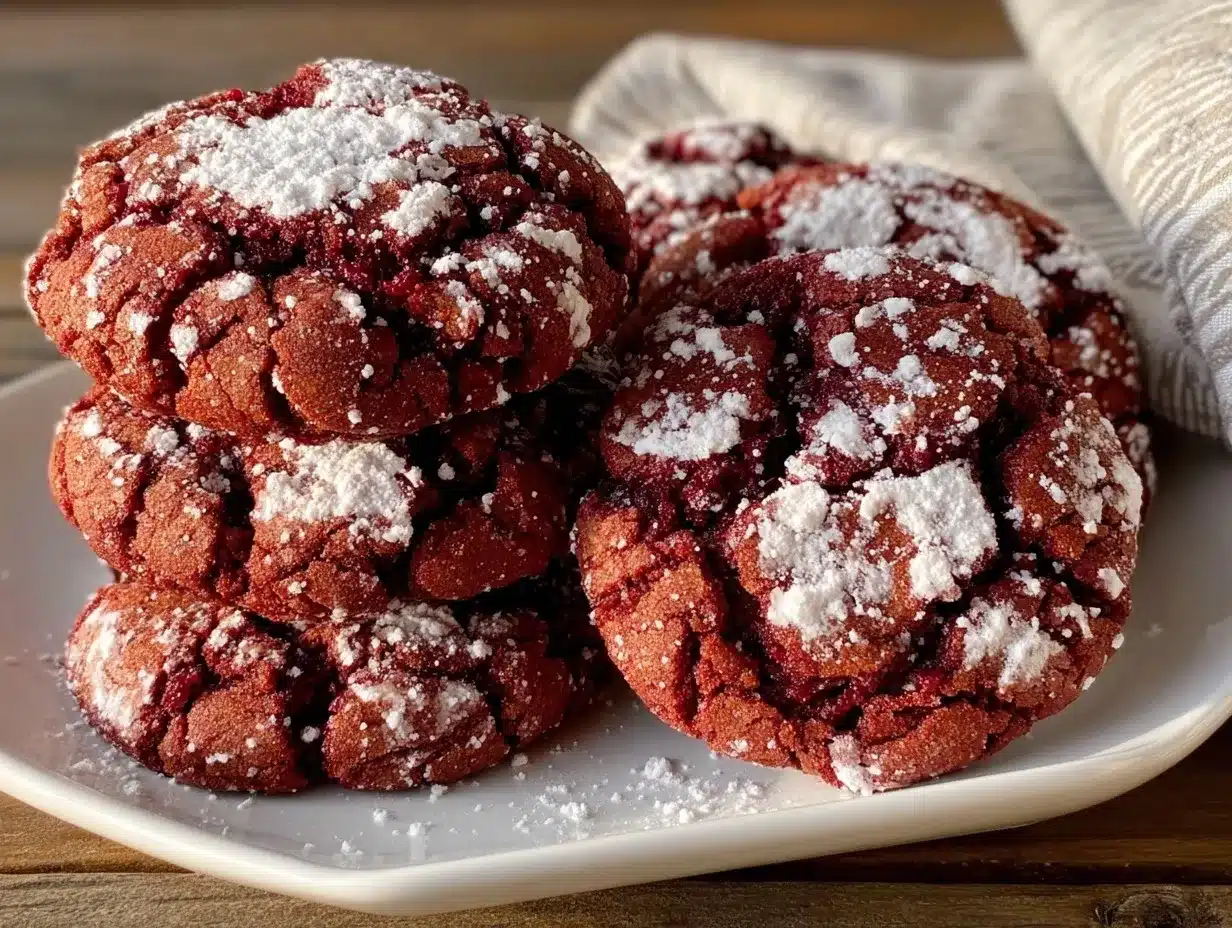
Let me tell you, the first time the aromatic swirl of cocoa and sweet vanilla drifted from my oven—those deep red velvet crinkle cookies baking away—I knew something magical was happening. The color alone is mesmerizing; that rich, ruby hue dusted with snowy powdered sugar, crackling and splitting as they puffed up. When I bit into one, the soft, chewy center and slight crisp on the edges just stopped me in my tracks. It was the kind of moment where you pause, take a deep breath, and just smile because you know you’re onto something truly special.
Honestly, I’ve been obsessed with red velvet since I was knee-high to a grasshopper. My grandma used to make red velvet cake for every birthday, and those flavors are pure, nostalgic comfort for me. Years ago, I tried to recreate that experience in a cookie—something easier to share at potlucks and perfect for holiday gifting. The result? These red velvet crinkle cookies with chewy centers! They’re dangerously easy, and you know what? I wish I’d stumbled upon this recipe earlier because it’s now my go-to for every festive season.
My family couldn’t stop sneaking them off the cooling rack (and I can’t really blame them). There’s something about the dramatic color and the crackled sugar that makes everyone’s eyes light up. Whether you’re looking to brighten up your Pinterest cookie board, need a sweet treat for your kids after school, or want a holiday dessert that stands out, this red velvet crinkle cookies recipe is just the ticket. I’ve tested it more times than I care to admit (in the name of research, of course!), and it’s become a staple for family gatherings and cookie exchanges. It truly feels like a warm hug in cookie form—and you’re going to want to bookmark this one!
Why You’ll Love This Recipe
When it comes to easy holiday treats, these red velvet crinkle cookies check every box. I’ve baked hundreds of batches (no exaggeration!) to perfect the chewy centers and bold flavor. Here’s why you’re going to love making them, just like I do:
- Quick & Easy: Ready in under 30 minutes—honestly, the hardest part is waiting for them to cool!
- Simple Ingredients: No fancy grocery runs. You probably have everything on hand already.
- Perfect for Holidays & Special Occasions: The deep red color and crackled sugar topping make them a showstopper for Christmas, Valentine’s Day, or any cookie swap.
- Crowd-Pleaser: These cookies always get rave reviews from kids and adults (even my picky cousin who usually won’t touch anything red velvet).
- Unbelievably Delicious: That classic cocoa-vanilla red velvet taste, paired with chewy centers and crisp edges—it’s comfort food, cookie-style!
What sets this red velvet crinkle cookies recipe apart? For starters, I use a touch of cream cheese in the dough for extra richness and chew. My technique for rolling in powdered sugar twice guarantees that crackled look (trust me, I learned the hard way after a few flat batches). The flavor is perfectly balanced—not too sweet, with a hint of tang and cocoa. It’s not just another red velvet cookie recipe—it’s the one that makes you close your eyes after the first bite.
If you’re looking for a cookie that’s as beautiful as it is delicious, this is it. No stress, no complicated steps, just pure, soul-soothing satisfaction. It’s my secret weapon for turning a simple dessert into something memorable and impressive, whether you’re sharing with friends or sneaking a couple with your morning coffee.
What Ingredients You Will Need
This recipe uses simple, wholesome ingredients to deliver bold flavor and satisfying texture without the fuss. Most of these are pantry staples, and you can easily swap a few if needed. Here’s what you’ll need for the perfect batch of red velvet crinkle cookies:
- For the Cookie Dough:
- All-purpose flour (210g / 1 ¾ cups) – standard flour gives just the right structure
- Unsweetened cocoa powder (15g / 2 tbsp) – I like Hershey’s or Ghirardelli for deep flavor
- Baking powder (5g / 1 tsp) – helps the cookies puff up and crackle
- Salt (2g / ¼ tsp) – just enough to balance the sweetness
- Granulated sugar (200g / 1 cup) – the base sweetness
- Unsalted butter, softened (57g / ¼ cup) – use room temperature; I recommend Kerrygold for richness
- Cream cheese, softened (57g / ¼ cup) – adds chewy texture and subtle tang (use full-fat for best results)
- Large egg (50g / 1) – binds everything together
- Vanilla extract (5ml / 1 tsp) – for classic red velvet flavor
- Red food coloring (5ml / 1 tsp gel or 2 tbsp liquid) – gel produces a richer color (I use Americolor Super Red)
- White vinegar (5ml / 1 tsp) – classic red velvet ingredient for a slight tang
- For Rolling:
- Powdered sugar (60g / ½ cup) – creates the “crinkle” effect
- Granulated sugar (optional, 30g / 2 tbsp) – helps powdered sugar stick better, especially if dough is moist
If you need to switch things up, here are some easy substitutions:
- Swap cream cheese for Greek yogurt (same amount) for a slightly lighter texture
- Use a gluten-free flour blend for gluten-sensitive folks (Bob’s Red Mill works well)
- Try plant-based butter and dairy-free cream cheese to make them vegan-friendly
- If you’re out of cocoa powder, use Dutch-processed—but expect a slightly different flavor
In summer, you can add a handful of mini chocolate chips or white chocolate chunks for extra richness. For a holiday twist, a pinch of cinnamon or nutmeg works wonders. Really, this dough is forgiving and easy to customize!
Equipment Needed
You won’t need anything fancy to whip up these chewy red velvet crinkle cookies. Here’s what I always use in my kitchen:
- Mixing bowls: One large, one medium—glass or metal work best for even mixing
- Electric hand mixer or stand mixer: Makes creaming butter and cream cheese a breeze; you can mix by hand, but the dough will be sticky
- Rubber spatula: For scraping down the sides and folding in ingredients
- Measuring cups and spoons: Accurate measurements make all the difference
- Kitchen scale: Optional, but I swear by it for perfectly consistent cookies every time
- Baking sheet: I use a heavy-duty, rimmed sheet for even baking
- Parchment paper: Prevents sticking and helps with easy cleanup
- Small cookie scoop (about 1 tbsp): For uniform cookies—if you don’t have one, two spoons work in a pinch
- Wire cooling rack: Essential for cooling and keeping cookies from getting soggy underneath
If you’re just starting out, don’t sweat it—mixing by hand and using basic kitchen gear works fine. For specialty items like cookie scoops, I like OXO for durability. Maintenance tip: keep your mixer attachments and scoops clean and dry so the dough doesn’t stick. And if you’re on a budget, parchment paper can be swapped with a silicone baking mat (though you might miss out on some easy cleanup!).
Preparation Method
Ready to make your own batch of chewy red velvet crinkle cookies? Here’s my step-by-step method, with all the little tricks I’ve learned along the way:
- Prep your baking sheet: Line with parchment paper or a silicone baking mat. This prevents sticking and helps the cookies spread evenly.
- Combine dry ingredients: In a medium bowl, whisk together 210g (1 ¾ cups) all-purpose flour, 15g (2 tbsp) unsweetened cocoa powder, 5g (1 tsp) baking powder, and 2g (¼ tsp) salt. Set aside. The cocoa gives that deep red velvet flavor—don’t skip it!
- Cream butter, cream cheese, and sugar: In a large bowl, beat 57g (¼ cup) unsalted butter and 57g (¼ cup) cream cheese with 200g (1 cup) granulated sugar until light and fluffy, about 2-3 minutes. If using a hand mixer, start on low and work up.
- Add wet ingredients: Beat in 1 large egg, 5ml (1 tsp) vanilla extract, 5ml (1 tsp) white vinegar, and 5ml (1 tsp gel or 2 tbsp liquid red food coloring. Mix until fully incorporated. The dough should be vibrant red and smooth—pause to admire that color!
- Mix dry into wet: Gradually add the flour mixture to the wet ingredients. Mix on low speed until just combined. Don’t overmix—stop when you see no dry streaks. The dough will be thick and slightly sticky.
- Chill the dough: Cover the bowl with plastic wrap and chill in the fridge for 30 minutes. Chilling helps the cookies hold their shape and prevents spreading. If you’re short on time, 15 minutes in the freezer works (I do this when the kids are impatient!).
- Preheat oven: While the dough chills, preheat your oven to 350°F (175°C).
- Prepare rolling sugars: Place 60g (½ cup) powdered sugar in a shallow bowl. Optional: mix in 30g (2 tbsp) granulated sugar for extra sticking power, especially if your kitchen is humid.
- Scoop and roll: Using a small cookie scoop (about 1 tbsp), portion out the dough and roll each ball first in granulated sugar (if using), then heavily in powdered sugar. You want a thick coating—the more, the merrier for dramatic crinkles.
- Space on baking sheet: Place dough balls 2 inches (5cm) apart on the prepared sheet. They’ll puff and spread a bit, so don’t crowd them.
- Bake: Bake for 10-12 minutes, until the tops are crackled and the edges just start to set. The centers will still look slightly underbaked—this is key for chewy cookies. If you bake until fully set, they’ll be cakey (learned that the hard way!).
- Cool: Let the cookies cool on the baking sheet for 5 minutes, then transfer to a wire rack. They’ll firm up as they cool, and the centers stay irresistibly soft.
Troubleshooting tips: If your cookies are flat, the dough likely needed more chilling. Too cakey? Try reducing baking time by 1 minute. For super vibrant color, use gel food coloring. And always taste a warm cookie “in the name of research” (it’s tradition in my house).
Cooking Tips & Techniques
Let’s face it—baking cookies isn’t rocket science, but a few tricks make all the difference for perfect chewy red velvet crinkle cookies. Here’s what I’ve learned through lots of trial and error:
- Double Rolling: Roll in granulated sugar before powdered sugar. This helps the crinkle stay visible and prevents the powdered sugar from dissolving into the dough (especially on humid days).
- Chill That Dough: Don’t skip chilling. Warm dough = flat cookies. I once rushed and ended up with red velvet pancakes. The fridge is your friend!
- Softened Butter & Cream Cheese: Room temperature ingredients blend easier and give a smoother dough. If you forget, zap them in the microwave for 10 seconds—just don’t melt them.
- Bake One Sheet at a Time: For even baking, stick to one tray per oven rack. Rotating trays can cause uneven heat and weird shapes.
- Don’t Overbake: Pull cookies when the edges are just set and the cracks look moist. They’ll finish cooking as they cool. If you wait until they look totally dry, the centers won’t be chewy.
- Use a Kitchen Scale: Consistent dough balls = consistent cookies. I resisted for years, but honestly, it’s a game changer for even baking.
- Let the Cookies Rest: Five minutes on the tray lets them firm up without losing that gooey center. I know it’s hard to wait, but it’s worth it.
Common mistakes? Overmixing (tough cookies), skipping the chill (flat cookies), and using too little powdered sugar (not enough crinkle). I’ve made every mistake here—so trust me, these tips will help you nail it every time!
Variations & Adaptations
One of my favorite things about this red velvet crinkle cookies recipe is how easy it is to customize. Here are a few fun ways to mix it up:
- Gluten-Free: Use a 1:1 gluten-free baking flour blend. I’ve tested Bob’s Red Mill and Cup4Cup—both hold up well and keep the cookies chewy.
- Vegan: Swap butter and cream cheese for plant-based versions, and use a flax egg (1 tbsp ground flax + 2.5 tbsp water) instead of an egg. They’ll be a bit softer but still delicious.
- Chocolate Lovers: Fold in ½ cup (85g) mini chocolate chips or white chocolate chunks for extra richness. My kids call this the “double velvet” version!
- Seasonal Twist: Add a pinch of cinnamon or nutmeg for a festive holiday flavor. Or, in spring, swap vanilla for almond extract and add a little lemon zest.
- Nutty Variation: Stir in ½ cup (60g) chopped pecans for crunch and a Southern vibe. My grandma would approve.
- Dye-Free: Skip the food coloring for cocoa crinkle cookies—just as chewy, with a classic chocolate look.
For allergies, you can use sunflower seed flour instead of almond flour for nut-free adaptations. I tried a batch with coconut sugar instead of granulated—more caramel undertones, but a bit less crinkle. Experiment and have fun—these cookies are forgiving!
Serving & Storage Suggestions
For the best experience, serve these red velvet crinkle cookies at room temperature. The chewy centers and crisp edges really stand out. I love stacking them on a festive platter for holiday parties or packaging them in clear cellophane bags for gifting (tied with ribbon, of course!).
Pair with a mug of hot cocoa, coffee, or even cold milk for the classic cookie experience. They’re also great with fresh berries or a scoop of vanilla ice cream for an easy dessert. Kids love dunking them, and let’s face it—I do too!
To store, keep cookies in an airtight container at room temperature for up to 5 days. They’ll stay soft and chewy. For longer storage, freeze in a zip-top bag for up to 2 months—just thaw at room temperature before serving. If you like them warm, pop a cookie in the microwave for 10 seconds. Pro tip: the flavors deepen after a day, and the texture gets even chewier. Honestly, they’re just as good on day three!
Nutritional Information & Benefits
Each red velvet crinkle cookie (about 25g) contains approximately:
- Calories: 90
- Fat: 4g
- Carbohydrates: 13g
- Sugar: 8g
- Protein: 1g
Key ingredients like cocoa provide natural antioxidants, and cream cheese adds a bit of calcium and protein. If you opt for gluten-free or vegan adaptations, the cookies can fit various dietary needs. Keep in mind, they do contain wheat and dairy, so they’re not suitable for all allergies. From a wellness perspective, these cookies are a sweet treat—best enjoyed in moderation, but totally worth the indulgence for holiday cheer!
Conclusion
If you’re searching for an easy, crowd-pleasing cookie that’s as gorgeous as it is delicious, this red velvet crinkle cookies recipe is a must-try. The chewy centers, vibrant color, and classic red velvet flavor make them a standout for any occasion. I love how simple they are to make, and honestly, they never fail to bring a smile to everyone’s face.
Customize them to suit your family’s tastes—add chocolate chips, swap for gluten-free flour, or spice things up for the holidays. That’s the beauty of a good recipe: making it your own. For me, these cookies are a bite of nostalgia and a little bit of magic in every crinkle.
Give them a shot, and let me know how your batch turns out! Share your tweaks, tag me on social, or drop a comment below with your favorite adaptations. Can’t wait to hear about your delicious results. Here’s to sweet moments, chewy cookies, and happy baking!
FAQs
How do I keep my red velvet crinkle cookies chewy?
Chilling the dough and pulling cookies out when the centers are still soft is key. Don’t overbake, and let them cool on the tray for a few minutes before transferring to a rack.
Can I make these cookies ahead of time?
Absolutely! The dough can be made and chilled for up to 24 hours. You can also freeze baked cookies and thaw as needed—they stay chewy even after freezing.
What’s the best food coloring for red velvet cookies?
Gel food coloring gives the most vibrant red color. I use Americolor Super Red, but any quality gel will work. Liquid coloring is okay—just use a bit more for deep color.
How do I make these gluten-free?
Swap the all-purpose flour for a certified gluten-free flour blend. Bob’s Red Mill or Cup4Cup are my favorites. No other changes needed!
Can I double the recipe?
Yes, just double all ingredients and use two baking sheets. Refrigerate dough between batches to keep cookies from spreading too much. Works great for big gatherings!
Pin This Recipe!

Red Velvet Crinkle Cookies
These easy, chewy red velvet crinkle cookies are a festive holiday treat with a vibrant ruby color, classic cocoa-vanilla flavor, and irresistible crackled powdered sugar tops. Perfect for cookie swaps, gifting, or family gatherings, they deliver soft centers and crisp edges in under 30 minutes.
- Prep Time: 15 minutes
- Cook Time: 10-12 minutes
- Total Time: 30 minutes
- Yield: 18-20 cookies 1x
- Category: Dessert
- Cuisine: American
Ingredients
- 1 3/4 cups all-purpose flour (210g)
- 2 tablespoons unsweetened cocoa powder (15g)
- 1 teaspoon baking powder (5g)
- 1/4 teaspoon salt (2g)
- 1 cup granulated sugar (200g)
- 1/4 cup unsalted butter, softened (57g)
- 1/4 cup cream cheese, softened (57g)
- 1 large egg
- 1 teaspoon vanilla extract (5ml)
- 1 teaspoon gel red food coloring or 2 tablespoons liquid red food coloring (5ml or 30ml)
- 1 teaspoon white vinegar (5ml)
- 1/2 cup powdered sugar (60g), for rolling
- 2 tablespoons granulated sugar (30g), optional, for rolling
Instructions
- Line a baking sheet with parchment paper or a silicone baking mat.
- In a medium bowl, whisk together flour, cocoa powder, baking powder, and salt.
- In a large bowl, beat butter, cream cheese, and granulated sugar until light and fluffy, about 2-3 minutes.
- Beat in egg, vanilla extract, white vinegar, and red food coloring until fully incorporated.
- Gradually add the dry ingredients to the wet mixture, mixing on low speed until just combined. Do not overmix.
- Cover the dough and chill in the refrigerator for 30 minutes (or 15 minutes in the freezer if short on time).
- Preheat oven to 350°F (175°C).
- Place powdered sugar in a shallow bowl. If desired, mix in granulated sugar for extra sticking power.
- Using a small cookie scoop (about 1 tablespoon), portion dough and roll each ball first in granulated sugar (if using), then heavily in powdered sugar.
- Place dough balls 2 inches apart on the prepared baking sheet.
- Bake for 10-12 minutes, until tops are crackled and edges just set. Centers should look slightly underbaked.
- Cool cookies on the baking sheet for 5 minutes, then transfer to a wire rack to cool completely.
Notes
Double rolling in granulated and powdered sugar creates dramatic crinkles. Chill dough for best texture and shape. Do not overbake—cookies should look slightly underdone in the center for maximum chewiness. For gluten-free or vegan adaptations, use suitable flour and dairy substitutes. Add-ins like chocolate chips, nuts, or spices can be used for variety.
Nutrition
- Serving Size: 1 cookie (about 25g)
- Calories: 90
- Sugar: 8
- Fat: 4
- Carbohydrates: 13
- Protein: 1
Keywords: red velvet, crinkle cookies, holiday cookies, Christmas cookies, easy cookies, chewy cookies, cocoa, powdered sugar, festive dessert


