“You won’t believe this, but I picked up the idea for these floral sugar cookies from the most unexpected place—a tiny flower shop nestled between the bakery and the florist downtown,” I said, grinning while dusting powdered sugar off my hands. It was a humid Saturday afternoon, and while waiting for my order, I watched the florist delicately arrange vibrant blooms. That’s when I noticed a small tin of flower-shaped cookies on the counter, frosted with the most beautiful royal icing designs—almost too pretty to eat.
Honestly, I wasn’t planning to become a cookie decorator that day. But those floral sugar cookies got stuck in my head like a catchy tune. I mean, you know that feeling when something simple yet stunning just won’t leave your thoughts? So I decided to try replicating them at home. Not gonna lie, the first attempt was a bit of a mess—I forgot to chill the dough, and the cookies spread out like pancake batter in the oven. But with a little patience and some tweaking, I finally nailed the perfect floral sugar cookies with royal icing that look gorgeous and taste even better.
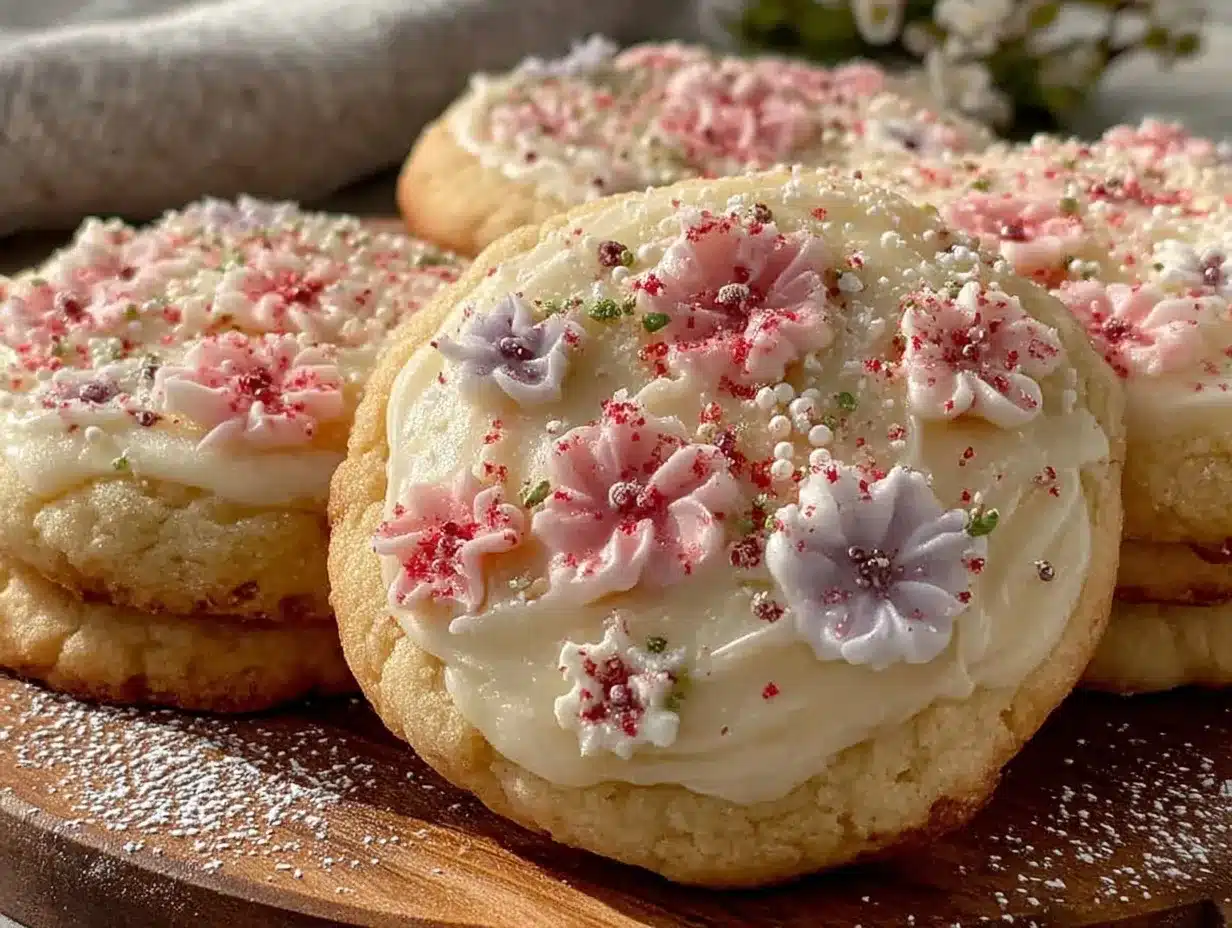
Let me tell you, these cookies quickly became my go-to treat for birthdays, garden parties, and even those random Tuesdays when you just need a little sweet pick-me-up. What makes them special isn’t just the delicate, melt-in-your-mouth texture but the way the floral icing turns simple sugar cookies into edible art. So if you’re ready to bring a little floral magic into your kitchen, keep reading—because I’m sharing everything you need to make these perfect floral sugar cookies with royal icing for every occasion.
Why You’ll Love This Recipe
Honestly, making these floral sugar cookies with royal icing is easier than it looks, and the results are absolutely worth the little effort. After testing multiple recipes, I can confidently say this one hits the sweet spot between flavor, texture, and stunning presentation. Here’s why you’re going to love baking these cookies:
- Quick & Easy: The dough comes together in under 15 minutes, and chilling time fits nicely into any day’s schedule.
- Simple Ingredients: You probably have everything on hand already—no last-minute grocery runs needed.
- Perfect for Every Occasion: Whether it’s a bridal shower, a picnic, or just a treat to brighten your afternoon, these cookies fit right in.
- Crowd-Pleaser: Kids and adults alike love these—my niece begged for seconds while my in-laws asked for the recipe!
- Unbelievably Delicious: The cookies have a tender, buttery crumb that pairs perfectly with the smooth, sweet royal icing.
What sets this recipe apart? The secret’s in the royal icing technique. Instead of thick blobs, you get delicate floral patterns that are almost like miniature paintings. Plus, the dough is sturdy enough to hold shape but soft enough to melt on your tongue. It’s comfort food with a bit of artistry, and honestly, it makes sharing these cookies feel like gifting a little happiness. You’re going to close your eyes after the first bite, trust me.
What Ingredients You Will Need
This recipe uses simple, wholesome ingredients to deliver bold flavor and satisfying texture without the fuss. The components are pantry staples, with a few tips to make sure your cookies come out just right.
For the Sugar Cookie Dough:
- 2 ¾ cups (345g) all-purpose flour – sifted for a light texture
- 1 teaspoon baking powder – helps the cookies hold their shape
- ½ teaspoon salt – balances sweetness
- 1 cup (226g) unsalted butter, softened – I recommend Kerrygold for rich flavor
- 1 ½ cups (300g) granulated sugar – regular white sugar works fine
- 1 large egg, room temperature – for binding and tenderness
- 2 teaspoons vanilla extract – pure vanilla adds the best aroma
- 1 teaspoon almond extract (optional) – gives a subtle floral note
For the Royal Icing:
- 3 cups (360g) powdered sugar – sifted to avoid lumps
- 2 large egg whites or 4 tablespoons meringue powder mixed with 6 tablespoons water – meringue powder is great if you want to avoid raw eggs
- ½ teaspoon cream of tartar – stabilizes the icing
- Food coloring gels – I use AmeriColor gels for vibrant hues
- Fresh lemon juice or water – to adjust icing consistency
If you want to make these cookies gluten-free, swap the all-purpose flour with a 1:1 gluten-free baking blend. For a dairy-free option, use vegan butter and substitute egg whites with aquafaba (chickpea water) – it can be a fun experiment!
Equipment Needed
- Mixing bowls: At least two – one large for dough, one small for royal icing.
- Electric mixer: Stand or handheld, to cream butter and sugar and whip the icing properly.
- Rolling pin: Preferably a smooth, medium-weight one for even dough thickness.
- Cookie cutters: Floral shapes of various sizes – I like using a set of three different flower designs.
- Baking sheets: Non-stick or lined with parchment paper.
- Cooling racks: Essential for letting cookies cool completely before icing.
- Piping bags and tips: Small round tips (sizes 1 or 2) work best for detailed floral designs.
- Sifter: For flour and powdered sugar to keep everything light and smooth.
If you don’t have a piping bag, a resealable plastic bag with a tiny corner snipped off does the trick in a pinch. I once forgot to buy piping bags before a big cookie batch and improvised like this—worked surprisingly well! For budget-friendly baking sheets, the aluminum ones from your local dollar store perform just fine if you line them well.
Preparation Method
- Mix dry ingredients: In a medium bowl, whisk together 2 ¾ cups (345g) sifted all-purpose flour, 1 teaspoon baking powder, and ½ teaspoon salt. Set aside. This ensures even distribution and prevents clumps in your dough. (Time: 5 minutes)
- Cream butter and sugar: In a large bowl, beat 1 cup (226g) softened unsalted butter with 1 ½ cups (300g) granulated sugar until light and fluffy, about 3-4 minutes on medium speed. You’ll notice the mixture turning pale and smooth—that’s your cue to move on.
- Add egg and extracts: Beat in 1 large room-temperature egg, 2 teaspoons vanilla extract, and 1 teaspoon almond extract (if using) until combined. The dough may look a bit loose here but don’t worry.
- Combine wet and dry: Gradually add the flour mixture to the butter mixture, mixing on low speed just until incorporated. Over-mixing will make cookies tough. You’re aiming for a soft, slightly sticky dough that holds together.
- Chill the dough: Divide dough into two disks, wrap in plastic wrap, and refrigerate for at least 1 hour (up to 24 hours). This step prevents spreading and makes rolling easier. (Trust me, skipping this step once led to a sad, flat cookie disaster!)
- Preheat oven and prepare baking sheets: Set oven to 350°F (175°C). Line baking sheets with parchment paper or silicone mats.
- Roll out dough: On a lightly floured surface, roll one disk of dough to about ¼ inch (6mm) thickness. Keep the other disk chilled until ready to use.
- Cut shapes: Use floral cookie cutters to cut out shapes. Transfer cookies carefully to baking sheets, spacing about 1 inch (2.5cm) apart.
- Bake: Bake for 8-10 minutes, until edges are just starting to turn golden. Cookies should look set but not browned. (If your oven runs hot, check at 7 minutes!)
- Cool completely: Remove cookies from sheets and place on cooling racks to cool fully before icing. This prevents royal icing from melting.
- Prepare royal icing: Beat 3 cups (360g) sifted powdered sugar with 2 large egg whites (or meringue powder mix) and ½ teaspoon cream of tartar until stiff peaks form. Adjust consistency with a few drops of lemon juice or water—thicker for outlines, thinner for flooding. Divide and tint with food coloring gels.
- Decorate: Using piping bags fitted with small round tips, outline cookie edges and floral details first with thicker icing. Let dry 15 minutes, then flood the inside with thinner icing. Use a toothpick or scribe tool to create petals and leaves. Patience is key here!
- Dry and store: Let decorated cookies dry uncovered at room temperature for at least 4 hours, preferably overnight, before stacking or packaging.
Cooking Tips & Techniques
When it comes to perfect floral sugar cookies with royal icing, a few tricks go a long way. First, always chill your dough. I learned the hard way that skipping chilling causes cookies to spread and lose their beautiful shape.
Next, rolling dough evenly is crucial. Use rolling pin rings or thickness guides if you have them—otherwise, eyeball it with care. Uneven dough can lead to cookies that bake unevenly.
With royal icing, consistency is everything. For piping outlines, you want a thick icing that holds its shape, while flooding requires a thinner version that spreads smoothly. If your icing is too runny, it’ll drip off the cookie edges; too thick, and it won’t flow nicely.
Don’t rush the drying process. I know it’s tempting to dive in, but royal icing needs time to harden fully. Otherwise, your beautiful designs might smudge or stick together.
Also, practice your piping on parchment paper before decorating the actual cookies. It’s a great way to get comfortable with pressure and angle without wasting cookies.
Lastly, multitasking helps. While cookies bake, prep your icing and color it. That way, when cookies are ready and cooled, you can start decorating right away. This little timing trick saves you from feeling rushed.
Variations & Adaptations
If you want to switch things up, here are some fun options for your floral sugar cookies with royal icing:
- Flavor Twist: Add a tablespoon of lemon or orange zest to the dough for a citrusy note that pairs beautifully with the floral theme.
- Dietary Alterations: Use a gluten-free baking blend instead of all-purpose flour. For egg-free royal icing, try aquafaba (chickpea water) whipped with powdered sugar.
- Alternative Decorations: Swap royal icing for a simple glaze made with powdered sugar and lemon juice, then sprinkle edible flower petals for a natural touch.
- Seasonal Themes: Replace floral shapes with holiday-themed cutters and adjust icing colors accordingly—think red and green for Christmas or pastel shades for Easter.
Personally, I once made these cookies using lavender-infused royal icing, which added a subtle, fragrant floral flavor. It was a hit at a garden party and felt fancy without any extra effort.
Serving & Storage Suggestions
These floral sugar cookies are best served at room temperature, allowing the buttery texture and sweet icing to shine. Display them on a pretty platter or tiered stand for an eye-catching centerpiece that’s as much a conversation starter as a treat.
Pair them with a cup of tea—Earl Grey or chamomile works miracles—or a glass of cold milk for a classic combo. They also make charming gifts wrapped in cellophane and tied with ribbon.
For storage, keep cookies in an airtight container at room temperature for up to 5 days. If your kitchen is humid, placing a small packet of silica gel inside the container helps keep icing crisp.
You can freeze decorated cookies placed in a single layer on a baking sheet, then transfer to a freezer-safe container once hardened. Thaw at room temperature before serving to avoid condensation ruining the icing’s texture.
Interestingly, the flavors of these cookies deepen after a day or two, so if you have the patience, letting them rest can make the experience even better.
Nutritional Information & Benefits
Each floral sugar cookie with royal icing contains approximately 150-180 calories, depending on size and icing thickness. They provide a modest amount of carbohydrates and fats, mostly from butter and sugar.
Key ingredients like butter provide vitamin A and fatty acids, while eggs contribute protein and essential nutrients. Using pure vanilla extract adds natural antioxidants.
For those mindful of allergens, this recipe contains gluten, dairy, and eggs, but substitutions can adapt it for gluten-free or vegan diets.
From a wellness perspective, these cookies are a delightful treat that, when enjoyed in moderation, fit into a balanced lifestyle. Plus, the joy of baking and sharing them is a boost to mental well-being all on its own!
Conclusion
Perfect floral sugar cookies with royal icing aren’t just pretty—they’re a sweet slice of happiness you can make at home. Whether you want to impress guests or simply enjoy a moment of creative baking, this recipe gives you the tools and confidence to craft cookies that look as wonderful as they taste.
Feel free to customize the shapes, colors, and flavors to match your personality or the occasion. I love how these cookies bring a little art and sweetness into my kitchen, and I hope they do the same for you.
If you try the recipe, I’d love to hear how it went or see your floral creations—drop a comment or share your photos! Baking is more fun when we share it together, right?
So grab your rolling pin, break out the piping bags, and let’s make some magic happen—one floral sugar cookie at a time.
FAQs
Can I make the sugar cookie dough ahead of time?
Absolutely! The dough can be refrigerated for up to 24 hours or frozen for up to 3 months. Just thaw before rolling and cutting.
Is it necessary to use egg whites for the royal icing?
You can substitute powdered meringue for egg whites to avoid raw eggs. Aquafaba is also an egg-free option but may require some practice.
How do I prevent the cookies from spreading too much?
Chilling the dough before rolling and baking is key. Also, avoid over-flouring the surface, which can dry out the dough.
Can I use store-bought royal icing instead?
Yes, but homemade royal icing gives you more control over consistency and colors, which is crucial for detailed floral designs.
How long do decorated sugar cookies last?
When stored properly in an airtight container, they stay fresh for up to 5 days at room temperature. For longer storage, freeze them.
Pin This Recipe!
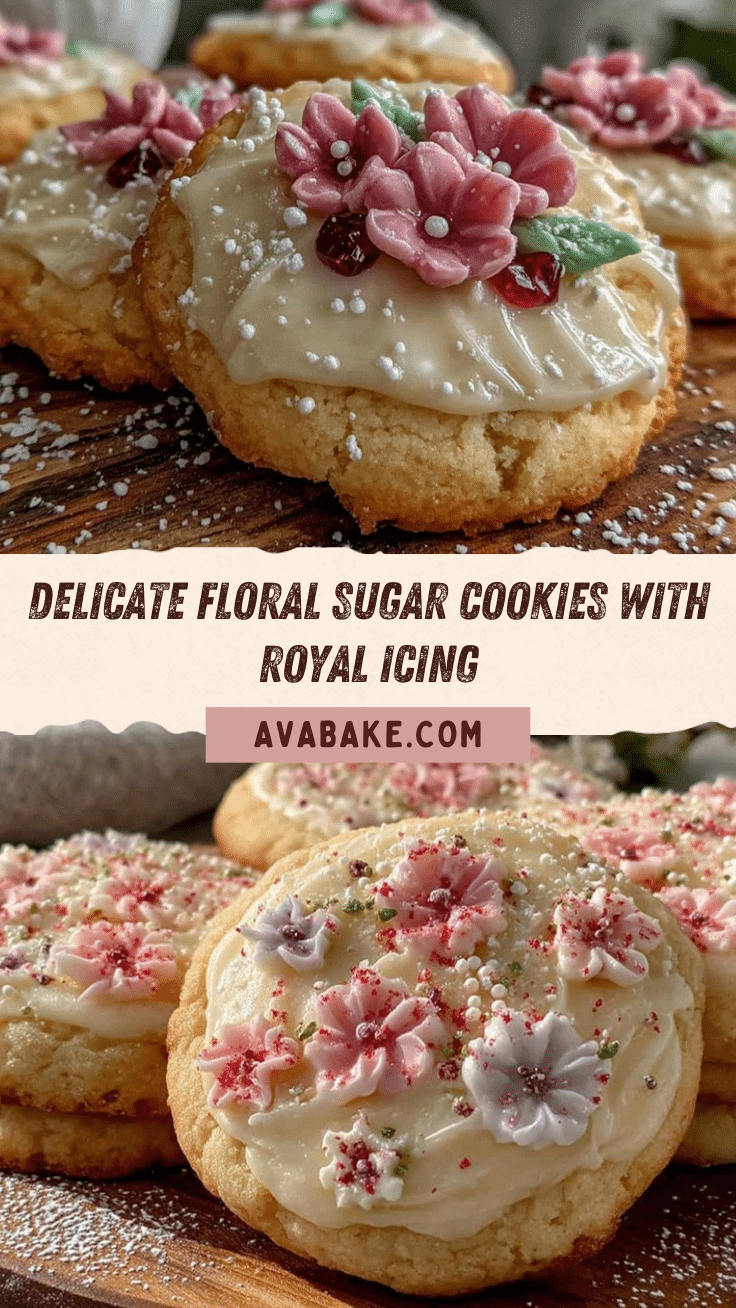
Perfect Floral Sugar Cookies Recipe Easy Homemade Royal Icing Tutorial for Every Occasion
These floral sugar cookies feature a tender, buttery crumb paired with delicate royal icing floral designs, perfect for birthdays, garden parties, or any occasion.
- Prep Time: 15 minutes
- Cook Time: 10 minutes
- Total Time: 1 hour 25 minutes
- Yield: About 24 cookies 1x
- Category: Dessert
- Cuisine: American
Ingredients
- 2 ¾ cups (345g) all-purpose flour, sifted
- 1 teaspoon baking powder
- ½ teaspoon salt
- 1 cup (226g) unsalted butter, softened
- 1 ½ cups (300g) granulated sugar
- 1 large egg, room temperature
- 2 teaspoons vanilla extract
- 1 teaspoon almond extract (optional)
- 3 cups (360g) powdered sugar, sifted
- 2 large egg whites or 4 tablespoons meringue powder mixed with 6 tablespoons water
- ½ teaspoon cream of tartar
- Food coloring gels
- Fresh lemon juice or water
Instructions
- Mix dry ingredients: In a medium bowl, whisk together 2 ¾ cups sifted all-purpose flour, 1 teaspoon baking powder, and ½ teaspoon salt. Set aside.
- Cream butter and sugar: In a large bowl, beat 1 cup softened unsalted butter with 1 ½ cups granulated sugar until light and fluffy, about 3-4 minutes on medium speed.
- Add egg and extracts: Beat in 1 large room-temperature egg, 2 teaspoons vanilla extract, and 1 teaspoon almond extract (if using) until combined.
- Combine wet and dry: Gradually add the flour mixture to the butter mixture, mixing on low speed just until incorporated.
- Chill the dough: Divide dough into two disks, wrap in plastic wrap, and refrigerate for at least 1 hour (up to 24 hours).
- Preheat oven and prepare baking sheets: Set oven to 350°F (175°C). Line baking sheets with parchment paper or silicone mats.
- Roll out dough: On a lightly floured surface, roll one disk of dough to about ¼ inch (6mm) thickness. Keep the other disk chilled until ready to use.
- Cut shapes: Use floral cookie cutters to cut out shapes. Transfer cookies carefully to baking sheets, spacing about 1 inch apart.
- Bake: Bake for 8-10 minutes, until edges are just starting to turn golden.
- Cool completely: Remove cookies from sheets and place on cooling racks to cool fully before icing.
- Prepare royal icing: Beat 3 cups sifted powdered sugar with 2 large egg whites (or meringue powder mix) and ½ teaspoon cream of tartar until stiff peaks form. Adjust consistency with lemon juice or water. Divide and tint with food coloring gels.
- Decorate: Using piping bags fitted with small round tips, outline cookie edges and floral details first with thicker icing. Let dry 15 minutes, then flood the inside with thinner icing. Use a toothpick or scribe tool to create petals and leaves.
- Dry and store: Let decorated cookies dry uncovered at room temperature for at least 4 hours, preferably overnight, before stacking or packaging.
Notes
Always chill your dough to prevent spreading. Use rolling pin rings or thickness guides for even dough thickness. Practice piping on parchment paper before decorating cookies. Let royal icing dry fully to avoid smudging. Dough can be refrigerated up to 24 hours or frozen up to 3 months. For egg-free royal icing, use aquafaba or meringue powder.
Nutrition
- Serving Size: 1 cookie
- Calories: 165
- Sugar: 16
- Sodium: 80
- Fat: 7
- Saturated Fat: 4
- Carbohydrates: 25
- Protein: 2
Keywords: floral sugar cookies, royal icing, sugar cookies, cookie decorating, homemade cookies, easy sugar cookies, floral cookies, baking tutorial