Introduction
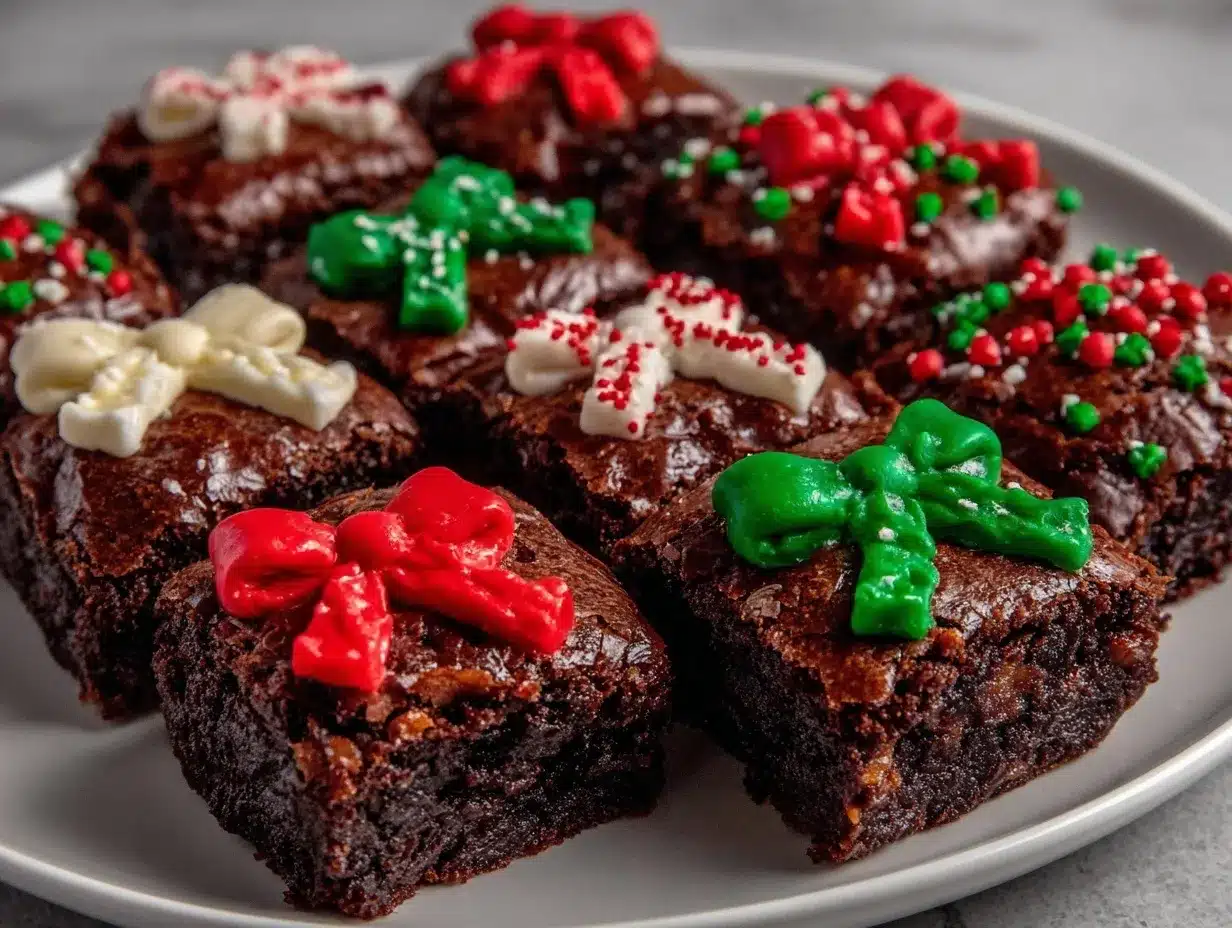
Let me set the scene: The kitchen is humming with holiday energy, cinnamon and cocoa scents swirling together in the warm air, and the sight of glossy chocolate batter being poured into tiny pans is just plain joy. You know that moment when you pull a tray of brownies from the oven—the crackly tops, the rich aroma, the irresistible urge to sneak a corner piece? Well, these mini Christmas brownies with festive icing bows capture all of that magic in bite-sized treats that look almost too cute to eat (almost).
The first time I whipped up these mini brownies, it was on a snowy afternoon when I was knee-high to a grasshopper, helping my grandma get ready for our big family Christmas party. She handed me the icing piping bag with a wink and said, “Don’t worry if they’re not perfect, kiddo—it just means they’re made with love.” That moment stuck with me. I was instantly hooked on both the flavor and the fun of decorating these sweet little squares.
Honestly, these brownies have become a staple for every holiday gathering, potluck, and cookie swap I attend. My family can’t keep their hands off them—I’ve caught more than one person sneaking them straight from the cooling rack (and I can’t really blame them). They’re the kind of treat that brings out pure, nostalgic comfort, the kind of moment where you pause, take a deep breath, and just smile because you know you’re onto something truly special. If you’re looking for a festive treat that puts a playful spin on classic chocolatey goodness, you’re going to want to bookmark this one for sure.
Perfect for gifting, showing off on your Pinterest boards, or just brightening up a chilly winter evening, these mini Christmas brownies with festive icing bows have been tested in my kitchen (many times, in the name of research, of course) and they never fail to deliver smiles and sugar rushes in equal measure.
Why You’ll Love This Recipe
When you’re on the hunt for a holiday treat that’s both adorable and delicious, these mini Christmas brownies are a total game-changer. I’ve baked hundreds of batches over the years (seriously, probably more than anyone should admit), and I can tell you with confidence: this recipe is foolproof, festive, and just plain fun to make.
- Quick & Easy: These brownies come together in under 45 minutes, making them perfect for busy holiday schedules or last-minute party prep.
- Simple Ingredients: Everything you need is likely already in your pantry—no wild goose chases for specialty items.
- Perfect for Holiday Occasions: Whether it’s a Christmas morning brunch, a classroom treat, or a family movie night, these brownies fit right in.
- Crowd-Pleaser: Kids adore the festive bows, grownups love the fudgy texture, and everyone asks for seconds (trust me).
- Unbelievably Delicious: Rich cocoa flavor, just the right amount of chew, and a pop of sweet vanilla icing on top. It’s comfort food with a holiday twist!
What sets this mini Christmas brownies recipe apart from the rest? For starters, the small size means more crispy edges (arguably the best part of any brownie), and the icing bows add a decorative touch that transforms a humble chocolate treat into a Pinterest-worthy dessert.
I use a mix of melted chocolate and cocoa powder for a deep, robust flavor, and a dash of espresso powder to really make the chocolate shine (you can skip it, but I wouldn’t). The icing bows aren’t just for looks—they add a creamy sweetness that balances out the rich fudge. It’s the kind of recipe that feels special, but won’t stress you out.
Let’s face it, holiday baking can get complicated fast, but these brownies are all about keeping things simple. You get all the fun of decorating, without any of the hassle, and you end up with a dessert that’s guaranteed to impress. Whether you’re making them with your kids, gifting to neighbors, or just treating yourself, this recipe delivers sweetness, smiles, and a little bit of holiday magic every time.
What Ingredients You Will Need
This mini Christmas brownies recipe uses classic, wholesome ingredients that deliver bold flavor and melt-in-your-mouth texture without any fancy tricks. Most of these are pantry staples, and I’ve included easy swaps if you need to tweak for allergies or preferences.
- For the brownies:
- 1/2 cup (115 g) unsalted butter, melted (adds richness and keeps brownies moist)
- 2 oz (60 g) semi-sweet chocolate, chopped (I like Ghirardelli or Baker’s for smooth melting)
- 3/4 cup (150 g) granulated sugar (for sweetness and structure)
- 1/4 cup (50 g) packed light brown sugar (adds chewiness and depth)
- 2 large eggs, room temperature (important for a smooth batter)
- 1 teaspoon vanilla extract (pure vanilla, if possible)
- 1/2 cup (65 g) all-purpose flour (use gluten-free blend if needed)
- 1/4 cup (25 g) unsweetened cocoa powder (Dutch process for deeper color, but any works)
- 1/4 teaspoon espresso powder (totally optional, but amps up the chocolate flavor)
- 1/4 teaspoon salt (balances sweetness)
- For the festive icing bows:
- 1 cup (120 g) powdered sugar (for smooth, pipeable icing)
- 2 tablespoons (30 ml) milk (use dairy-free if preferred)
- 1/2 teaspoon vanilla extract (for flavor)
- Gel food coloring (red, green, or any festive colors you like)
- Optional for decoration:
- Sprinkles, edible glitter, or crushed candy canes (for extra holiday sparkle)
If you’re missing an ingredient, don’t worry—I’ve swapped in coconut oil for butter before (works great), and dairy-free milk for the icing is just as tasty. For flour, almond flour gives a slightly different texture but is perfect for gluten-free friends. In summer, I’ve even tossed a few fresh raspberries into the batter for a fruity twist. The recipe is flexible, so don’t be afraid to make it your own.
For best results, I recommend using a quality cocoa powder and chocolate—cheap stuff can taste a bit flat. And if you’re shopping for sprinkles or edible decorations, look for ones labeled “bake-safe” so they hold up in the oven or on the icing.
Equipment Needed
You don’t need a ton of fancy gear to whip up these mini Christmas brownies, which is great news for anyone baking in a cozy kitchen (or with impatient helpers). Here’s what I use every time:
- Mini muffin pan or mini brownie pan (24-cavity): This gives the brownies their perfect bite-sized shape. If you only have a regular muffin pan, just fill halfway for mini portions.
- Mixing bowls (at least two): One for melting chocolate and butter, one for whisking the dry ingredients.
- Whisk and spatula: The whisk gets everything smooth, and the spatula helps scrape all that chocolatey goodness into the pans.
- Piping bag and small round tip: For icing the bows. A zip-top bag with the corner snipped works in a pinch.
- Wire cooling rack: Brownies cool faster and don’t get soggy bottoms (learned that the hard way).
- Nonstick spray or baking cups: I’ve tried both—baking cups make cleanup a breeze, but a good spray gets those crispy edges.
If you don’t have a mini pan, honestly, just cut them into small squares after baking in a regular pan. I’ve used silicone pans, which pop the brownies out easily, but metal pans get the best crisp. For piping, reusable bags are great, but disposable ones save on cleanup during busy holidays. Maintenance tip: soak pans with a little baking soda if chocolate sticks—works wonders! And if you’re shopping on a budget, skip the specialty piping tips and use a small spoon for rustic-looking bows. No one’s judging!
Preparation Method
- Prep the pan and oven: Preheat your oven to 350°F (175°C). Spray your mini muffin or brownie pan with nonstick spray or line with baking cups. Set aside. (If using a regular pan, line with parchment for easy lifting.)
- Melt the butter and chocolate: In a microwave-safe bowl, combine 1/2 cup (115 g) unsalted butter and 2 oz (60 g) chopped semi-sweet chocolate. Microwave in 20-second bursts, stirring after each, until smooth and glossy—usually takes about 1 minute total. Let cool slightly (so you don’t scramble the eggs later).
- Mix the wet ingredients: In a large mixing bowl, whisk together 3/4 cup (150 g) granulated sugar and 1/4 cup (50 g) packed light brown sugar. Add the melted chocolate-butter mixture and whisk until combined. Crack in 2 large eggs (room temperature is best for a smooth batter) and add 1 teaspoon vanilla extract. Whisk until the mixture is thick and shiny.
- Sift and add dry ingredients: Over the wet mixture, sift 1/2 cup (65 g) all-purpose flour, 1/4 cup (25 g) unsweetened cocoa powder, 1/4 teaspoon espresso powder, and 1/4 teaspoon salt. Fold gently with a spatula until just combined—don’t overmix, or your brownies will be tough. Batter should be thick and glossy.
- Fill the pan: Spoon batter into the prepared mini muffin cavities, filling each about 3/4 full. I use a small cookie scoop for even portions (trust me, it makes life easier).
- Bake: Place in the oven and bake for 14–16 minutes, or until the tops are crackly and a toothpick inserted comes out with a few moist crumbs. Don’t wait for a clean toothpick—brownies should be fudgy! If you’re baking in a regular pan, bake for 18–22 minutes.
- Cool: Let brownies cool in the pan for about 5 minutes, then transfer to a wire rack. This helps keep the bottoms from getting soggy. If sticking occurs, gently run a knife around the edges.
- Make the icing bows: In a small bowl, whisk together 1 cup (120 g) powdered sugar, 2 tablespoons (30 ml) milk, and 1/2 teaspoon vanilla extract. Divide into bowls and tint each with your desired gel food coloring.
- Pipe the bows: Once brownies are completely cool, pipe small bows onto each using a piping bag or zip-top bag. If you’re new to piping, just squeeze out a line for the ribbon and two small loops for the bow—perfection isn’t required; the festive spirit counts!
- Decorate (optional): Sprinkle with festive sprinkles or edible glitter for extra holiday cheer.
Preparation notes: If your icing is too thick, add a splash more milk. Too runny? Add a bit more powdered sugar. For extra fudgy brownies, slightly underbake and let them set as they cool. If you’re working with kids, let them decorate—it’s messy, but totally worth it. Watch the oven closely; mini brownies can go from fudgy to dry in a flash. Sensory cue: The brownies should smell deeply chocolatey, with crackly tops and soft centers.
Cooking Tips & Techniques
Here’s where experience comes in handy. I’ve baked these mini Christmas brownies enough to know a few tricks for guaranteed success—and a couple pitfalls to avoid!
- Don’t overmix: As tempting as it is to keep stirring, stop once the flour disappears. Overmixing leads to dense, tough brownies.
- Use quality chocolate: It makes all the difference. Cheap chocolate can taste waxy and won’t melt as smoothly. I learned this the hard way one year—never again!
- Watch the bake time: Mini brownies bake fast. Start checking at the 14-minute mark, and remember, a little moist crumb is what you want. Dry brownies are a holiday bummer.
- Cool before decorating: I’ve tried rushing this step, and trust me, warm brownies melt the icing into a puddle. Patience pays off here.
- Multitasking tip: While the brownies bake, mix up your icing and set out decorations. It keeps you ahead of the game and makes the process feel less hectic.
- Consistency is key: Use a cookie scoop for even portions, and a piping tip for neat bows. But honestly, homemade means a little variation—that’s part of the charm.
- If the brownies stick: Let them cool an extra minute, then gently run a butter knife around the edges. Silicone pans help, but metal pans give the best texture.
- Decorating fails: If a bow flops, just add another layer of icing or toss on extra sprinkles. No one notices in the holiday excitement!
One year, I tried to frost while distracted by a Christmas movie, and the bows turned out more like blobs—but they tasted just as good. So don’t stress about perfection. The best brownies are always made with a bit of personality.
Variations & Adaptations
There’s so much room to play with this mini Christmas brownies recipe! I’ve tried plenty of versions over the years, and here are my favorites:
- Gluten-Free: Swap the all-purpose flour for a 1:1 gluten-free blend. The brownies stay fudgy and delicious—no one will know the difference.
- Dairy-Free: Use coconut oil instead of butter, and almond or oat milk for the icing. Works perfectly for lactose-intolerant guests.
- Flavor Twists: Add a dash of peppermint extract to the batter for minty brownies, or stir in orange zest for a citrus kick. I’ve tried both, and they’re a hit!
- Seasonal Adaptations: In spring, swap the bows for pastel colors. For Halloween, use orange and black icing with spooky sprinkles.
- Allergen-Friendly: Nut allergies? Skip any nut-based flour and use sunflower seed butter for added richness (if you like).
- My favorite twist: I sometimes swirl raspberry jam into the batter before baking. It adds a tart note that pairs beautifully with the chocolate.
If you prefer your brownies less sweet, cut back on the sugar by a couple tablespoons. You can also double the recipe for a crowd—just extend the baking time slightly. Honestly, decorating is where you can really let your creativity shine. Let your kids or guests pick colors and sprinkles for a truly personalized holiday treat!
Serving & Storage Suggestions
Let’s talk presentation—these mini Christmas brownies look best piled high on a pretty platter or tucked into festive cupcake liners. Serve them at room temperature for the richest flavor and softest texture (cold brownies get a little firm, not gonna lie). If you want them warm, a quick 5-second zap in the microwave does the trick.
Pair with a mug of hot cocoa, spiced tea, or even a glass of cold milk for classic comfort. I like to add a bowl of fresh berries or a scoop of vanilla ice cream to round things out at parties.
For storage, keep brownies in an airtight container at room temperature for up to 4 days. They stay moist and fudgy thanks to the butter and brown sugar. If you need to store longer, freeze in a single layer, then pop into a zip-top bag—just thaw at room temp before serving. Tip: decorate after thawing so the icing stays vibrant.
Flavors deepen overnight, so don’t worry if you make them a day ahead—sometimes they’re even better the next day! For gifting, wrap a few in cellophane bags tied with ribbon. They’re sturdy enough to travel and make wonderful homemade presents.
Nutritional Information & Benefits
Here’s an estimate per mini brownie (based on 24 servings):
- Calories: ~95
- Fat: ~4.5g
- Carbohydrates: ~13g
- Protein: ~1.5g
- Sugar: ~9g
Key ingredients like cocoa powder and semi-sweet chocolate offer antioxidants and a little mood-boosting magic (honestly, chocolate just makes everything better). Using almond flour or coconut oil for substitutions bumps up healthy fats and keeps things gluten-free or dairy-free as needed.
The recipe does contain eggs, dairy, and wheat (unless adapted), so be mindful of allergies. I always check with guests before serving. My personal take? These brownies are a treat, but the small size means portion control is easy—and the pure joy they bring is good for the soul.
Conclusion
If you’re looking for a festive, easy, and irresistibly cute treat to brighten your holiday table, these mini Christmas brownies with festive icing bows are the answer. They deliver rich chocolate flavor, playful presentation, and all the cozy holiday vibes you could want—without any kitchen drama.
Don’t be afraid to mix up the colors, swap ingredients, or get creative with decorations. Baking should be fun, and these brownies are all about smiles and sweet memories. I love this recipe because it brings my family together every year and lets us get a little messy, a little creative, and a whole lot happy.
Give them a try, share your own twists in the comments, and pin your results to Pinterest for your friends to see. Honestly, once you taste these, you’ll be making them every December (and maybe a few months in between!). Here’s to homemade holiday magic—one mini brownie at a time!
FAQs
Can I make these mini Christmas brownies ahead of time?
Absolutely! You can bake them up to two days in advance. Just store in an airtight container and add the icing bows the day you plan to serve.
How do I get my icing bows to look neat?
Use a piping bag with a small round tip, and make sure the brownies are completely cool before decorating. If you’re new to piping, simple loops work fine—practice makes perfect!
Can I freeze the brownies after baking?
Yes! Freeze the undecorated brownies in a single layer, then transfer to a bag. Thaw at room temperature and decorate once defrosted for freshest results.
What if I don’t have a mini muffin pan?
No worries—just bake in a regular pan and cut into small squares. You’ll still get all the flavor and fun, minus the bite-sized shape.
Are there any nut-free adaptations?
Definitely! Use regular all-purpose flour and skip any nut-based ingredients. Always check labels on chocolate and decorations, just to be safe.
Pin This Recipe!
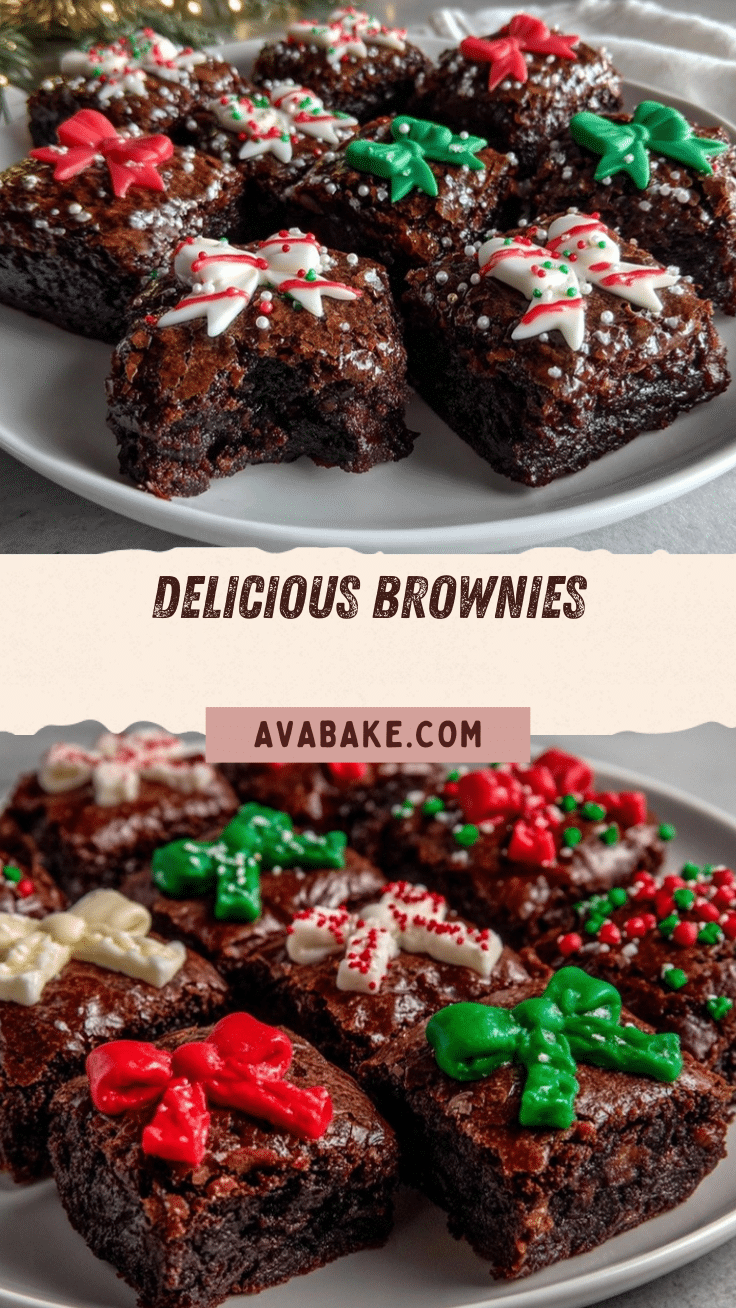
Mini Christmas Brownies Recipe: Easy Festive Bows for Holidays
These mini Christmas brownies are rich, fudgy, and topped with festive icing bows, making them the perfect bite-sized treat for holiday gatherings. Quick to prepare and fun to decorate, they bring holiday cheer to any table.
- Prep Time: 15 minutes
- Cook Time: 16 minutes
- Total Time: 31 minutes
- Yield: 24 mini brownies 1x
- Category: Dessert
- Cuisine: American
Ingredients
- 1/2 cup (115 g) unsalted butter, melted
- 2 oz (60 g) semi-sweet chocolate, chopped
- 3/4 cup (150 g) granulated sugar
- 1/4 cup (50 g) packed light brown sugar
- 2 large eggs, room temperature
- 1 teaspoon vanilla extract
- 1/2 cup (65 g) all-purpose flour
- 1/4 cup (25 g) unsweetened cocoa powder
- 1/4 teaspoon espresso powder (optional)
- 1/4 teaspoon salt
- 1 cup (120 g) powdered sugar
- 2 tablespoons (30 ml) milk
- 1/2 teaspoon vanilla extract
- Gel food coloring (red, green, or festive colors)
- Sprinkles, edible glitter, or crushed candy canes (optional for decoration)
Instructions
- Preheat oven to 350°F (175°C). Spray a mini muffin or brownie pan with nonstick spray or line with baking cups.
- In a microwave-safe bowl, combine butter and chopped chocolate. Microwave in 20-second bursts, stirring after each, until smooth and glossy. Let cool slightly.
- In a large mixing bowl, whisk together granulated sugar and brown sugar. Add the melted chocolate-butter mixture and whisk until combined.
- Add eggs and vanilla extract to the mixture. Whisk until thick and shiny.
- Sift flour, cocoa powder, espresso powder, and salt over the wet mixture. Fold gently with a spatula until just combined.
- Spoon batter into prepared mini muffin cavities, filling each about 3/4 full.
- Bake for 14–16 minutes, or until tops are crackly and a toothpick inserted comes out with a few moist crumbs.
- Let brownies cool in the pan for 5 minutes, then transfer to a wire rack.
- In a small bowl, whisk together powdered sugar, milk, and vanilla extract for the icing. Divide and tint with gel food coloring.
- Pipe bows onto cooled brownies using a piping bag or zip-top bag.
- Decorate with sprinkles, edible glitter, or crushed candy canes if desired.
Notes
For gluten-free brownies, use a 1:1 gluten-free flour blend. Dairy-free substitutions include coconut oil for butter and almond or oat milk for icing. Watch bake time closely—mini brownies bake fast. Decorate only after brownies are fully cool. Brownies can be made ahead and stored in an airtight container for up to 4 days. Freeze undecorated brownies for longer storage and decorate after thawing.
Nutrition
- Serving Size: 1 mini brownie
- Calories: 95
- Sugar: 9
- Sodium: 40
- Fat: 4.5
- Saturated Fat: 2.5
- Carbohydrates: 13
- Fiber: 1
- Protein: 1.5
Keywords: Christmas brownies, holiday dessert, mini brownies, festive treats, chocolate brownies, icing bows, easy brownies, kid-friendly, party food, Christmas baking


