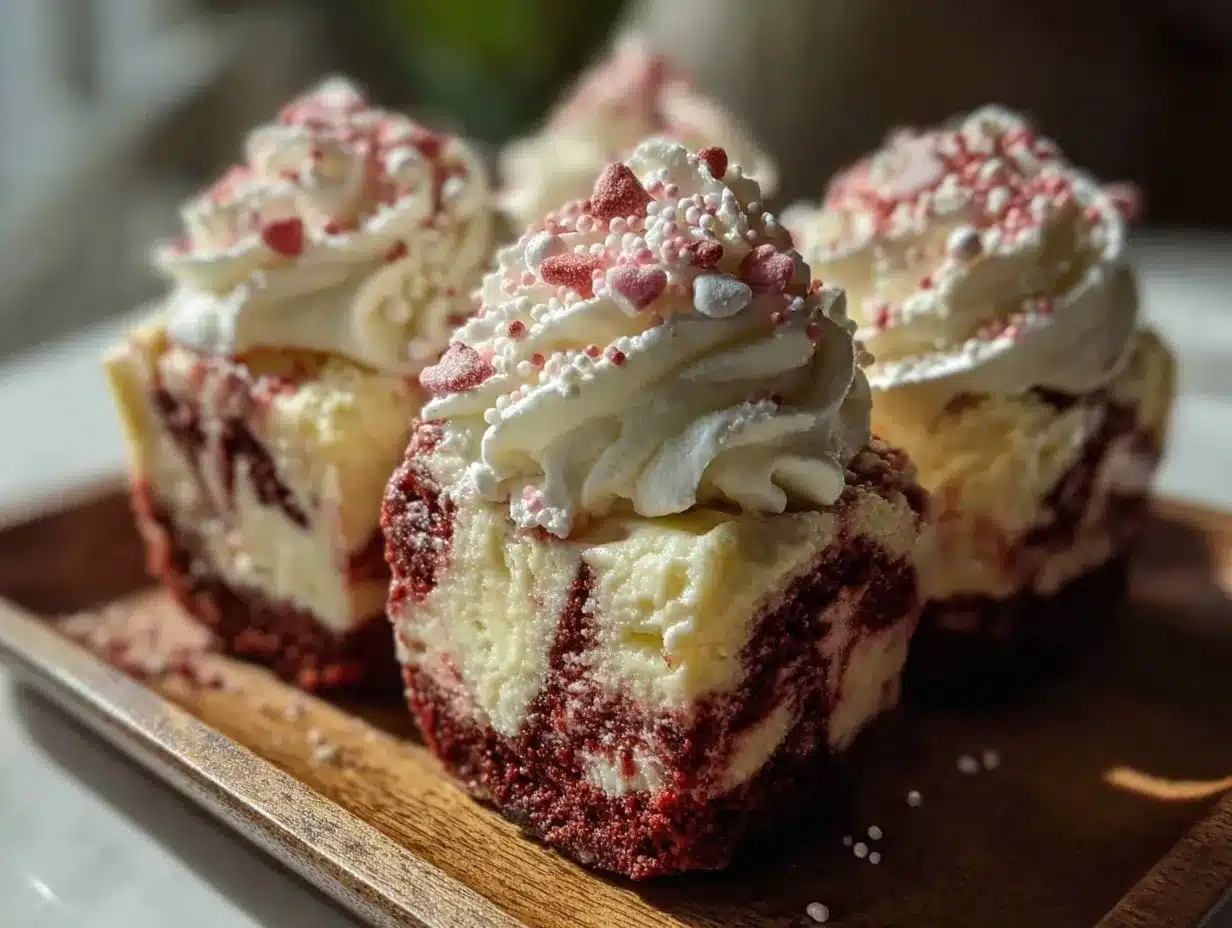
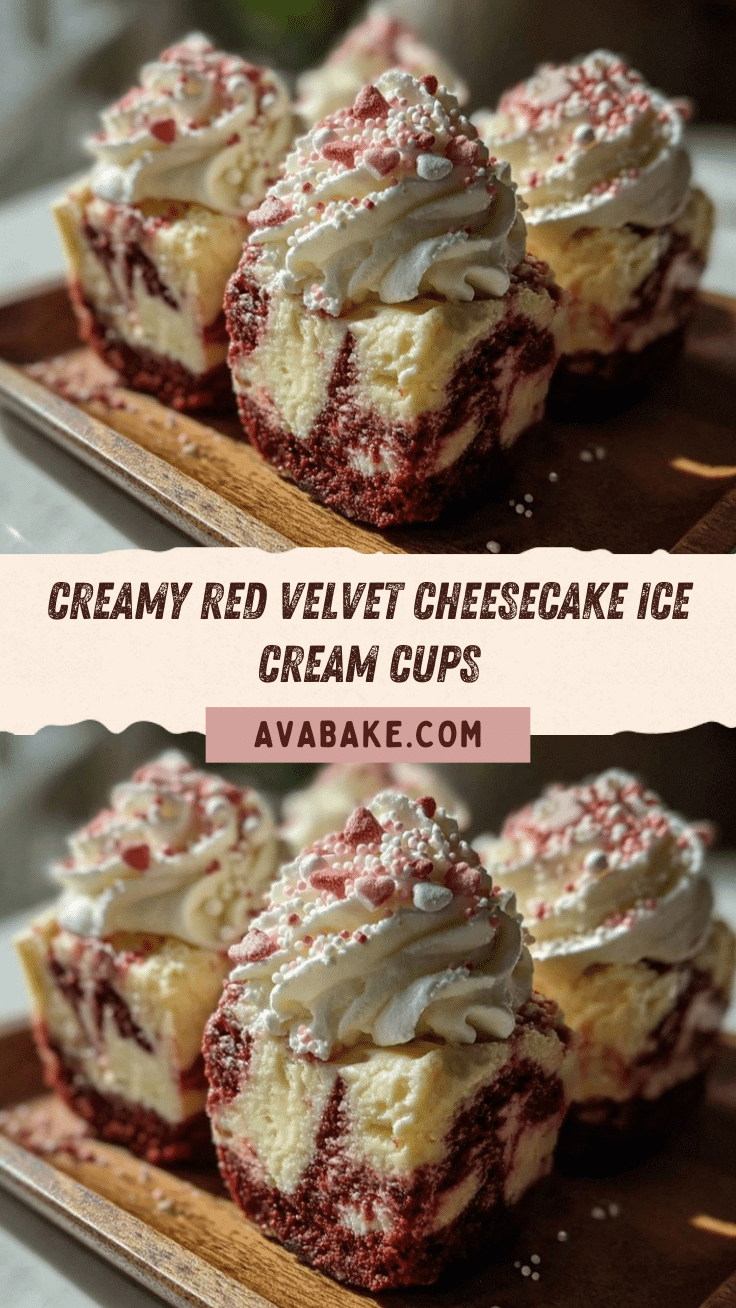
Let me tell you, the scent of rich cocoa mingling with velvety cream cheese and a hint of sweetness—wafting from these dreamy red velvet cheesecake ice cream cups—is enough to make anyone’s mouth water. The first time I whipped up these luscious little treats, I was instantly hooked. It was one of those rare moments where you pause, take a deep breath, and just smile because you know you’re onto something truly special. Years ago, when I was knee-high to a grasshopper, Valentine’s Day desserts meant boxed chocolates and maybe a lonely heart-shaped cookie. But discovering this recipe changed the game.
I stumbled upon it on a rainy weekend, trying to recreate the magic of my grandma’s cheesecake but with a fun, frozen twist perfect for a romantic night in. Honestly, my family couldn’t stop sneaking them off the cooling rack—and I can’t really blame them. These creamy Valentine’s red velvet cheesecake ice cream cups have become a staple for our family gatherings and a charming gift idea for loved ones. They’re dangerously easy, bursting with pure, nostalgic comfort, and perfect for brightening up any Pinterest cookie board or dessert table.
You know what makes these ice cream cups so irresistible? They’re the perfect blend of silky cheesecake richness and the classic red velvet flavor you adore, all wrapped up in a frozen delight. Whether you’re planning a cozy date night or a sweet treat for your kids, these cups never fail to impress. Trust me—after testing this recipe more times than I can count (in the name of research, of course), it’s now a go-to for Valentine’s Day and beyond. You’re going to want to bookmark this one.
Why You’ll Love This Creamy Valentine’s Red Velvet Cheesecake Ice Cream Cups Recipe
Having tried countless dessert recipes over the years, I can say this one stands out for so many reasons. Not only does it taste amazing, but it’s also incredibly approachable—even if you’re not a seasoned baker or ice cream maker.
- Quick & Easy: Comes together in under 30 minutes, making it perfect for last-minute romantic nights or spontaneous dessert cravings.
- Simple Ingredients: No fancy trips to specialty stores needed; you likely have everything in your pantry and fridge already.
- Perfect for Valentine’s Day: The rich red velvet color and creamy texture make these ice cream cups a charming way to celebrate love.
- Crowd-Pleaser: Kids, adults, cheesecake lovers, and ice cream fans alike rave about these cups every time.
- Unbelievably Delicious: The smooth cheesecake layer combined with the subtle cocoa and tang of cream cheese gives you a next-level comfort food experience.
What really sets this recipe apart is the way the cheesecake layer is blended into the ice cream base, giving you an ultra-creamy, silky texture that’s hard to find in homemade frozen desserts. Plus, the red velvet cake crumbs add just the right touch of moistness and that iconic flavor. This isn’t just another ice cream recipe—it’s your best version of a classic Valentine’s dessert, with a bit of personality and flair.
Honestly, this recipe isn’t just good; it’s the kind that makes you close your eyes after the first bite and smile. It’s comfort food reimagined—both indulgent and refreshing, with the soul-soothing satisfaction of cheesecake and the cool delight of ice cream. Whether you’re impressing a special someone or treating yourself, these creamy Valentine’s red velvet cheesecake ice cream cups deliver every time.
What Ingredients You Will Need
This recipe uses simple, wholesome ingredients to deliver bold flavor and satisfying texture without the fuss. Most are pantry staples, and you can find everything at your local grocery store without breaking a sweat. Here’s what you’ll gather to make these luscious Valentine’s red velvet cheesecake ice cream cups:
- For the Ice Cream Base:
- 1 cup (240 ml) heavy cream (for richness and creaminess)
- 1 cup (240 ml) whole milk (helps achieve smooth texture)
- 3/4 cup (150 g) granulated sugar (balances the tang of cream cheese)
- 4 oz (115 g) cream cheese, softened (key for that luscious cheesecake flavor)
- 1 teaspoon pure vanilla extract (adds warmth and depth)
- 1/4 teaspoon salt (to enhance all the flavors)
- For the Red Velvet Cake Layer:
- 1 cup (120 g) red velvet cake crumbs (homemade or store-bought; moist crumbs work best)
- 1 tablespoon cocoa powder (unsweetened, for that classic red velvet note)
- 1 tablespoon buttermilk (optional, keeps crumbs tender)
- 1 teaspoon red food coloring (optional, for vibrant color)
- For Garnish and Assembly:
- Whipped cream (store-bought or homemade, for topping)
- Mini chocolate chips or chocolate shavings (adds a little crunch and elegance)
- Fresh strawberries or raspberries (for a fresh, tangy contrast)
Pro tip: I recommend using Philadelphia cream cheese for the best texture—it’s smooth and tangy. If you want to keep this dairy-free, swap the cream cheese with a plant-based alternative and use coconut cream instead of heavy cream; the flavor changes but still delightful! Also, if you prefer a gluten-free dessert, opt for gluten-free red velvet cake crumbs or make your own using almond flour and cocoa powder.
Equipment Needed
- Mixing bowls (a couple of medium-sized ones for batter and cake crumb mixing)
- Electric mixer or stand mixer (makes blending the cream cheese and sugar a breeze)
- Measuring cups and spoons (for precise ingredient amounts)
- Spatula (to scrape down the sides of bowls and fold ingredients)
- Ice cream maker (optional but highly recommended for creamy texture; alternatives below)
- Small serving cups or ramekins (to serve the ice cream cups elegantly)
- Freezer-safe container (if you prefer to store the ice cream in bulk)
If you don’t have an ice cream maker, no worries! You can still make this recipe by freezing the mixture in a shallow dish and stirring every 30 minutes until it firms up. This method takes a bit longer, but the results are still pretty fantastic. For budget-friendly options, a hand mixer works just fine instead of a stand mixer. And if you’re passionate about presentation, mini mason jars or pretty glass cups make these Valentine’s red velvet cheesecake ice cream cups look irresistible.
Preparation Method
- Prepare the Red Velvet Cake Crumbs: If using homemade cake, crumble your cooled red velvet cake into fine crumbs (about 1 cup). Toss gently with cocoa powder and buttermilk to keep the crumbs moist. Set aside. (10 minutes)
- Make the Cheesecake Ice Cream Base: In a mixing bowl, beat the softened cream cheese with sugar until smooth and creamy—no lumps here! This usually takes about 3-4 minutes on medium speed. (5 minutes)
- Add Dairy and Flavorings: Slowly pour in the heavy cream and whole milk while mixing on low speed. Stir in the vanilla extract and salt. The mixture should be silky and pourable, not too thick. (3 minutes)
- Chill the Mixture: Cover the bowl and refrigerate the ice cream base for at least 2 hours or overnight. This step is key for a smooth texture and to let flavors meld. (2+ hours)
- Churn the Ice Cream: Pour the chilled mixture into your ice cream maker and churn according to the manufacturer’s instructions (usually 20-25 minutes). The texture should be thick but not frozen solid. (20-25 minutes)
- Layer the Ice Cream Cups: Spoon a layer of red velvet cake crumbs into the bottom of each serving cup. Add a generous scoop of the cheesecake ice cream on top. Repeat layers if your cups are tall enough, finishing with ice cream on top. (10 minutes)
- Freeze to Set: Place the cups in the freezer for at least 2 hours to firm up and let the layers meld beautifully. (2 hours)
- Garnish and Serve: Before serving, top with whipped cream, mini chocolate chips or shavings, and fresh berries for that extra wow factor. (5 minutes)
Note: If your ice cream base tastes a little tangy after chilling, that’s the cream cheese doing its magic—it balances out perfectly once frozen. When layering, don’t compress the cake crumbs too hard; you want them to retain some crumbly texture to contrast the creamy ice cream. And trust me, freezing the cups longer than 2 hours won’t hurt—just let them thaw a few minutes before scooping.
Cooking Tips & Techniques
Making the perfect creamy Valentine’s red velvet cheesecake ice cream cups is about a few key techniques that help you get that silky texture and rich flavor every time. First, always soften your cream cheese well—room temperature is best. Trying to mix cold cream cheese often leaves lumps that won’t fully dissolve, and nobody wants surprise chunks when they just want smooth indulgence.
When combining dairy ingredients, add them gradually to avoid curdling and to keep the mixture smooth. Chilling the ice cream base before churning is a not-so-secret weapon; it helps the mixture freeze evenly and prevents icy crystals. If you’re skipping the ice cream maker, be patient with stirring during the freezing process—it’s the secret to creamy texture without fancy equipment.
One mistake I made early on was pressing the cake crumbs too firmly in the layers, which made the texture dense and less enjoyable. Lightly layering lets the crumbs keep their crumbly charm and provides a nice contrast to the creamy ice cream. Also, don’t skip the garnish! It adds not only visual appeal but freshness and crunch that make every bite more exciting.
Timing is everything here—try to prep the cake crumbs and ice cream base in advance, so assembly on the day of serving is quick and stress-free. And if you find your ice cream is too firm right out of the freezer, just let it sit at room temperature for 5-10 minutes before serving to soften perfectly.
Variations & Adaptations
Want to mix things up? These creamy Valentine’s red velvet cheesecake ice cream cups are surprisingly versatile. Here are a few ideas I’ve tried and loved:
- Vegan Version: Use coconut cream instead of heavy cream, a dairy-free cream cheese alternative, and vegan red velvet cake crumbs. It’s a bit different but still delicious!
- Nutty Twist: Add chopped toasted pecans or walnuts between the layers for a delightful crunch that pairs well with the rich cheesecake.
- Berry Infusion: Fold in fresh or frozen raspberries into the ice cream base before churning for a fruity surprise that brightens the classic red velvet flavor.
- Chocolate Lovers’ Dream: Swirl in some melted dark chocolate or fudge sauce into the ice cream before freezing for a marbled effect and extra decadence.
- Mini Cupcakes: Instead of cake crumbs, use mini red velvet cupcakes crumbled in layers for a chunkier texture and a fun presentation.
Allergy-friendly? Swap the dairy with plant-based options and use gluten-free cake crumbs. These adjustments keep the spirit of the recipe alive while fitting your dietary needs. Personally, I once added a splash of espresso powder to the ice cream base—it gave a subtle mocha undertone that was unexpectedly amazing!
Serving & Storage Suggestions
These ice cream cups are best served chilled but not rock-solid frozen. Let them sit at room temperature for about 5 minutes before digging in—that way, you get that perfect creamy scoop without the brain freeze. For presentation, I love serving them in clear glass cups so the layers peek through, topped with a swirl of whipped cream and a dusting of cocoa powder or a fresh raspberry.
Pair these desserts with a rich coffee or a glass of sweet red wine to complement the flavors. They also make a fantastic ending to a cozy dinner or a fun surprise for a Valentine’s brunch.
To store, keep the ice cream cups tightly covered in the freezer for up to 3 days. If you’re prepping ahead, assemble the cups and freeze them overnight for the layers to meld nicely. When reheating (or rather, thawing), just pull them out 10-15 minutes before serving to soften slightly. The flavors tend to deepen after a day or two in the freezer, so sometimes waiting a bit actually pays off!
Nutritional Information & Benefits
Each serving of these creamy Valentine’s red velvet cheesecake ice cream cups contains approximately:
| Nutrient | Amount per Serving |
|---|---|
| Calories | 280-320 kcal |
| Fat | 18 g |
| Carbohydrates | 28 g |
| Protein | 4 g |
| Sugar | 22 g |
Key ingredients like cream cheese provide calcium and protein, while the red velvet cake crumbs add a touch of cocoa antioxidants. If you choose plant-based substitutions, you can reduce saturated fat and boost fiber content (if using whole grain crumbs). This dessert is naturally gluten-containing unless swapped for gluten-free crumbs, and it contains dairy unless adapted.
From a wellness perspective, I see this recipe as a lovely treat to enjoy mindfully on special occasions—a perfect blend of indulgence and comfort without being overly complicated or heavy. It’s the kind of dessert that nurtures the soul and satisfies the sweet tooth, all at once.
Conclusion
There you have it—creamy Valentine’s red velvet cheesecake ice cream cups that are as simple to make as they are delicious to eat. This recipe is a little love letter to classic flavors, with a frozen twist that feels fresh and special. Whether you stick to the original or customize it with your own flair, these cups are guaranteed to bring smiles and sweet memories.
Honestly, I love this recipe because it blends nostalgia with fun, and it’s just the right amount of fancy without any fuss. If you try it, I’d love to hear how you make it your own—drop a comment or share your favorite variations! And hey, don’t keep this one to yourself; share it with friends, family, or that special someone and watch it become a new tradition.
So go on, scoop up some sweetness and make your Valentine’s Day a little creamier and a lot more delicious!
FAQs About Creamy Valentine’s Red Velvet Cheesecake Ice Cream Cups
Can I make these ice cream cups without an ice cream maker?
Absolutely! Just freeze the mixture in a shallow container and stir every 30 minutes for about 3 hours until it reaches a creamy consistency. It takes longer but works well.
How far ahead can I prepare these ice cream cups?
You can make and freeze them up to 3 days in advance. Just store them covered tightly and thaw for 5-10 minutes before serving.
Can I use other cake flavors instead of red velvet?
Yes! Chocolate, vanilla, or even strawberry cake crumbs work wonderfully if you want to switch things up.
Is there a way to reduce the sugar in this recipe?
You can try reducing the sugar by 1/4 cup, but keep in mind it might affect texture and sweetness. Using a natural sweetener like maple syrup can also be an option.
What’s the best way to store leftovers?
Keep leftovers in a freezer-safe container, covered tightly, to prevent freezer burn. Consume within 3 days for best flavor and texture.
Pin This Recipe!
Creamy Valentine’s Red Velvet Cheesecake Ice Cream Cups
A luscious frozen dessert combining silky cheesecake richness with classic red velvet flavor, perfect for romantic nights or special occasions.
- Prep Time: 20 minutes
- Cook Time: 25 minutes
- Total Time: 4 hours 10 minutes
- Yield: 6 servings 1x
- Category: Dessert
- Cuisine: American
Ingredients
- 1 cup (240 ml) heavy cream
- 1 cup (240 ml) whole milk
- 3/4 cup (150 g) granulated sugar
- 4 oz (115 g) cream cheese, softened
- 1 teaspoon pure vanilla extract
- 1/4 teaspoon salt
- 1 cup (120 g) red velvet cake crumbs
- 1 tablespoon cocoa powder
- 1 tablespoon buttermilk (optional)
- 1 teaspoon red food coloring (optional)
- Whipped cream (for topping)
- Mini chocolate chips or chocolate shavings (for garnish)
- Fresh strawberries or raspberries (for garnish)
Instructions
- Prepare the Red Velvet Cake Crumbs: Crumble cooled red velvet cake into fine crumbs (about 1 cup). Toss gently with cocoa powder and buttermilk to keep crumbs moist. Set aside. (10 minutes)
- Make the Cheesecake Ice Cream Base: Beat softened cream cheese with sugar until smooth and creamy, about 3-4 minutes on medium speed. (5 minutes)
- Add Dairy and Flavorings: Slowly pour in heavy cream and whole milk while mixing on low speed. Stir in vanilla extract and salt until silky and pourable. (3 minutes)
- Chill the Mixture: Cover and refrigerate the ice cream base for at least 2 hours or overnight to let flavors meld. (2+ hours)
- Churn the Ice Cream: Pour chilled mixture into ice cream maker and churn according to manufacturer’s instructions, about 20-25 minutes, until thick but not frozen solid. (20-25 minutes)
- Layer the Ice Cream Cups: Spoon a layer of red velvet cake crumbs into the bottom of each serving cup. Add a generous scoop of cheesecake ice cream on top. Repeat layers if cups are tall enough, finishing with ice cream on top. (10 minutes)
- Freeze to Set: Place cups in freezer for at least 2 hours to firm up and meld layers. (2 hours)
- Garnish and Serve: Top with whipped cream, mini chocolate chips or shavings, and fresh berries before serving. (5 minutes)
Notes
If you don’t have an ice cream maker, freeze the mixture in a shallow dish and stir every 30 minutes until creamy (about 3 hours). Use Philadelphia cream cheese for best texture. For dairy-free, substitute cream cheese with plant-based alternative and heavy cream with coconut cream. For gluten-free, use gluten-free red velvet cake crumbs or make your own with almond flour and cocoa powder. Let ice cream cups sit at room temperature for 5-10 minutes before serving for perfect scoopability.
Nutrition
- Serving Size: 1 ice cream cup
- Calories: 280320
- Sugar: 22
- Fat: 18
- Carbohydrates: 28
- Protein: 4
Keywords: red velvet, cheesecake, ice cream, Valentine's Day dessert, creamy, frozen dessert, easy dessert, romantic dessert


