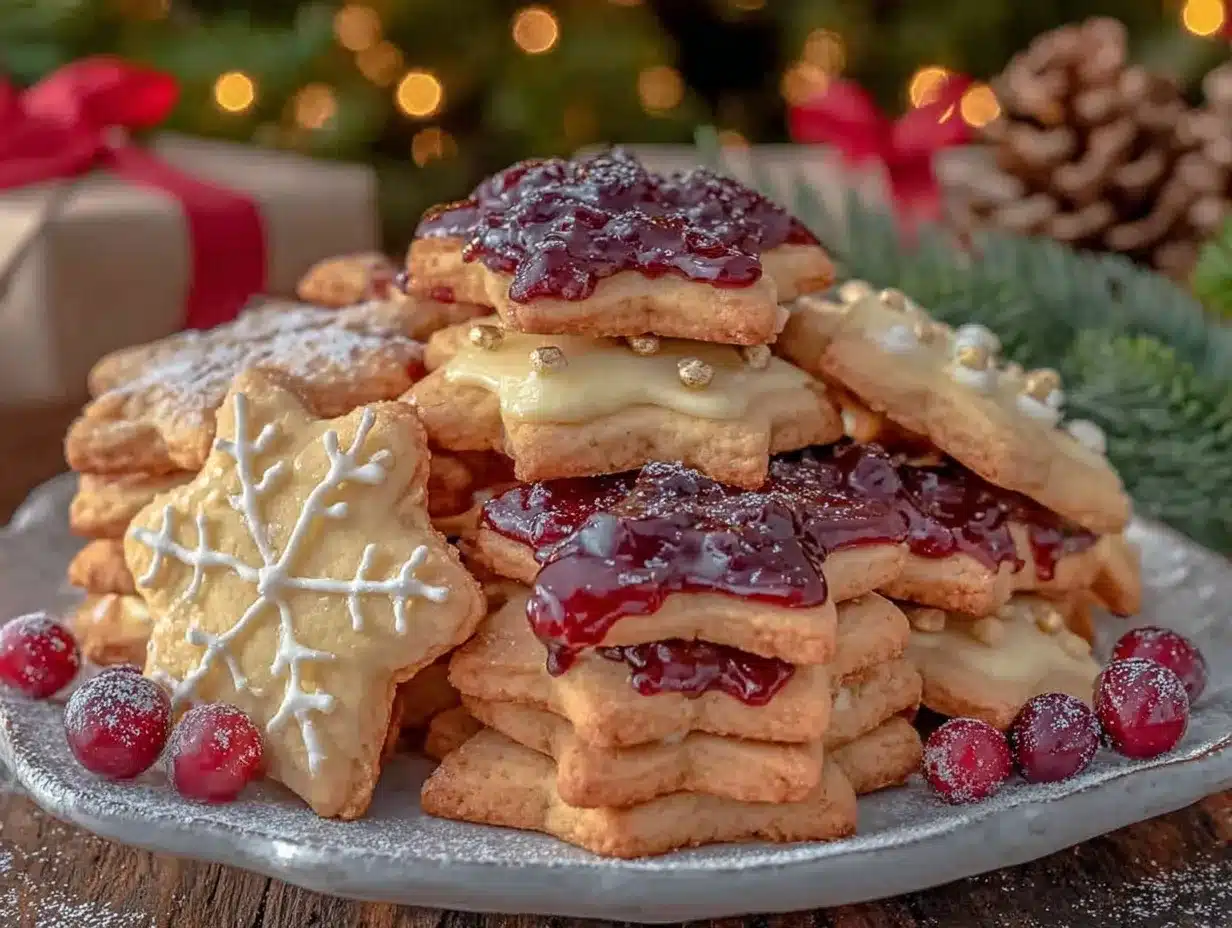
Let me tell you, the aroma of buttery dough and sweet vanilla drifting from my kitchen is honestly one of my favorite smells—especially when it’s Christmas Sugar Cookies baking up for holiday gifts and tea parties. The golden cookies, each sparkling with festive sprinkles or a glossy royal icing, have a way of catching the light on a chilly December afternoon. You know that feeling when you bite into something that’s both crisp and tender, the kind of treat that melts on your tongue and makes you close your eyes for a second? That’s what these cookies do. It’s pure, nostalgic comfort.
The first time I made these Christmas Sugar Cookies, I was knee-high to a grasshopper, helping my grandma roll out dough on her old wooden table. I was instantly hooked. Her kitchen always smelled like vanilla and cinnamon, and there was flour on every surface. I still remember pausing, taking a deep breath, and thinking, “This is the kind of moment you want to hold onto forever.” Honestly, if I’d known how easy it was to whip up a big batch of these, I would’ve started baking them for every holiday sooner. These cookies have seen bake sales, rainy weekends, and more than one late-night craving.
My family can’t stop sneaking them off the cooling rack (and let’s face it, neither can I). Friends have started requesting them for their own gatherings and gift boxes. There’s something about the festive shapes—stars, trees, snowflakes—and the endless decorating options that make them perfect for potlucks, a sweet treat for your kids, or even to brighten up your Pinterest cookie board. These are dangerously easy to make and even easier to love. After testing this recipe more times than I’d like to admit (in the name of research, of course), it’s become a staple for family gatherings and gifting. It just feels like a warm hug in cookie form, and you’re going to want to bookmark this one for sure.
Why You’ll Love This Recipe
If you’re searching for a Christmas Sugar Cookies recipe that’s actually easy AND tastes like the ones you remember from childhood, you’ve landed in the right place. Years of trial, error, and a few burnt batches later, I’ve settled on a method that’s simple enough for beginners but impressive enough for any holiday table. Here’s why these cookies are a must-bake (and why I keep coming back to them every December):
- Quick & Easy: Ready in under 45 minutes, so you can whip up a batch even on busy weeknights or when you get that sudden sweet tooth.
- Simple Ingredients: All you need are pantry staples—flour, sugar, butter, eggs, and vanilla. No need for a special grocery run or fancy extracts.
- Perfect for Every Holiday Occasion: These cookies shine at tea parties, gift exchanges, Christmas brunch, or even tucked into a holiday care package.
- Crowd-Pleaser: Kids love decorating them, adults love eating them, and honestly, they disappear faster than you’d expect.
- Unbelievably Delicious: Crisp edges, soft centers, and that classic melt-in-your-mouth texture thanks to a few simple tricks (like chilling the dough and using real butter).
What sets my Christmas Sugar Cookies apart is a little trick I learned from my mom—using a blend of almond and vanilla extracts for deeper flavor, plus rolling the dough a tad thicker for that perfect bite. These aren’t just another sugar cookie; they’re the ones you’ll remember. Every batch comes out with golden edges, a tender crumb, and just the right amount of sweetness. Whether you’re baking for gifting or for a cozy tea party, these cookies are comfort food with a festive twist.
Closing your eyes after that first bite? Yep, I still do it. They’re great for impressing guests without any stress. And if you want to make a simple meal or gathering feel memorable, just bring out a plate of these beauties. They’re a little piece of holiday magic—healthier than store-bought, faster than you’d think, and guaranteed to make your kitchen the happiest place on earth for an afternoon.
What Ingredients You Will Need
This Christmas Sugar Cookies recipe uses basic, wholesome ingredients to deliver bold flavor and a melt-in-your-mouth texture—without any fuss. Most of these are pantry staples, and you’ll find them easy to substitute if needed. Here’s what you’ll need:
- For the Cookies:
- 2 3/4 cups (345g) all-purpose flour (unbleached is best for texture)
- 1 teaspoon baking powder
- 1/2 teaspoon salt
- 1 cup (227g) unsalted butter, softened (real butter, not margarine, for flavor)
- 1 cup (200g) granulated sugar
- 1 large egg, room temperature
- 2 teaspoons pure vanilla extract (I like Nielsen-Massey for the best vanilla flavor)
- 1/2 teaspoon almond extract (optional, but it adds a festive touch)
- For Decorating:
- Assorted colored sprinkles (red, green, gold—whatever fits your holiday vibe)
- Royal icing (1 cup powdered sugar, 1-2 tablespoons milk, 1/2 teaspoon vanilla extract—adjust consistency as needed)
- Food coloring (gel-based gives vibrant colors without thinning the icing)
- Candy pearls or edible glitter (optional, but so fun for tea parties!)
Ingredient Notes & Substitutions:
- If you need gluten-free cookies, swap the all-purpose flour with a good quality 1:1 gluten-free baking blend (King Arthur’s works well).
- For dairy-free, use vegan butter and plant-based milk in the icing. The cookies will still hold their shape and taste great.
- No almond extract? Just use extra vanilla or try lemon extract for a zesty twist.
- In summer, swap in pastel sprinkles or edible flowers for a seasonal tea party look.
I always recommend using fresh baking powder for the best rise and checking your butter’s temperature—it should be soft but not melty. Honestly, the quality of your vanilla extract does matter here. If you have kiddos helping, give them free rein with the sprinkles. These ingredients are forgiving, so don’t stress if you’re missing one or two; there’s always a way to make it work!
Equipment Needed
You don’t need a fancy kitchen setup for these Christmas Sugar Cookies, which is part of the charm. Here’s what I reach for every time:
- Mixing bowls—at least two (one for dry, one for wet ingredients)
- Hand mixer or stand mixer (a wooden spoon and elbow grease work in a pinch!)
- Measuring cups and spoons (accuracy matters for perfect cookies)
- Rolling pin (if you don’t have one, a clean wine bottle works—trust me, I’ve tried it)
- Cookie cutters—stars, trees, snowflakes, or circles (plastic or metal, whatever you’ve got)
- Baking sheets (I use rimmed ones lined with parchment paper for easy cleanup)
- Wire cooling rack (optional, but helps cookies firm up evenly)
- Spatula or offset spatula (for transferring cookies and spreading icing)
- Small bowls and toothpicks (for mixing and swirling icing colors)
If you’re on a budget, skip the specialty cutters and try making shapes with a glass or freehand with a knife. I’ve baked these using my oldest hand mixer—still works after all these years! For easier cleanup, parchment paper is a lifesaver. And hey, if you invest in a quality rolling pin, just wipe it down and oil it occasionally to keep it in top shape.
Preparation Method
Ready to bake up a batch of Christmas Sugar Cookies? Here’s my step-by-step method for the perfect holiday treat:
- Mix Dry Ingredients: In a medium bowl, whisk together 2 3/4 cups (345g) flour, 1 teaspoon baking powder, and 1/2 teaspoon salt. Set aside. (The flour should look light and fluffy—not compacted.)
- Cream Butter & Sugar: In a large mixing bowl, beat 1 cup (227g) unsalted butter and 1 cup (200g) sugar until light and fluffy—about 2-3 minutes. (It should become pale and airy.)
- Add Eggs & Extracts: Beat in 1 large egg, 2 teaspoons vanilla, and 1/2 teaspoon almond extract. Mix until just combined. (Don’t overmix; it can make cookies tough.)
- Combine Wet & Dry: Gradually add the flour mixture to the wet ingredients, mixing on low until a soft dough forms. If dough feels sticky, add a tablespoon of flour at a time until it’s workable. (It should pull away from the sides of the bowl.)
- Chill the Dough: Turn dough onto a sheet of plastic wrap, flatten into a disk, and refrigerate for at least 30 minutes. (This helps prevent spreading and makes rolling easier.)
- Preheat Oven: Set oven to 350°F (175°C). Line baking sheets with parchment paper.
- Roll & Cut: On a lightly floured surface, roll the dough to about 1/4-inch (6mm) thickness. Cut out shapes using your favorite cookie cutters. (If dough cracks, let it warm up a bit.)
- Arrange & Bake: Place cookies 2 inches (5cm) apart on prepared sheets. Bake for 8-10 minutes, or until edges are just golden. (If your cookies brown too fast, check oven temp with an oven thermometer.)
- Cool: Let cookies cool on the sheet for 2 minutes, then transfer to a wire rack. (They’ll firm up as they cool—don’t move them too soon or they might break.)
- Decorate: Mix royal icing by combining 1 cup powdered sugar, 1-2 tablespoons milk, and 1/2 teaspoon vanilla. Tint with gel food coloring. Spread or pipe onto cooled cookies, then add sprinkles or candy pearls. (If icing is too runny, add more powdered sugar.)
Troubleshooting:
- If cookies spread too much, your dough may be too warm—pop it back in the fridge.
- For extra soft centers, roll dough a bit thicker (closer to 3/8-inch or 1cm).
Efficiency tip: Make the dough a day ahead and store in the fridge. I’ve found that decorating is easiest with a small offset spatula and toothpicks for swirling colors. Don’t rush the chilling step—it’s worth every minute for perfect shapes!
Cooking Tips & Techniques
Baking Christmas Sugar Cookies isn’t tricky, but a few pro tips make all the difference. Here’s what I’ve learned over dozens of batches (and a few cookie fails):
- Chill the Dough: Seriously, don’t skip this! Cold dough keeps cookies from spreading and helps your shapes stay sharp.
- Even Rolling: Use rolling pin guides or two chopsticks on either side of your dough to keep thickness consistent. Uneven cookies can burn or bake unevenly.
- Soft Butter, Not Melted: Butter should be “just softened”—press your finger in and it leaves a gentle dent, but doesn’t turn mushy.
- Don’t Overmix: Once you add flour, mix just until combined. Overmixing develops gluten, which makes cookies tough instead of tender.
- Watch the Bake Time: Check cookies at 8 minutes. They should be set and just barely golden on the edges. Overbaking = crunchy cookies (which isn’t bad, but not the classic texture).
- Multitasking Strategy: While one batch is baking, prep the next tray or mix icing colors. This keeps the flow going and saves time.
- Decorating: If you’re piping icing, use small sandwich bags snipped at the corner if you don’t have piping bags. I learned that trick after running out one Christmas Eve!
Common mistake? Not letting cookies cool before icing—they’ll melt the icing right off. I’ve done it, and it’s not pretty! If you want extra sparkle, add sprinkles before the icing dries. For consistent results, always use room-temperature eggs and measure flour by spooning and leveling (not scooping). There’s no shame in a wonky cookie—just call it “rustic” and enjoy every bite!
Variations & Adaptations
One of the best things about Christmas Sugar Cookies is how easy they are to adapt for different tastes and needs. Here are my favorite ways to mix things up:
- Gluten-Free: Swap the all-purpose flour for a 1:1 gluten-free blend. King Arthur’s or Bob’s Red Mill work well, and the cookies still hold their festive shapes.
- Dairy-Free: Use vegan butter and plant milk in both the dough and icing. I’ve done this for friends with sensitivities, and honestly, you wouldn’t know the difference.
- Flavor Twist: Replace almond extract with lemon or orange zest for a citrusy holiday spin. Try peppermint extract and crushed candy canes for a wintery tea party look.
- Cooking Methods: If you’re short on time, pat dough into a pan and bake as “sugar cookie bars.” Cut into squares, then decorate.
- Allergen Substitutions: For nut-free, just skip the almond extract. For egg-free, try a flaxseed egg (1 tablespoon ground flax + 3 tablespoons water, let sit 5 minutes).
- Personal Variation: Last Christmas, I mixed in 1/4 cup mini chocolate chips and the cookies were a hit at my neighbor’s tea party!
Customize with different shapes, colors, or toppings for each occasion. If you’ve got picky eaters, let them pick their favorite sprinkles or design their own cookie. There’s really no wrong way to decorate or adapt—just have fun with it!
Serving & Storage Suggestions
These Christmas Sugar Cookies are best served at room temperature, arranged on a festive platter or tiered stand for maximum holiday cheer. They’re perfect with a mug of hot cocoa, spiced tea, or even a glass of milk (Santa-approved!). I love pairing them with fresh fruit for tea parties, or alongside other holiday treats like peppermint bark or chocolate truffles.
For gifting, stack cookies in a cellophane bag tied with ribbon, or layer them in a decorative tin with parchment between layers. They keep well at room temperature in an airtight container for up to 1 week. If you want to stretch out the holiday spirit, freeze undecorated cookies for up to 2 months—just thaw and decorate when ready.
To reheat, pop a cookie in the microwave for 5-10 seconds for that fresh-from-the-oven taste (but don’t overdo it, or the icing will melt). Over time, the flavors deepen and the texture stays tender (especially if you store them with a slice of bread in the container—grandma’s trick for soft cookies!).
Nutritional Information & Benefits
Each Christmas Sugar Cookie (about 35g) contains approximately:
- Calories: 110
- Fat: 6g (mostly from real butter, which gives that classic taste)
- Carbs: 14g
- Protein: 1g
- Sugar: 7g
These cookies are naturally nut-free (if you omit the almond extract), and can easily be adapted for gluten-free or dairy-free diets. The real vanilla and optional almond extract contain antioxidants, and using whole ingredients means you control what goes in. If you’re watching sugar intake, you can reduce the sugar by 1/4 cup, though they’ll be a bit less sweet.
As someone who tries to balance treats with overall wellness, I see these cookies as a celebration food—perfect for sharing and enjoying in moderation. Just remember to check for allergens if gifting to others!
Conclusion
So, why do I keep coming back to these Christmas Sugar Cookies for holiday gifts and tea parties? Because they’re easy, delicious, and full of festive spirit. They’re the kind of treat that brings people together, whether you’re decorating with kids or gifting a batch to your neighbors. The recipe is flexible, forgiving, and honestly—just plain fun.
Don’t be afraid to make them your own! Try new shapes, flavors, or decorations. I love this recipe because it always delivers, no matter how hectic the holiday season gets. It’s become a tradition in my house, and I hope it will in yours too.
If you give these cookies a try, leave a comment below with your favorite variation or decorating tip. Share this recipe with friends, pin it to your holiday board, or tag me if you post your creations—there’s nothing better than seeing your festive cookies out in the world. Wishing you a sweet, cozy, and colorful holiday season!
FAQs
Can I make the dough ahead of time?
Absolutely! You can refrigerate the dough for up to 2 days or freeze it for up to 2 months. Just thaw overnight in the fridge before rolling and cutting.
Do I have to chill the dough?
Yes, chilling helps the cookies keep their shape and prevents spreading. Even 30 minutes in the fridge makes a big difference!
What’s the best way to decorate Christmas Sugar Cookies?
Let cookies cool completely, then use royal icing, sprinkles, and candy pearls. I love using gel food colors for vibrant designs. Kids love making patterns with toothpicks!
Can I make these cookies gluten-free?
Yes, use a 1:1 gluten-free flour blend. The texture will be slightly different, but they’ll still taste great and hold up for decorating.
How do I keep the cookies soft?
Store cookies in an airtight container with a slice of bread. The bread helps keep them moist for days. If they get hard, a quick zap in the microwave softens them right up!
Pin This Recipe!
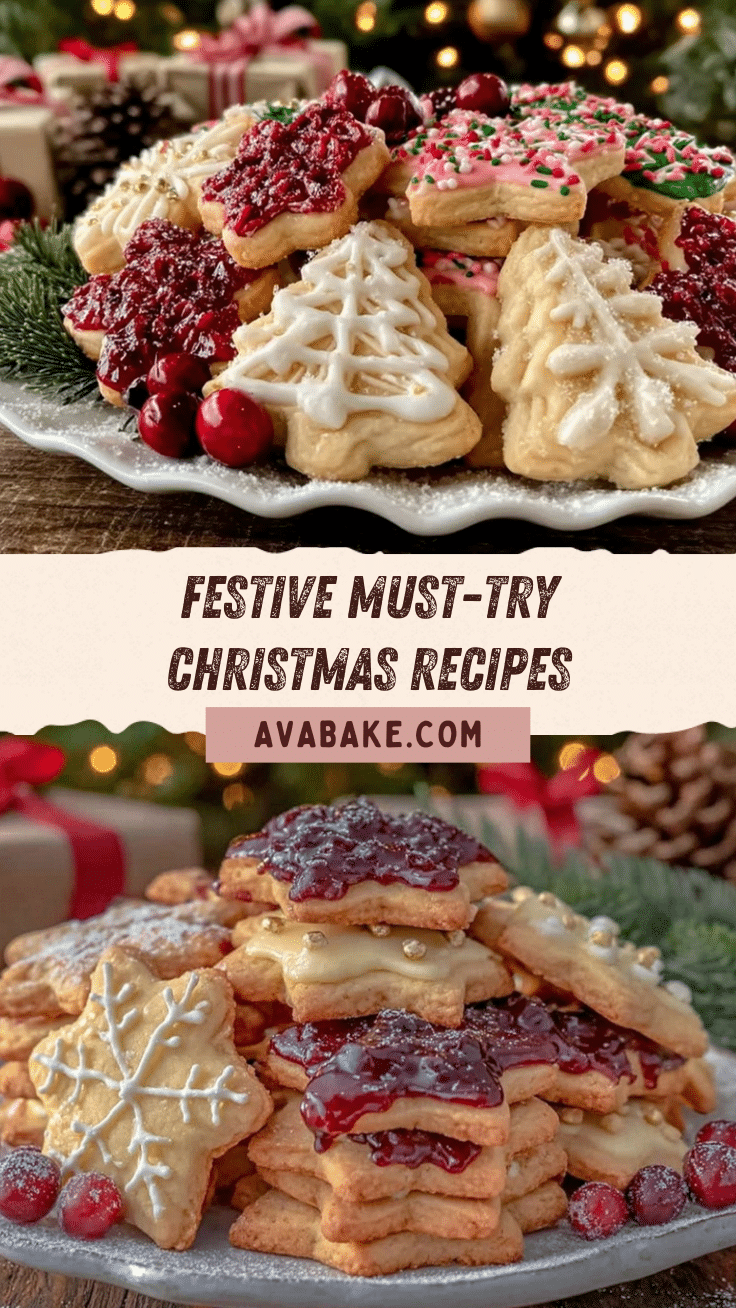
Christmas Sugar Cookies: Easy Recipe for Holiday Gifts & Tea Parties

These classic Christmas Sugar Cookies are crisp on the edges, tender in the center, and perfect for holiday gifts or festive tea parties. Simple pantry ingredients and easy decorating make them a crowd-pleaser for all ages.
- Prep Time: 20 minutes
- Cook Time: 10 minutes
- Total Time: 45 minutes
- Yield: 24-30 cookies 1x
- Category: Dessert
- Cuisine: American
Ingredients
- 2 3/4 cups all-purpose flour (unbleached preferred)
- 1 teaspoon baking powder
- 1/2 teaspoon salt
- 1 cup unsalted butter, softened
- 1 cup granulated sugar
- 1 large egg, room temperature
- 2 teaspoons pure vanilla extract
- 1/2 teaspoon almond extract (optional)
- Assorted colored sprinkles
- Royal icing (1 cup powdered sugar, 1-2 tablespoons milk, 1/2 teaspoon vanilla extract)
- Food coloring (gel-based)
- Candy pearls or edible glitter (optional)
Instructions
- In a medium bowl, whisk together flour, baking powder, and salt. Set aside.
- In a large mixing bowl, beat butter and sugar until light and fluffy, about 2-3 minutes.
- Beat in egg, vanilla extract, and almond extract (if using) until just combined.
- Gradually add the dry ingredients to the wet mixture, mixing on low until a soft dough forms. If dough is sticky, add flour 1 tablespoon at a time.
- Turn dough onto plastic wrap, flatten into a disk, and refrigerate for at least 30 minutes.
- Preheat oven to 350°F (175°C). Line baking sheets with parchment paper.
- On a lightly floured surface, roll dough to 1/4-inch thickness. Cut out shapes with cookie cutters.
- Place cookies 2 inches apart on prepared sheets. Bake for 8-10 minutes, until edges are just golden.
- Cool cookies on the sheet for 2 minutes, then transfer to a wire rack to cool completely.
- Mix royal icing by combining powdered sugar, milk, and vanilla extract. Tint with gel food coloring as desired.
- Decorate cooled cookies with icing, sprinkles, and candy pearls. Let icing set before serving or storing.
Notes
Chill dough for best results and sharp shapes. For gluten-free, use a 1:1 baking blend. Store cookies with a slice of bread to keep them soft. Decorate only after cookies are fully cooled. Dough can be made ahead and refrigerated or frozen.
Nutrition
- Serving Size: 1 cookie (about 35g)
- Calories: 110
- Sugar: 7
- Sodium: 60
- Fat: 6
- Saturated Fat: 4
- Carbohydrates: 14
- Protein: 1
Keywords: Christmas cookies, sugar cookies, holiday baking, tea party, easy cookies, festive dessert, gift cookies, royal icing, decorated cookies


