“I never thought a poke cake could cause such a ruckus at a neighborhood barbecue,” my friend Lisa laughed as she recounted that sunny Fourth of July afternoon. It wasn’t just any dessert on the table; it was the perfect red white and blue poke cake with Jello layers that somehow stole the spotlight. Honestly, I was just trying to whip up a quick patriotic treat and ended up with something way better than I expected.
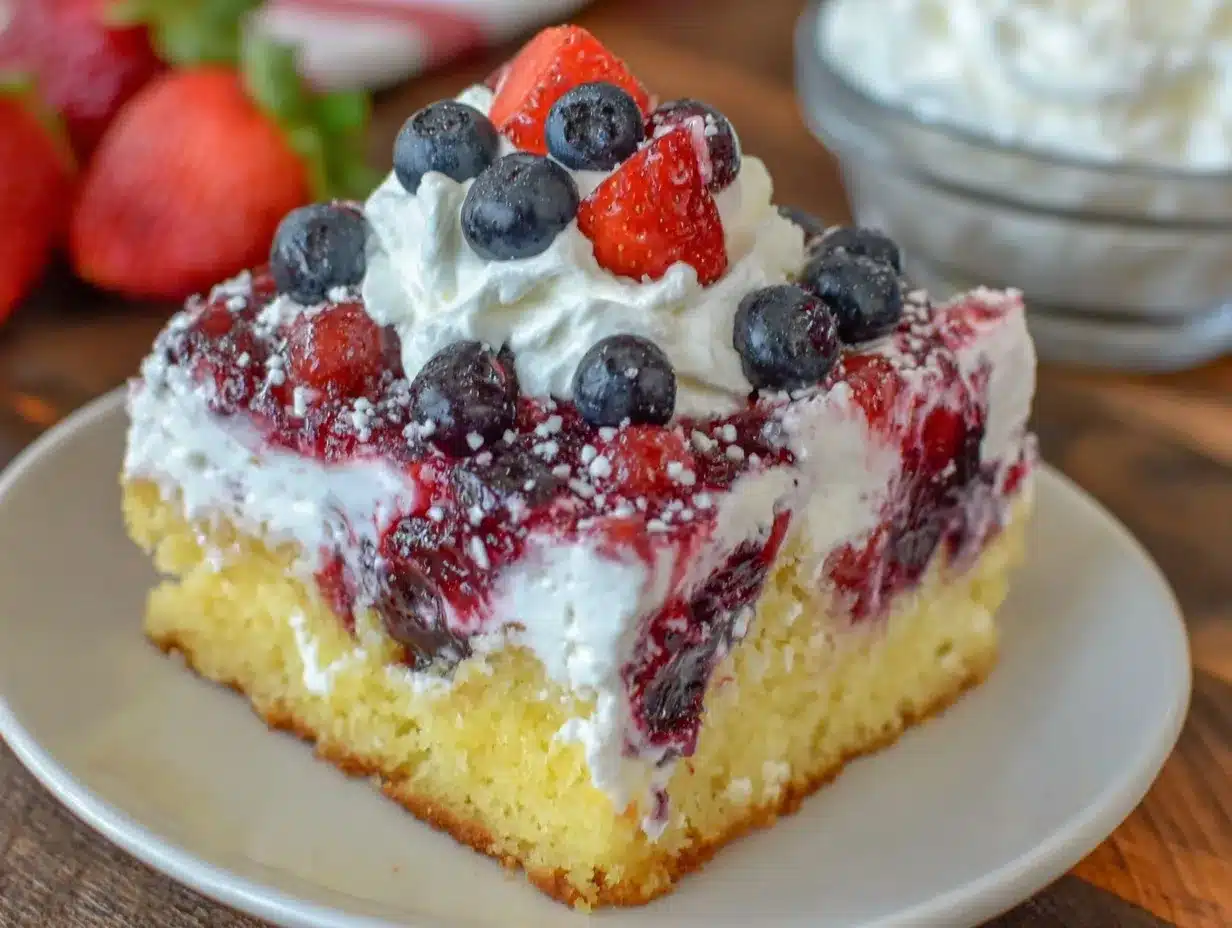
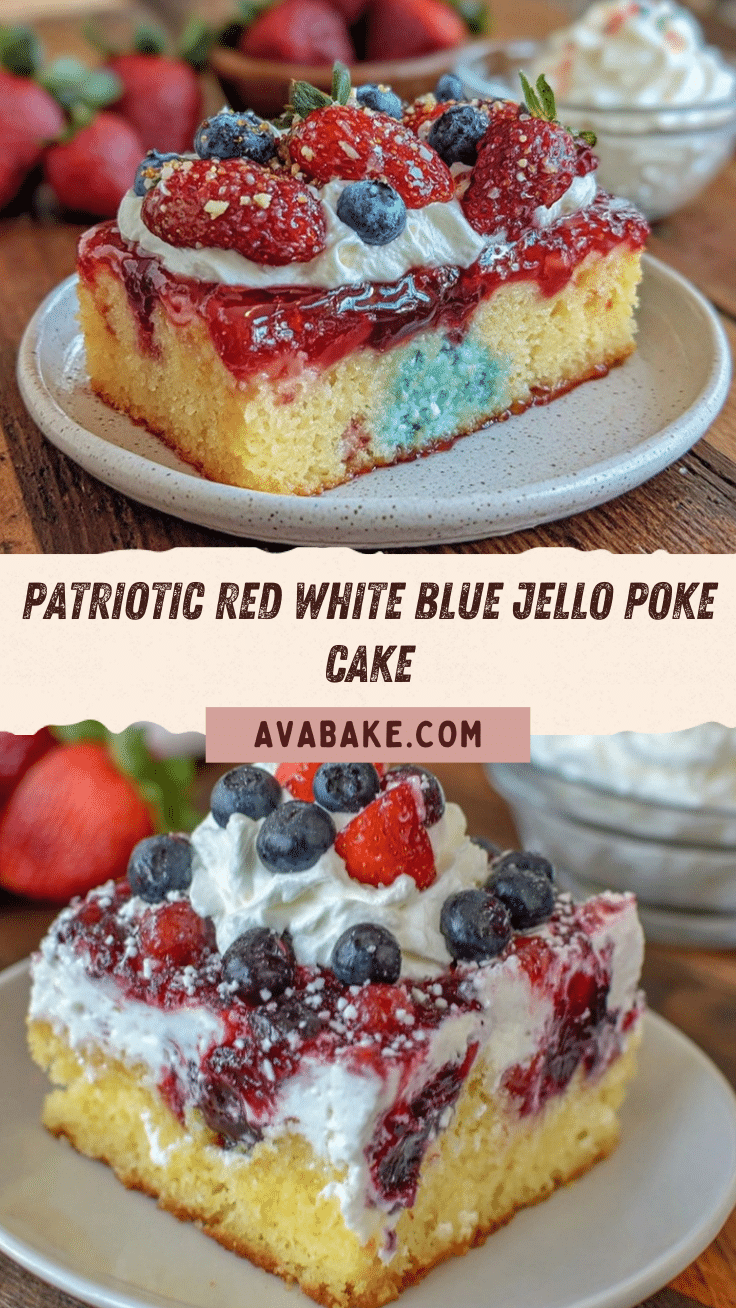
Picture this: a moist vanilla cake dotted with colorful Jello, each bite bursting with sweet, fruity flavor. The way the red and blue Jello seeped into the cake’s nooks gave it a magical, marbled look that made it impossible to resist. And the fluffy clouds of whipped cream on top? Let’s just say they were gone in seconds. You know that feeling when a simple recipe turns into a crowd favorite? That’s exactly what happened here.
Maybe you’ve been there—trying to impress with a dessert that looks complicated but tastes like a dream, only to realize it’s surprisingly easy to make. This recipe stuck with me not just because it tastes great, but because it’s a fun, festive way to celebrate without the fuss. Plus, I had to laugh when I forgot to set the Jello properly the first time (don’t ask), but that little mess just made the second attempt that much sweeter.
This red white and blue poke cake is the kind of recipe you’ll want to pull out every summer, especially when you want a splash of color and flavor that brings smiles all around. Let me tell you, it’s one of those desserts that feels like a party on your plate.
Why You’ll Love This Recipe
After making this perfect red white and blue poke cake with Jello layers a handful of times, I can honestly say it’s become a go-to for celebrations and casual get-togethers alike. From my kitchen trials to backyard cookouts, it’s the dessert that checks all the boxes.
- Quick & Easy: Ready in under an hour, including chilling time, making it perfect for last-minute plans or busy weekends.
- Simple Ingredients: No need to hunt down specialty items—most are pantry staples or easy to find at your local grocery store.
- Perfect for Summer Parties: The vibrant colors and refreshing Jello layers make it a hit at barbecues, picnics, and patriotic holidays.
- Crowd-Pleaser: Kids love the sweetness and fun colors, while adults appreciate the light, fluffy texture and balanced flavors.
- Unbelievably Delicious: The combination of moist cake, fruity Jello, and creamy whipped topping is honestly next-level comfort food.
What makes this recipe stand out? It’s the gentle poke technique that lets the Jello soak into the cake, creating a moist, flavorful interior without making it soggy. Plus, swapping in fresh berries for the Jello layers is a neat twist I tried once that brought a whole new freshness to the dessert. This isn’t just another poke cake—it’s the one I keep coming back to.
Whether you’re aiming to impress guests or want a colorful treat to brighten your day, this cake delivers both ease and wow factor. Trust me, the first bite will have you closing your eyes and savoring the perfect blend of flavors.
What Ingredients You Will Need
This recipe uses simple, wholesome ingredients to deliver bold flavor and a satisfying texture without any fuss. Most are pantry staples, and the Jello layers add that festive pop of color and fruitiness that makes this cake unforgettable.
- For the Cake:
- 1 box white cake mix (about 15.25 ounces) – I like Betty Crocker for a reliable, fluffy result
- Ingredients called for on the cake mix box (usually eggs, oil, and water)
- For the Jello Layers:
- 1 package (3 ounces) red Jello (cherry or strawberry works best)
- 1 package (3 ounces) blue Jello (blueberry or blue raspberry flavor)
- 1 1/4 cups boiling water (divided to prepare both Jello flavors)
- 1 1/4 cups cold water (divided)
- For the Topping:
- 2 cups heavy whipping cream, chilled
- 1/4 cup powdered sugar
- 1 teaspoon pure vanilla extract
- Fresh blueberries and strawberries (optional, for garnish)
Pro tip: Look for firm, small-curd Jello packets—they tend to hold their shape better when poked into the cake. If you want to make this gluten-free, just swap the cake mix for a gluten-free white cake mix, and you’re good to go. For a dairy-free version, coconut whipped cream is a dreamy alternative.
Equipment Needed
- 9×13-inch baking dish (glass or metal works fine; I prefer glass because it heats evenly)
- Medium mixing bowls (for cake batter and Jello preparation)
- Electric mixer or stand mixer (for whipping cream easily)
- Wooden spoon or spatula (to mix cake batter)
- Toothpick or skewer (to poke holes in the cake)
- Measuring cups and spoons
- Whisk (for combining powdered sugar and vanilla into cream)
You can absolutely make this without a stand mixer—just an electric hand mixer or even a good whisk and some muscle will do. And if you don’t have a 9×13-inch pan, a similarly sized oven-safe dish will work, but keep an eye on baking time as it might vary slightly. Also, keep your mixing bowls cool in the fridge before whipping the cream; trust me, it makes a world of difference in getting those soft peaks.
Preparation Method
- Preheat your oven to 350°F (175°C). Grease your 9×13-inch baking dish lightly with butter or non-stick spray to prevent sticking. This sets the stage for a flawless cake.
- Prepare the cake batter. In a medium bowl, combine the white cake mix with the eggs, oil, and water according to the box instructions. Mix gently but thoroughly until smooth, about 2-3 minutes. Avoid overmixing—you want the batter light and airy.
- Pour the batter into your prepared pan. Spread it out evenly using a spatula. Pop it into the oven and bake for 28-32 minutes, or until a toothpick inserted in the center comes out clean. (You’ll know it’s ready when the edges start to pull away slightly from the pan.)
- While the cake bakes, prepare your Jello layers. For each Jello package (red and blue), dissolve it separately in 2/3 cup boiling water. Stir until completely dissolved. Then add 2/3 cup cold water to each and mix well. Set aside to cool slightly—don’t let it set up yet!
- When the cake is done, remove it from the oven and let it cool for about 10 minutes. Then, using a toothpick or skewer, poke holes all over the top of the cake about 1 inch apart. This is the fun part where the magic happens!
- Pour the Jello layers carefully. First, pour the red Jello evenly over half the cake, allowing it to seep into the holes. Then pour the blue Jello over the other half. Use the back of a spoon to gently spread if needed. The Jello will sink into the cake, creating those beautiful, colorful pockets.
- Place the cake in the fridge for at least 2 hours, or until the Jello is fully set. This chilling step is crucial for the cake to firm up and the flavors to meld perfectly.
- Prepare the whipped cream topping. In a chilled bowl, beat the heavy whipping cream with powdered sugar and vanilla extract until soft peaks form. This usually takes about 3-5 minutes with an electric mixer.
- Once the cake is set, spread the whipped cream evenly over the top. If you want, garnish with fresh blueberries and sliced strawberries for an extra patriotic touch and a little fresh bite.
- Serve chilled and enjoy! This cake tastes best cold, so keep it refrigerated until serving. Slice it with a sharp knife to get those gorgeous red, white, and blue layers in every piece.
If you notice the Jello isn’t soaking in enough, try poking deeper holes next time. Also, a quick tip: don’t rush the chilling; the cake needs that time to become perfectly firm and sliceable.
Cooking Tips & Techniques
Getting the perfect red white and blue poke cake is all about timing and technique. Here are some tips I picked up the hard way:
- Don’t overbake the cake. It should be just done—moist and tender. Overbaking makes the cake dry, which means the Jello won’t soak in as nicely.
- Use a toothpick or skewer for poking holes. Make sure the holes are evenly spaced and deep enough (about 1 to 1.5 inches). This helps the Jello seep fully into the cake.
- Let the Jello cool slightly before pouring it over the cake. Too hot and it might melt the cake’s surface; too cool and it won’t spread well.
- Chill the cake fully. The Jello needs time to set inside the cake. Patience here pays off big time.
- Whip the cream in a cold bowl. I learned this trick after a few failed attempts. It whips faster and holds shape better.
- When slicing, use a sharp, serrated knife. It helps you cut clean slices without tearing the whipped cream topping.
- Multitasking tip: Prepare your Jello while the cake bakes and cools to save time.
Honestly, the first time I made this, I forgot to poke enough holes and ended up with a patchy Jello effect. Lesson learned! Now, I poke generously, and the result is always that gorgeous marbled look.
Variations & Adaptations
This cake is a fun canvas for creativity. Here are some variations I’ve tried (and loved):
- Dietary tweaks: Swap the white cake mix for a gluten-free or almond flour-based mix to suit dietary needs without losing flavor.
- Seasonal twist: In summer, replace the Jello with fresh berry purees or gelatin-free fruit layers to keep it light and fresh.
- Flavor swaps: Use lime and orange Jello instead of red and blue for a citrusy punch. I once tried peach and raspberry—delicious and unexpected.
- Cooking method: If you’re short on time, try a microwave cake mix recipe and poke it while warm. Just watch the texture closely.
- Personal favorite: Adding a thin layer of cream cheese frosting under the whipped topping gives a tangy contrast that brightens the whole cake.
If you’re avoiding gelatin, agar-agar works as a vegan substitute, but the texture will be a bit different—still tasty, just less jiggly. Feel free to experiment with different fruit toppings or even add a sprinkle of toasted coconut for a tropical vibe.
Serving & Storage Suggestions
This poke cake tastes best served chilled, straight from the fridge. The coolness keeps the Jello layers firm and the whipped cream fluffy. I like to slice it into generous squares and serve on colorful plates for a festive look.
Pair it with a light, sparkling drink like lemonade or a fruity iced tea to balance the sweetness. For a grown-up twist, a splash of sparkling rosé works wonders.
To store, cover the cake tightly with plastic wrap or keep it in an airtight container in the refrigerator. It stays fresh for up to 3 days. If you need to prep ahead, make it the day before and let the flavors meld overnight.
Reheating? Nope, this cake is best cold. But if you want to soften the whipped cream topping before serving, let it sit at room temperature for 10-15 minutes.
Fun fact: the flavors actually deepen after a day or two, so it’s a great make-ahead dessert for parties. Just be sure to give it a gentle stir if the Jello separates slightly.
Nutritional Information & Benefits
Estimated per serving (based on 12 servings):
| Calories | 320 |
|---|---|
| Fat | 15g |
| Carbohydrates | 42g |
| Protein | 3g |
| Sugar | 28g |
This dessert is a treat, but it also includes some nutritional benefits from the fresh berries (if you add them) and the protein in the heavy cream. The Jello adds fruit flavor with relatively low calories compared to dense frostings.
For gluten-free diets, swapping the cake mix makes it accessible, and the recipe can be adjusted for dairy-free by using coconut-based alternatives. The key allergens here are eggs, dairy, and gluten (depending on your cake mix), so keep that in mind if cooking for sensitive guests.
From a wellness perspective, I love that this cake feels indulgent without being overly heavy or greasy—perfect for those summer days when you want something sweet but not overwhelming.
Conclusion
This perfect red white and blue poke cake with Jello layers is honestly one of those recipes that brings joy and a touch of celebration to any table. It’s colorful, fun, and surprisingly easy to make—ideal for when you want your dessert to look as good as it tastes without a lot of fuss.
Feel free to tweak the flavors and toppings to suit your style, whether you prefer a tangy twist or extra fruitiness. I keep coming back to this recipe because it’s reliable, festive, and just downright delicious.
Give it a try, and I’d love to hear how it turns out! Drop a comment below with your favorite variations or any fun twists you’ve discovered. Sharing is caring, after all!
Here’s to sweet moments and even sweeter bites—happy baking!
FAQs
Can I use other Jello flavors for this poke cake?
Absolutely! While red, white, and blue are perfect for patriotic occasions, you can use any flavors you like. Just be sure they complement each other and suit your color theme.
How long should I chill the cake after adding the Jello?
At least 2 hours in the fridge is ideal to let the Jello set fully inside the cake. Overnight chilling will make it even better.
Can I make this poke cake ahead of time?
Yes! It’s perfect for making a day ahead. Just keep it covered in the refrigerator until serving.
What can I use instead of heavy whipping cream for the topping?
You can use whipped coconut cream or store-bought non-dairy whipped topping for a dairy-free option.
Is it necessary to poke holes all over the cake?
Yes, poking holes allows the Jello to seep into the cake, giving it that signature moist, colorful effect. Make sure holes are evenly spaced and deep enough for the best result.
Pin This Recipe!
Perfect Red White and Blue Poke Cake Recipe with Easy Jello Layers

A moist vanilla poke cake with red and blue Jello layers that create a colorful, festive dessert topped with whipped cream. Perfect for summer parties and patriotic celebrations.
- Prep Time: 15 minutes
- Cook Time: 30 minutes
- Total Time: 2 hours 45 minutes
- Yield: 12 servings 1x
- Category: Dessert
- Cuisine: American
Ingredients
- 1 box white cake mix (about 15.25 ounces)
- Ingredients called for on the cake mix box (usually eggs, oil, and water)
- 1 package (3 ounces) red Jello (cherry or strawberry)
- 1 package (3 ounces) blue Jello (blueberry or blue raspberry)
- 1 1/4 cups boiling water (divided)
- 1 1/4 cups cold water (divided)
- 2 cups heavy whipping cream, chilled
- 1/4 cup powdered sugar
- 1 teaspoon pure vanilla extract
- Fresh blueberries and strawberries (optional, for garnish)
Instructions
- Preheat your oven to 350°F (175°C). Grease a 9×13-inch baking dish lightly with butter or non-stick spray.
- Prepare the cake batter by combining the white cake mix with eggs, oil, and water according to the box instructions. Mix gently until smooth, about 2-3 minutes.
- Pour the batter into the prepared pan and bake for 28-32 minutes, or until a toothpick inserted in the center comes out clean.
- While the cake bakes, dissolve each Jello package separately in 2/3 cup boiling water. Stir until dissolved, then add 2/3 cup cold water to each and mix well. Let cool slightly.
- Remove the cake from the oven and let it cool for about 10 minutes. Using a toothpick or skewer, poke holes about 1 inch apart all over the cake.
- Pour the red Jello evenly over half the cake, allowing it to seep into the holes. Then pour the blue Jello over the other half. Spread gently if needed.
- Refrigerate the cake for at least 2 hours or until the Jello is fully set.
- In a chilled bowl, beat the heavy whipping cream with powdered sugar and vanilla extract until soft peaks form, about 3-5 minutes.
- Spread the whipped cream evenly over the top of the set cake. Garnish with fresh blueberries and sliced strawberries if desired.
- Serve chilled and enjoy.
Notes
Use firm, small-curd Jello packets for best shape retention. Chill mixing bowls before whipping cream for better peaks. Use a sharp serrated knife to slice cleanly. For gluten-free, use gluten-free cake mix; for dairy-free, substitute coconut whipped cream. Do not overbake the cake to keep it moist for Jello absorption.
Nutrition
- Serving Size: 1 slice (1/12 of cak
- Calories: 320
- Sugar: 28
- Fat: 15
- Carbohydrates: 42
- Protein: 3
Keywords: poke cake, red white and blue cake, Jello poke cake, patriotic dessert, Fourth of July dessert, easy summer cake, vanilla cake with Jello, whipped cream topping


