“You know that moment when you’re craving something sweet but the last thing you want is to turn on the oven? That’s exactly how these creamy no bake cookie butter cheesecake bars came to be my go-to treat. It was a sleepy Wednesday evening, and honestly, I was too tired to bake anything complicated. I rummaged through my pantry and found a jar of cookie butter—something I hadn’t thought much about before—and thought, ‘Why not?’ The next thing I knew, I was mixing up a cheesecake that didn’t require heat or fuss, just a bit of patience in the fridge.
It wasn’t all smooth sailing though. I accidentally grabbed the wrong pan, the one a bit too small, and ended up with bars that were thicker than planned. But honestly, those thicker bars? They turned out to be the best part. The texture was decadently creamy, and the cookie butter flavor was so rich it reminded me of those cozy afternoons spent chatting with my neighbor who swears by this spread for everything. Maybe you’ve been there—stuck on a dessert that’s fuss-free but still feels special.
So, these cheesecake bars stuck around in my recipe box, not just because they’re simple, but because they hit that perfect spot between indulgent and easy. Plus, I love that they don’t require an oven, which means they’re perfect for those hot summer days or last-minute dessert emergencies. Let me tell you, once you try these creamy no bake cookie butter cheesecake bars, they might just become your favorite too.
Why You’ll Love This Recipe
Honestly, this recipe has won me over for so many reasons. It’s one of those desserts that feels fancy but is actually incredibly straightforward. Here’s why this creamy no bake cookie butter cheesecake bars recipe is a keeper:
- Quick & Easy: Ready in under 30 minutes, making it perfect for busy weeknights or surprising guests.
- Simple Ingredients: No need for specialty shops; you likely have cookie butter and cream cheese hiding in your fridge already.
- Perfect for Dessert: Ideal for potlucks, casual dinners, or just treating yourself without a ton of cleanup.
- Crowd-Pleaser: Kids and adults alike rave about the creamy texture and rich flavor combo.
- Unbelievably Delicious: The balance of cookie butter’s spice notes with smooth cheesecake is next-level comfort food.
What makes this recipe stand out? Well, blending the cookie butter into the cheesecake base—not just swirling it—creates an ultra-smooth, velvety texture that’s utterly addictive. Plus, no baking means no risk of cracking or drying out, which I’ve battled with in other cheesecake recipes. It’s effortless but still feels indulgent, the kind of dessert that makes you close your eyes with the first bite. Perfect for impressing guests without breaking a sweat, or simply transforming a simple snack into a memorable experience.
What Ingredients You Will Need
This recipe calls for straightforward, wholesome ingredients that work together to deliver a bold flavor and luscious texture without any fuss. Most are pantry staples or easy to find, and substitutions are simple if needed.
- For the Crust:
- 1 ½ cups graham cracker crumbs (about 12 full sheets) – I prefer Honey Maid for consistent texture
- 6 tablespoons unsalted butter, melted (adds richness and helps bind)
- 2 tablespoons granulated sugar (balances the buttery crust)
- For the Cheesecake Filling:
- 16 ounces (450g) cream cheese, softened (use full-fat for best creaminess)
- 1 cup cookie butter (like Biscoff) – look for smooth texture
- ¾ cup powdered sugar (helps sweetness blend seamlessly)
- 1 teaspoon pure vanilla extract (adds depth to flavor)
- 1 cup heavy whipping cream, cold (whipped to soft peaks for fluffy texture)
If you want to customize, you can swap the graham crackers for gluten-free cookies or use dairy-free cream cheese and coconut cream for a vegan twist. Seasonal tip: In colder months, a pinch of cinnamon in the crust amps up the warm spice vibe. I once tried almond butter instead of cookie butter—delicious but less iconic, so I keep coming back to the classic.
Equipment Needed
- 8×8 inch (20×20 cm) square baking pan – I’ve used glass and metal pans; glass helps monitor crust browning when chilled.
- Mixing bowls – at least two, one for crust and one for filling.
- Electric mixer or stand mixer – really helps whip cream cheese smooth and get fluffy whipped cream.
- Measuring cups and spoons – for accuracy, especially with sugar and butter.
- Rubber spatula – perfect for folding whipped cream gently without deflating.
- Plastic wrap or parchment paper – to cover and chill the bars.
If you don’t have an electric mixer, a sturdy whisk and some patience can work, but it’ll take longer to get that perfect creamy texture. Budget-friendly tip: some handheld battery mixers are surprisingly powerful and affordable, and they save so much time.
Preparation Method
- Prepare the Crust (10 minutes): In a medium bowl, combine 1 ½ cups graham cracker crumbs, 6 tablespoons melted butter, and 2 tablespoons sugar. Stir until the mixture resembles wet sand. Press firmly into the bottom of your 8×8 pan, ensuring it’s evenly spread and compacted to form a solid base. Chill in the fridge while you prepare the filling.
- Make the Cheesecake Filling (15 minutes): Using an electric mixer, beat 16 ounces softened cream cheese on medium speed until smooth and creamy, about 2-3 minutes. Add 1 cup cookie butter, ¾ cup powdered sugar, and 1 teaspoon vanilla extract. Continue mixing until fully combined and silky.
- Whip the Cream (5 minutes): In a separate cold bowl, whip 1 cup heavy cream on high speed until soft peaks form—when you lift the whisk, the cream should hold its shape but curl over slightly.
- Fold in Whipped Cream (3 minutes): Gently fold the whipped cream into the cream cheese mixture with a spatula. Use a light hand to keep it airy—overmixing will deflate the fluffiness.
- Assemble and Chill (at least 4 hours): Pour the filling over the chilled crust and spread evenly. Cover the pan tightly with plastic wrap and refrigerate for at least 4 hours, preferably overnight, to allow the bars to set firmly.
- Cut and Serve: Once set, carefully lift the cheesecake from the pan using parchment paper edges or invert onto a cutting board. Cut into 9 or 12 bars with a sharp knife warmed under hot water for clean edges.
Quick tip: If your cookie butter is too stiff, microwave it for 10-15 seconds to soften before mixing—it blends so much easier that way. Also, don’t rush the chilling process; patience here means creamy bars that hold their shape without crumbling.
Cooking Tips & Techniques
Making no bake cheesecake bars sounds simple, but a few tricks really make a difference. First, always start with softened cream cheese—not too cold, or lumps will ruin your smooth filling. Let it sit at room temperature for about 30 minutes before mixing.
When whipping cream, cold ingredients and bowl are key. I often pop my metal bowl and beaters in the freezer for 10-15 minutes beforehand. This little trick helps the cream whip up faster and hold its shape better.
Folding whipped cream into the cream cheese mixture requires a delicate touch. Use a spatula with a gentle motion, folding from the bottom up—this keeps the filling light and fluffy. I’ve learned the hard way that overmixing leads to dense, less enjoyable texture.
Another tip: press the crust firmly and evenly into the pan. I use the bottom of a glass or measuring cup to really compact it. A loose crust can crumble when cutting, which is frustrating. And if you want cleaner slices, chill the bars overnight and warm your knife under hot water before cutting.
Lastly, don’t skip chilling time. I get tempted to dig in early, but the cheesecake needs at least 4 hours to set properly. If you’re short on time, a few hours in the freezer can help firm it up faster—just don’t forget it in there too long or it might freeze solid.
Variations & Adaptations
One of the best things about this creamy no bake cookie butter cheesecake bars recipe is how easy it is to adapt:
- Nut-Free Version: Swap graham cracker crumbs for crushed oat cookies or nut-free digestive biscuits to keep it allergy-friendly.
- Seasonal Twist: Add a swirl of pumpkin puree and a dash of pumpkin spice to the filling for a fall-inspired treat.
- Chocolate Lover’s Delight: Mix in ½ cup mini chocolate chips or spread a thin layer of melted dark chocolate over the crust before adding the filling.
- Vegan Adaptation: Use vegan cream cheese, coconut cream instead of heavy cream, and vegan cookie butter. It’s surprisingly close to the original.
Personally, I once tried adding a teaspoon of espresso powder to the filling for a subtle coffee kick. It was unexpected but paired beautifully with the cookie butter’s caramel notes. Feel free to experiment with your favorite flavors or swap ingredients based on what you have on hand!
Serving & Storage Suggestions
These cheesecake bars are best served chilled, straight from the fridge. The creamy texture and rich flavor really shine when cool. For presentation, dust a little cinnamon or cocoa powder on top, or add a few cookie crumbs for a rustic touch.
Pair them with a hot cup of coffee or a cold glass of milk for a classic combo. They also make a fantastic dessert after a light meal or a sweet snack during afternoon tea.
Store leftovers tightly covered in the refrigerator for up to 5 days. If you want to keep them longer, wrap individual bars in plastic wrap and freeze for up to 2 months. To reheat, let frozen bars thaw in the fridge overnight—this helps maintain their creamy texture without becoming watery.
Over time, the flavors tend to meld and deepen, so sometimes I find the bars taste even better the next day. Just a little heads-up: if you plan to freeze, avoid adding fresh toppings beforehand, as moisture can affect texture.
Nutritional Information & Benefits
Each creamy no bake cookie butter cheesecake bar (assuming 12 servings) contains roughly:
| Nutrient | Amount per Serving |
|---|---|
| Calories | 320 |
| Fat | 22g |
| Carbohydrates | 25g |
| Protein | 4g |
| Sugar | 18g |
The cookie butter adds some spice and caramel notes, but it’s also a source of added sugar and fat, so moderation is key. Cream cheese provides protein and calcium, while the whipped cream adds richness but little nutrition. This recipe isn’t low-calorie, but it’s a satisfying treat that can fit into a balanced diet.
It’s gluten-free if you use gluten-free graham crackers or substitutes, making it suitable for those with gluten sensitivity. For dairy-free adaptations, vegan cream cheese and coconut cream options make this dessert accessible for more diets.
From my wellness perspective, I enjoy this recipe as an occasional indulgence that doesn’t require hours in the kitchen—perfect for when I want a little luxury without stress.
Conclusion
This creamy no bake cookie butter cheesecake bars recipe proves that you can have a dessert that’s both indulgent and effortless. It’s simple enough for beginners but rich enough to impress your friends or satisfy your sweet tooth after a long day. The combination of cookie butter and creamy cheesecake is truly something special—and the no bake aspect means less mess and more time to relax.
I encourage you to make it your own, whether by adding your favorite mix-ins or adjusting the sweetness. Honestly, I keep coming back to this recipe because it’s reliable, delicious, and just the right amount of fuss-free. If you give it a try, please drop a comment or share your tweaks—I’d love to hear how you make these bars your own.
Happy no baking, and may your dessert moments be creamy and joyful!
FAQs
Can I make these cheesecake bars ahead of time?
Yes! They actually taste better after chilling overnight. Just cover and refrigerate, then cut and serve when ready.
Is cookie butter necessary, or can I substitute something else?
Cookie butter gives a unique flavor, but you can substitute with peanut butter or almond butter for a different twist.
How do I prevent the crust from getting soggy?
Press the crust firmly and chill it before adding filling. You can also spread a thin layer of melted chocolate over the crust to create a barrier.
Can I freeze the cheesecake bars?
Absolutely. Wrap individual bars tightly and freeze for up to 2 months. Thaw in the fridge overnight before serving.
What if I don’t have an electric mixer?
You can whisk by hand, but it will take more effort to get the cream cheese smooth and the cream whipped. A handheld mixer is a great affordable option if you plan to make this often.
Pin This Recipe!
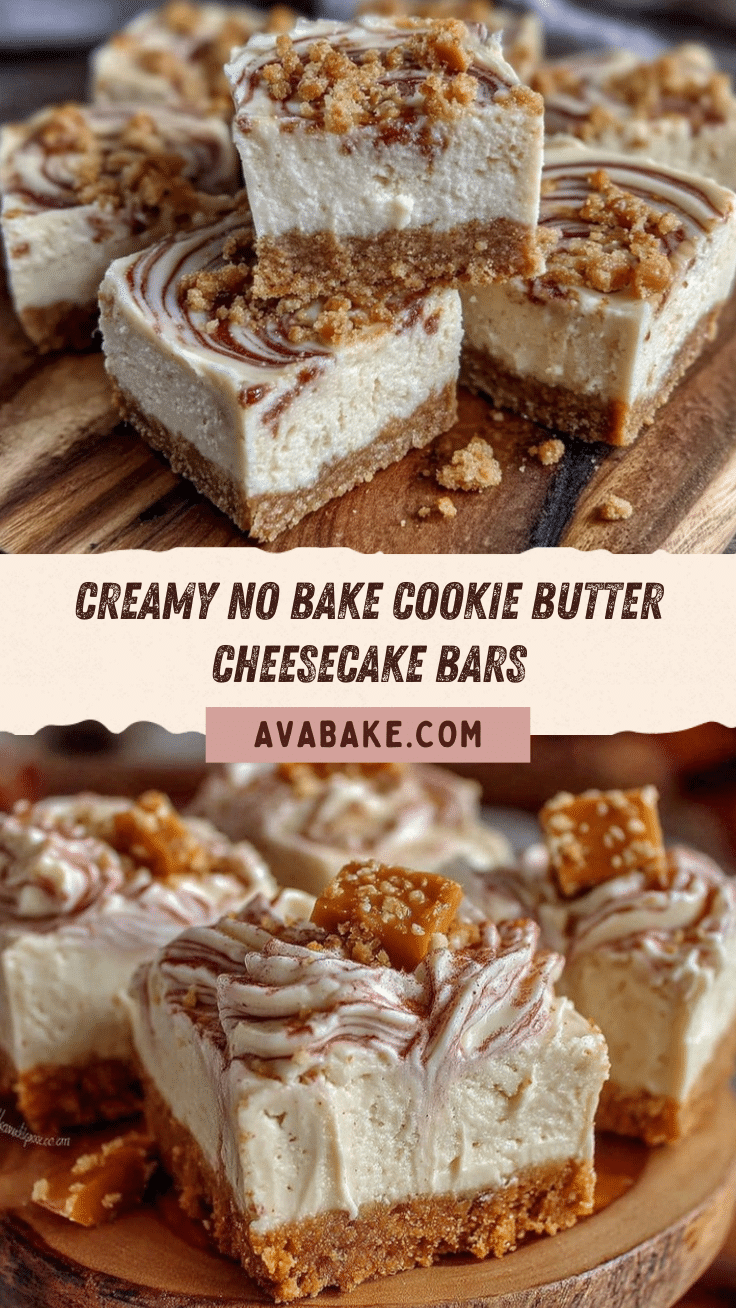
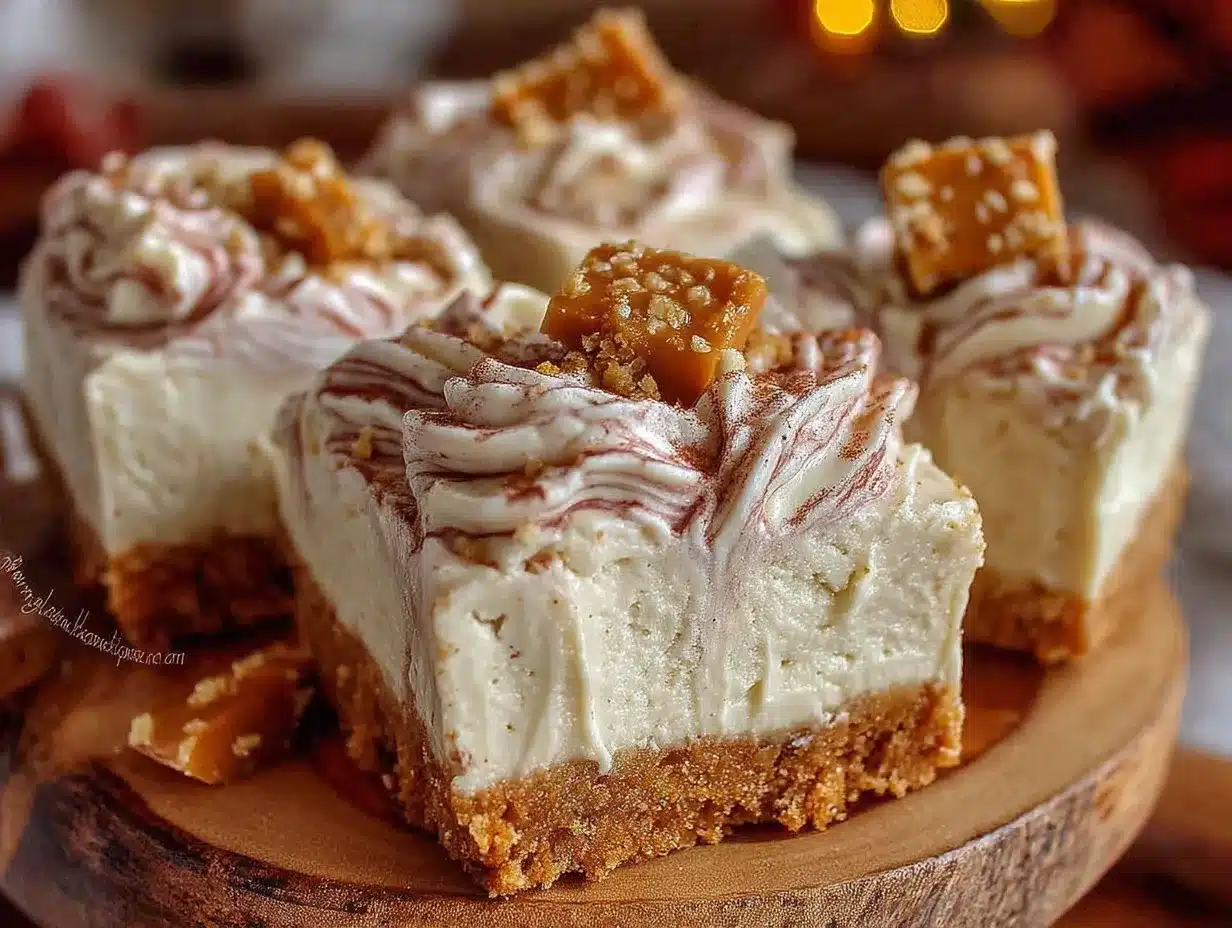
Creamy No Bake Cookie Butter Cheesecake Bars
A quick and easy no bake dessert featuring a creamy cheesecake filling blended with cookie butter on a buttery graham cracker crust. Perfect for hot days or last-minute treats.
- Prep Time: 15 minutes
- Cook Time: 0 minutes
- Total Time: 4 hours 15 minutes
- Yield: 9 to 12 bars 1x
- Category: Dessert
- Cuisine: American
Ingredients
- 1 ½ cups graham cracker crumbs (about 12 full sheets)
- 6 tablespoons unsalted butter, melted
- 2 tablespoons granulated sugar
- 16 ounces (450g) cream cheese, softened
- 1 cup cookie butter (like Biscoff)
- ¾ cup powdered sugar
- 1 teaspoon pure vanilla extract
- 1 cup heavy whipping cream, cold
Instructions
- Prepare the Crust (10 minutes): In a medium bowl, combine 1 ½ cups graham cracker crumbs, 6 tablespoons melted butter, and 2 tablespoons sugar. Stir until the mixture resembles wet sand. Press firmly into the bottom of your 8×8 inch pan, ensuring it’s evenly spread and compacted to form a solid base. Chill in the fridge while you prepare the filling.
- Make the Cheesecake Filling (15 minutes): Using an electric mixer, beat 16 ounces softened cream cheese on medium speed until smooth and creamy, about 2-3 minutes. Add 1 cup cookie butter, ¾ cup powdered sugar, and 1 teaspoon vanilla extract. Continue mixing until fully combined and silky.
- Whip the Cream (5 minutes): In a separate cold bowl, whip 1 cup heavy cream on high speed until soft peaks form—when you lift the whisk, the cream should hold its shape but curl over slightly.
- Fold in Whipped Cream (3 minutes): Gently fold the whipped cream into the cream cheese mixture with a spatula. Use a light hand to keep it airy—overmixing will deflate the fluffiness.
- Assemble and Chill (at least 4 hours): Pour the filling over the chilled crust and spread evenly. Cover the pan tightly with plastic wrap and refrigerate for at least 4 hours, preferably overnight, to allow the bars to set firmly.
- Cut and Serve: Once set, carefully lift the cheesecake from the pan using parchment paper edges or invert onto a cutting board. Cut into 9 or 12 bars with a sharp knife warmed under hot water for clean edges.
Notes
Use softened cream cheese for smooth filling. Chill bowls and beaters before whipping cream for better results. Press crust firmly to avoid crumbling. Warm knife under hot water before cutting for clean slices. If cookie butter is stiff, microwave 10-15 seconds to soften. Chill at least 4 hours or overnight for best texture. Can freeze bars wrapped individually for up to 2 months.
Nutrition
- Serving Size: 1 bar (if cut into 1
- Calories: 320
- Sugar: 18
- Fat: 22
- Carbohydrates: 25
- Protein: 4
Keywords: no bake, cookie butter, cheesecake bars, easy dessert, no oven dessert, creamy cheesecake, quick dessert


