Let me tell you, the smell of fresh mint mingling with buttery cookies as they bake is enough to make anyone’s mouth water. The first time I whipped up these Delicious St. Patrick’s Green Mint Cookie Dipped Bars, I was instantly hooked. It was one of those rare moments when you pause, take a deep breath, and just smile because you know you’re onto something truly special. Years ago, when I was knee-high to a grasshopper, my grandma used to make minty treats around St. Patrick’s Day that felt like pure, nostalgic comfort. This recipe brings all those warm memories back, but with a fun, modern twist that’s dangerously easy to make.
Honestly, my family couldn’t stop sneaking them off the cooling rack (and I can’t really blame them). These bars have become a staple for our holiday gatherings and even for sweet, unexpected gifts. You know what’s great? They brighten up any Pinterest cookie board with their perfect green hue and festive vibe. Whether you’re making them for a potluck, a cozy night in, or just to treat your kids, these St. Patrick’s Green Mint Cookie Dipped Bars deliver on flavor and fun. After testing this recipe a handful of times—in the name of research, of course—I can confidently say you’re going to want to bookmark this one.
Why You’ll Love This Recipe
This recipe is not just another cookie bar; it’s a minty, green-hued celebration of flavor and texture that’s easy to make and even easier to love. Here’s why it stands out:
- Quick & Easy: Comes together in under 45 minutes, perfect for last-minute St. Patrick’s Day plans or sweet cravings.
- Simple Ingredients: No fancy or hard-to-find items—just pantry staples and a touch of festive green.
- Perfect for Celebrations: Great for holiday parties, classroom treats, or a fun family baking day.
- Crowd-Pleaser: Kids and adults alike rave about the minty flavor and the crunchy-dipped finish.
- Unbelievably Delicious: The combo of soft cookie bars and the chocolate-mint dip creates a texture and flavor combo that feels indulgent yet fresh.
What really makes this recipe pop is the simple trick of infusing mint extract directly into the dough and pairing it with a rich chocolate dip that’s been colored for St. Patrick’s flair. I’ve tweaked this recipe multiple times to balance sweetness and mint intensity just right—it’s not overpowering, just the kind of treat that makes you close your eyes after the first bite. This isn’t just comfort food; it’s comfort food reimagined with a festive twist that’s as fun to make as it is to eat.
What Ingredients You Will Need
This recipe uses simple, wholesome ingredients to deliver bold mint flavor and satisfying texture without the fuss. Most are pantry staples, and a few festive touches bring the magic.
- All-purpose flour (2 ½ cups / 315g) – the base for tender, chewy bars
- Baking powder (1 tsp) – helps the bars rise just enough
- Salt (½ tsp) – balances the sweetness
- Unsalted butter, softened (1 cup / 227g) – adds richness and moisture (I prefer Kerrygold for that creamy texture)
- Granulated sugar (1 cup / 200g) – classic sweetness
- Brown sugar, packed (½ cup / 110g) – adds chewiness and depth
- Large eggs (2), room temperature – binds everything together
- Pure peppermint extract (1 ½ tsp) – the star mint flavor (don’t swap with oil; it’s too strong)
- Green food coloring (a few drops) – for that iconic St. Patrick’s green (optional, but fun!)
- Dark or semi-sweet chocolate chips (1 ½ cups / 270g) – for the dipping coating
- Vegetable shortening (2 tbsp) – to smooth out the chocolate dip and give it shine (Crisco works great)
For substitutions, you can use coconut oil instead of butter for a dairy-free version, or swap all-purpose flour for a gluten-free blend if needed, but expect a slight texture change. If fresh mint is available, you could infuse it into the butter first for an extra herbal note, though pure peppermint extract keeps the flavor consistent and bright year-round.
Equipment Needed
- 9×13 inch baking pan: The perfect size for these bars; if you don’t have one, a slightly smaller pan works but the bars will be thicker.
- Mixing bowls: One large for dry ingredients, one for wet.
- Electric mixer: Either hand or stand mixer makes creaming butter and sugar easier (but you can do it by hand with some muscle).
- Rubber spatula and wooden spoon: For folding and mixing the dough gently.
- Double boiler or microwave-safe bowl: To melt chocolate and shortening for the dip smoothly.
- Wire rack: For cooling bars after baking and dipping.
For those on a budget, mixing by hand with a sturdy spoon works fine, and melting chocolate in short bursts in the microwave is totally doable (just watch closely!). I’ve tried this recipe with fancy silicone spatulas and plain wooden spoons—the key is just gentle folding to keep the dough tender.
Preparation Method
- Preheat your oven to 350°F (175°C). Grease your 9×13 inch pan or line it with parchment paper for easy removal. This step takes about 10 minutes.
- Combine dry ingredients: In a large bowl, whisk together 2 ½ cups (315g) all-purpose flour, 1 teaspoon baking powder, and ½ teaspoon salt. Set aside.
- Cream butter and sugars: Using a mixer, beat 1 cup (227g) softened unsalted butter with 1 cup (200g) granulated sugar and ½ cup (110g) packed brown sugar until light and fluffy—about 3-4 minutes. You’ll know it’s ready when the mixture is pale and smooth.
- Add eggs and mint: Beat in 2 large eggs one at a time, then stir in 1 ½ teaspoons pure peppermint extract and a few drops of green food coloring until the color is even. The dough should be vibrantly green but not too artificial-looking.
- Incorporate dry ingredients: Gradually mix the flour mixture into the wet ingredients on low speed or by hand using a spatula. Be careful not to overmix; stop when just combined for tender bars.
- Press dough into pan: Spread the dough evenly into your prepared pan using your hands or a spatula. It’ll be thick and sticky—don’t worry, that’s perfect. Smooth the top gently.
- Bake: Place in the oven and bake for 25-30 minutes, or until the edges are golden and a toothpick inserted in the center comes out with a few moist crumbs. Avoid overbaking to keep those bars soft.
- Cool completely: Let the bars cool in the pan on a wire rack for at least 30 minutes. This makes them easier to dip and cut cleanly without crumbling.
- Prepare chocolate dip: Melt 1 ½ cups (270g) chocolate chips with 2 tablespoons vegetable shortening in a double boiler or microwave-safe bowl. Stir until smooth and glossy.
- Dip bars: Cut the cooled bars into rectangles (about 2×3 inches). Dip half of each bar into the melted chocolate, letting excess drip off. Place bars back on parchment-lined rack to set. Chill briefly in the fridge if you want the chocolate to firm up faster.
Some quick tips: If your dough feels too sticky to press, pop it in the fridge for 10 minutes. When melting chocolate, low and slow is your friend—burnt chocolate tastes bitter! And trust me, letting the bars cool fully before dipping saves a lot of sticky mess.
Cooking Tips & Techniques
One secret to these bars’ success is creaming the butter and sugars thoroughly—that air incorporation is what gives the bars a light, tender crumb. Don’t rush this step; it’s worth the extra time. Also, be precise with your peppermint extract. Too much and it can overpower, too little and the mint flavor falls flat. I usually start with 1 ½ teaspoons and adjust up a bit next time if I want it bolder.
Overbaking is the biggest pitfall here. You want soft, chewy bars, not cracker-like ones. Keep a close eye after the 20-minute mark. The toothpick test is your best friend. Moist crumbs clinging to the toothpick mean you’re good to go.
When dipping bars, use vegetable shortening to thin the chocolate—it melts smoother and sets with a lovely shine. If you skip it, your chocolate might harden dull and brittle. Lastly, cutting bars with a sharp knife warmed under hot water helps achieve clean edges without crumbling.
Variations & Adaptations
- Dietary Swap: Use almond flour for a gluten-free twist, and swap butter for coconut oil for dairy-free. The texture will be slightly different but still delicious.
- Seasonal Flavor: Swap peppermint extract for orange or lemon zest for a citrus version perfect for springtime.
- Chocolate Variation: Instead of dipping in dark chocolate, try white chocolate tinted green for a mint-chocolate chip vibe.
- Nutty Upgrade: Add ½ cup chopped toasted pecans or walnuts into the batter for extra crunch and flavor.
- Personal Favorite: I once added crushed candy canes to the chocolate dip for a festive crunch. It was a hit at holiday parties!
Serving & Storage Suggestions
These bars are best served at room temperature so the chocolate dip is slightly soft but set. They make a lovely addition to any dessert platter or St. Patrick’s Day celebration tray. Pair them with a cup of hot tea or minty hot chocolate for a cozy treat.
Store leftover bars in an airtight container at room temperature for up to 3 days, or refrigerate for up to a week. If refrigerated, let them sit out a bit before serving so the texture softens. You can freeze these bars for up to 3 months; just thaw overnight in the fridge and then bring to room temp before enjoying.
Flavors actually deepen and meld after a day or two, so if you can resist, they taste even better the next day. Just watch out—they disappear fast!
Nutritional Information & Benefits
Each bar (assuming 12 bars per batch) contains approximately 250-300 calories, with a balance of fats and sugars that make it a satisfying treat. The peppermint extract adds freshness without calories, and choosing dark chocolate for dipping provides antioxidants.
This recipe is naturally free from artificial preservatives and can be adapted to be gluten-free or dairy-free as needed. While it’s a sweet treat, the use of real butter and quality chocolate means you’re not skimping on flavor or texture.
From a wellness perspective, a little indulgence like this every now and then keeps the spirit bright—especially around the holidays. Plus, the mint offers a natural breath-freshening bonus after enjoying these bars!
Conclusion
If you’re looking for a festive, tasty treat that brings a bit of magic to your St. Patrick’s Day table, these Delicious St. Patrick’s Green Mint Cookie Dipped Bars are exactly what you need. They’re easy to make, fun to customize, and always a hit with family and friends. I love how they combine nostalgic flavors with a fresh, colorful twist that feels both classic and new.
Give this recipe a try, tweak it to your taste, and don’t be shy about sharing your own spin in the comments—I love hearing how you make it your own. Honestly, these bars feel like a warm hug wrapped in mint and chocolate, and I’m sure they’ll become a favorite for you, too.
Happy baking, and may your St. Patrick’s Day be full of sweetness and smiles!
FAQs
Can I make these bars ahead of time?
Absolutely! They store well at room temperature for a few days, and the flavors even improve after a day or two. Just keep them in an airtight container.
What if I don’t have peppermint extract?
You can substitute with mint extract, but be cautious as it’s stronger. Start with half the amount and adjust to taste.
Can I skip the green food coloring?
Yes, the bars will still taste amazing without the green tint. The color just adds a festive St. Patrick’s Day touch.
How do I keep the chocolate from melting on warm days?
Keep the dipped bars refrigerated until serving, and avoid direct sunlight or heat. The shortening in the chocolate dip helps it stay stable.
Is there a vegan version of this recipe?
With swaps like plant-based butter, egg replacers, and dairy-free chocolate, you can make a vegan-friendly version. The texture might be slightly different but still delicious.
Pin This Recipe!
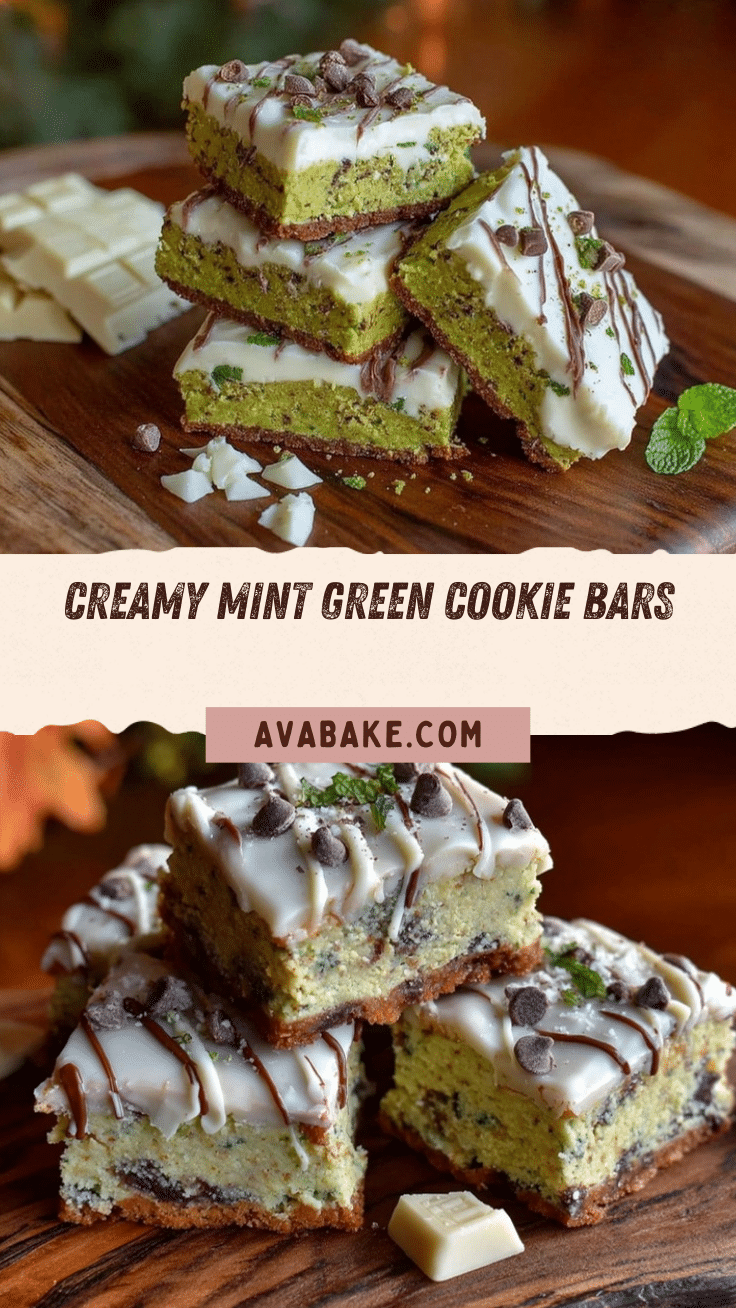
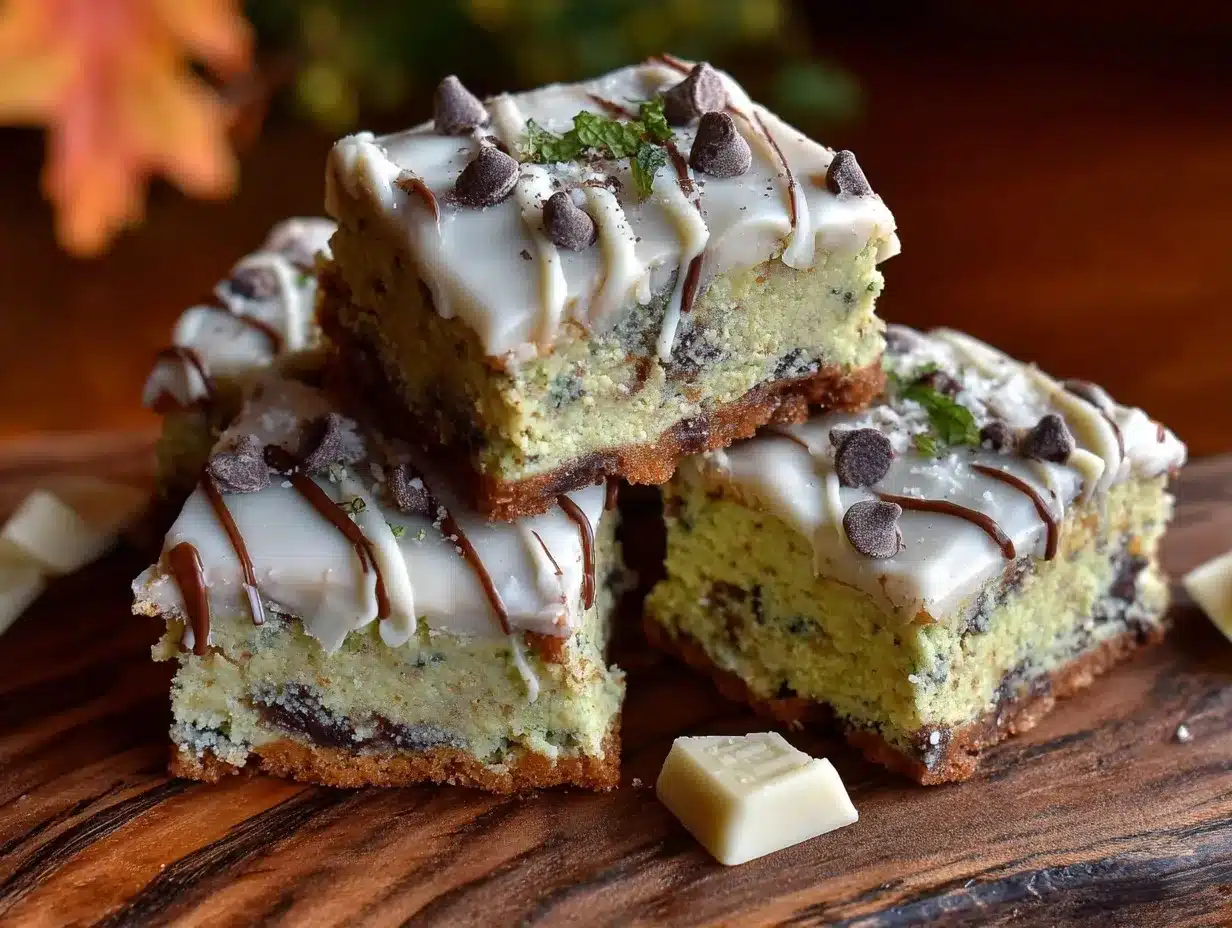
Delicious St. Patrick’s Green Mint Cookie Bars Easy Homemade Recipe
These minty green cookie bars are a festive and easy-to-make treat perfect for St. Patrick’s Day celebrations. They combine a soft, chewy texture with a rich chocolate-mint dip for a crowd-pleasing dessert.
- Prep Time: 15 minutes
- Cook Time: 30 minutes
- Total Time: 45 minutes
- Yield: 12 servings 1x
- Category: Dessert
- Cuisine: American
Ingredients
- 2 ½ cups (315g) all-purpose flour
- 1 teaspoon baking powder
- ½ teaspoon salt
- 1 cup (227g) unsalted butter, softened
- 1 cup (200g) granulated sugar
- ½ cup (110g) packed brown sugar
- 2 large eggs, room temperature
- 1 ½ teaspoons pure peppermint extract
- A few drops green food coloring (optional)
- 1 ½ cups (270g) dark or semi-sweet chocolate chips
- 2 tablespoons vegetable shortening
Instructions
- Preheat your oven to 350°F (175°C). Grease a 9×13 inch pan or line it with parchment paper.
- In a large bowl, whisk together the flour, baking powder, and salt. Set aside.
- Using a mixer, beat the softened butter with granulated sugar and brown sugar until light and fluffy, about 3-4 minutes.
- Beat in the eggs one at a time, then stir in the peppermint extract and green food coloring until evenly colored.
- Gradually mix the dry ingredients into the wet ingredients on low speed or by hand until just combined.
- Spread the dough evenly into the prepared pan and smooth the top gently.
- Bake for 25-30 minutes, or until edges are golden and a toothpick inserted comes out with a few moist crumbs.
- Cool the bars completely in the pan on a wire rack for at least 30 minutes.
- Melt the chocolate chips with vegetable shortening in a double boiler or microwave-safe bowl until smooth and glossy.
- Cut the cooled bars into rectangles (about 2×3 inches). Dip half of each bar into the melted chocolate, letting excess drip off.
- Place dipped bars on parchment-lined rack to set. Chill briefly in the fridge if desired.
Notes
If dough is too sticky, chill for 10 minutes before pressing into pan. Use vegetable shortening in chocolate dip for smoothness and shine. Avoid overbaking to keep bars soft and chewy. Warm knife under hot water for clean cuts. Bars taste better after a day or two as flavors meld.
Nutrition
- Serving Size: 1 bar (approx. 2x3 i
- Calories: 275
- Sugar: 20
- Sodium: 150
- Fat: 15
- Saturated Fat: 9
- Carbohydrates: 33
- Fiber: 2
- Protein: 3
Keywords: St. Patrick’s Day, mint cookie bars, green cookies, chocolate dipped, easy dessert, holiday treats, festive cookies


