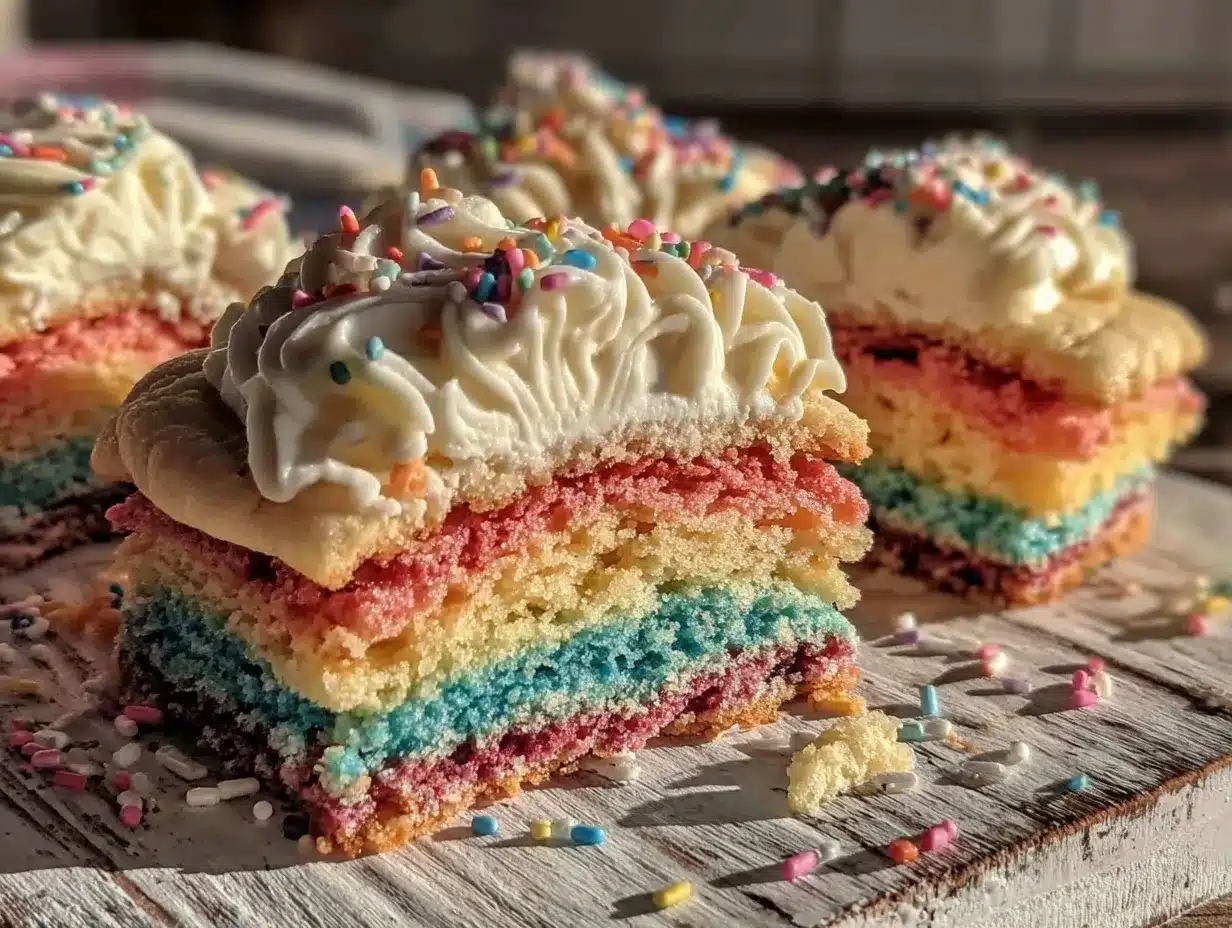
Let me tell you, the moment those fluffy Dr. Seuss Rainbow Sugar Cookie Stacks with Creamy Frosting come out of the oven, the scent alone is enough to make your mouth water uncontrollably. You know that warm, sweet aroma that wraps around you like a cozy blanket? That’s exactly what you get here—soft, pillowy sugar cookies bursting with vibrant colors, layered high with luscious frosting that’s honestly dangerous to resist.
The first time I baked these rainbow sugar cookie stacks, I was instantly hooked. It was one of those rare baking moments where everything just clicks—the texture, the flavors, and the fun of stacking those bright cookies into colorful towers. I remember pausing, taking a deep breath, and smiling because I knew I was onto something truly special. It felt like capturing a little slice of childhood joy on a plate.
Years ago, when I was knee-high to a grasshopper, my grandma used to whip up simple sugar cookies, but they never had this kind of fluffy, melt-in-your-mouth magic or that pop of rainbow whimsy. Honestly, I wish I’d discovered this recipe back then. My family couldn’t stop sneaking these cookie stacks off the cooling rack (and I can’t really blame them). Whether it’s for a birthday party, a rainy weekend baking adventure, or just a sweet treat to brighten your day, these cookie stacks deliver pure, nostalgic comfort with a modern twist.
Perfect for potlucks, kids’ celebrations, or even just to brighten up your Pinterest cookie board, this recipe has become a staple in my kitchen. I’ve tested it more times than I can count (in the name of research, of course), and trust me, you’re going to want to bookmark this one for your next homemade treat craving.
Why You’ll Love This Recipe
Honestly, this fluffy Dr. Seuss Rainbow Sugar Cookie Stacks with Creamy Frosting recipe isn’t just another sugar cookie. It’s a tried-and-true crowd-pleaser that’s been thoroughly tested in my kitchen and approved by my family’s toughest critics. Here’s why you’ll fall in love:
- Quick & Easy: Comes together in under 30 minutes, perfect for busy weeknights or last-minute baking plans.
- Simple Ingredients: No fancy grocery store runs needed; you likely have everything in your pantry right now.
- Perfect for Celebrations: Great for birthday parties, holiday gatherings, or any occasion needing a splash of color and sweetness.
- Crowd-Pleaser: Kids and adults alike rave about the soft texture and creamy frosting combo.
- Unbelievably Delicious: The cookies are fluffy, not dense, and the frosting is smooth with just the right amount of sweetness.
This recipe stands out because of its special technique: I blend the butter and sugar until light and fluffy, which creates that perfect melt-in-your-mouth texture. Plus, the frosting isn’t just sweet—it’s creamy and tangy, thanks to a touch of cream cheese, giving it a balance that keeps you coming back for more.
It’s the kind of cookie stack that makes you close your eyes after the first bite, savoring all those fun colors and flavors. Whether you’re looking to impress guests without stressing over complicated steps, or just want a sweet, joyful treat for yourself, this recipe delivers every time.
What Ingredients You Will Need
This recipe uses simple, wholesome ingredients to deliver bold flavor and a satisfying texture without any fuss. Most are pantry staples, and you can easily swap a few if needed.
- For the Cookie Batter:
- 2 ¾ cups (345 g) all-purpose flour (sifted for best texture)
- 1 teaspoon baking powder
- ½ teaspoon salt
- 1 cup (226 g) unsalted butter, softened (I recommend Land O Lakes for rich flavor)
- 1 ½ cups (300 g) granulated sugar
- 2 large eggs, at room temperature
- 1 tablespoon pure vanilla extract (quality matters—Nielsen-Massey is my go-to)
- Food coloring gels in red, orange, yellow, green, blue, and purple (gel colors give the brightest hues without thinning the dough)
- For the Creamy Frosting:
- 1 cup (226 g) unsalted butter, softened
- 8 ounces (225 g) cream cheese, softened (Philadelphia brand is reliable)
- 4 cups (480 g) powdered sugar, sifted
- 2 teaspoons pure vanilla extract
- 2-3 tablespoons whole milk (or dairy-free milk like almond for a lighter touch)
If you’re gluten-free, swapping the all-purpose flour for a 1:1 gluten-free blend works well here, just keep an eye on the dough’s consistency. And if you want a dairy-free frosting, replacing cream cheese with coconut cream and butter with vegan margarine can make it just as dreamy.
Equipment Needed
- Mixing bowls (preferably glass or stainless steel for easy cleanup)
- Electric hand mixer or stand mixer (a must for fluffy butter and sugar creaming)
- Measuring cups and spoons (accuracy is key here!)
- Rubber spatula for scraping down the bowl
- Cookie sheets lined with parchment paper or silicone baking mats (prevents sticking and promotes even baking)
- Cooling racks (to cool cookies evenly without sogginess)
- Round cookie cutters (about 2.5 inches / 6.5 cm diameter) for uniform cookie shapes
If you don’t have a stand mixer, a sturdy hand mixer works just fine, though you might want to scrape the sides a bit more often. I’ve found silicone mats to be worth every penny versus parchment, especially after dozens of batches. For a budget-friendly option, simple parchment paper does the trick perfectly.
Preparation Method
- Preheat your oven to 350°F (175°C). Line your cookie sheets with parchment paper or silicone mats to keep those cookies from sticking.
- In a medium bowl, whisk together the sifted all-purpose flour, baking powder, and salt. Set this dry mix aside.
- In your mixer bowl, cream the softened butter and granulated sugar together on medium speed for about 3-4 minutes until light and fluffy. You’ll notice the mixture turning pale and airy—that’s the magic that makes these cookies so fluffy.
- Add the eggs one at a time, mixing well after each addition. Then stir in the vanilla extract.
- Slowly add the dry ingredients to the wet mixture, mixing on low speed until just combined. Don’t overmix here—you want the dough to stay tender.
- Divide the dough into six equal parts. Tint each portion with a different gel food coloring, kneading gently with your hands or a spatula until the colors are fully blended and vibrant.
- Roll each colored dough out to about ¼ inch (6 mm) thick on a lightly floured surface. Use your round cookie cutter to cut out circles from each color.
- Stack one cookie of each color carefully on the prepared baking sheet, creating rainbow stacks. Gently press down so they stick together but don’t flatten the cookies.
- Bake for 10-12 minutes, or until the edges are just turning golden. The cookies will still feel soft to the touch—that’s perfect.
- Remove from oven and let cool on the baking sheet for 5 minutes before transferring to a wire rack to cool completely.
- While cookies cool, prepare the frosting: Beat softened butter and cream cheese together on medium speed for 2-3 minutes until smooth and creamy.
- Add powdered sugar gradually, mixing on low speed to avoid powder clouds, then increase speed until fluffy.
- Stir in vanilla extract and milk one tablespoon at a time until you reach a spreadable consistency.
- Once cookies are completely cool, spread or pipe creamy frosting between each cookie layer and on top to finish your beautiful stacks.
Pro tip: If your dough feels too sticky after coloring, pop it in the fridge for 10 minutes before rolling out. And when stacking, a small dab of frosting between layers can act as edible glue if you want extra stability.
Cooking Tips & Techniques
Getting these fluffy Dr. Seuss Rainbow Sugar Cookie Stacks just right takes a few insider tips I’ve learned the hard way. First, creaming the butter and sugar until really light is non-negotiable—it traps air that gives you that melt-in-your-mouth softness. Don’t rush this step!
A common mistake is overworking the dough after adding flour, which can make cookies tough rather than tender. Mix just until combined. Also, using gel food coloring instead of liquid keeps the dough from getting too sticky or runny, which makes rolling and stacking a breeze.
Timing is key—cookies can go from perfect to overbaked in a minute or two. Set a timer and keep an eye on those golden edges. When multitasking, I prep the frosting while cookies bake to save time and keep everything fresh.
And here’s a little lesson learned: cooling cookies completely before frosting is crucial. Warm cookies will melt the frosting and turn your pretty stacks into a messy rainbow puddle. Trust me, I’ve had to start over a couple of times to get this right!
Variations & Adaptations
Want to mix things up? Here are some fun ways to customize your rainbow sugar cookie stacks:
- Dietary Twist: Swap all-purpose flour for almond flour to make these gluten-free; just add an extra egg for structure. For a vegan option, use dairy-free butter and flax eggs.
- Flavor Variation: Add a teaspoon of lemon zest to the dough for a bright citrusy note, or swap vanilla extract for almond extract for a nutty twist.
- Seasonal Spin: Instead of rainbow colors, try pastel shades for spring or fall hues with cinnamon and pumpkin spice mixed into the dough.
- Frosting Swap: Use chocolate ganache or a simple glaze instead of cream cheese frosting for a different flavor profile.
I once tried a batch with lavender-infused frosting, and although it was an unexpected flavor, it surprisingly balanced beautifully with the sweet cookies. Don’t be afraid to experiment—you might find a new favorite!
Serving & Storage Suggestions
These cookie stacks are best served at room temperature, where the frosting is creamy and the cookies are soft. For a fun presentation, arrange them on a colorful platter or stack them on individual dessert plates tied with a little ribbon for gifting.
Pair these treats with a cold glass of milk, a hot cup of tea, or even a bright berry smoothie to complement the sweetness.
Store any leftovers in an airtight container in the fridge for up to 5 days. If you want to freeze them, wrap each stack tightly in plastic wrap and place in a freezer bag for up to 3 months. When ready to enjoy, thaw overnight in the fridge and bring to room temperature before serving.
Over time, the flavors meld together beautifully, making these cookie stacks even more delightful the next day (if they last that long!).
Nutritional Information & Benefits
Each fluffy Dr. Seuss Rainbow Sugar Cookie Stack with Creamy Frosting contains roughly 250-300 calories depending on size. They offer a comforting treat with key ingredients like butter providing fat for satiety, and eggs adding a bit of protein.
While these are definitely an indulgence, using real vanilla and quality butter means you’re savoring natural flavors without artificial shortcuts. For those with dietary restrictions, easy substitutions like gluten-free flour or dairy-free frosting make this recipe accessible.
At the end of the day, this recipe is about joy and celebration, and I believe treating yourself occasionally is part of a balanced, happy lifestyle.
Conclusion
If you’re looking for a homemade treat that’s not only visually stunning but also soft, fluffy, and downright delicious, these Dr. Seuss Rainbow Sugar Cookie Stacks with Creamy Frosting are your new go-to. You can customize them to your heart’s content, and honestly, once you try this recipe, you’ll understand why it’s become a family favorite in my house.
So grab your mixing bowls, pull out those food colors, and get ready to make some magic. I’d love to hear how your cookie stacks turn out—drop a comment, share your photos, or tell me about your favorite variations. Baking should be fun, and these cookies are proof that simple ingredients can create something truly special.
Happy baking, friends! Your next favorite cookie is just a batch away.
FAQs
Can I make the cookie dough ahead of time?
Yes! You can prepare the dough, color it, and wrap it tightly in plastic wrap. Refrigerate for up to 24 hours before rolling and baking.
What can I use if I don’t have gel food coloring?
Liquid food coloring works, but use less to avoid making the dough too sticky. Alternatively, natural colorants like beet powder or matcha can add subtle hues.
How do I prevent my cookies from spreading too much?
Make sure your butter is softened but not melted. Chilling the dough for 15-20 minutes before rolling can also help cookies hold their shape.
Can I make the frosting ahead and store it?
Absolutely! Store the cream cheese frosting in an airtight container in the fridge for up to 3 days. Bring it to room temperature and whip briefly before using.
What’s the best way to stack and assemble these cookies?
Use a small spoon or piping bag to add frosting between each cookie layer. Gently press down to secure, but don’t squish them flat—keeping the fluff is key!
Pin This Recipe!

Fluffy Dr. Seuss Rainbow Sugar Cookie Stacks with Creamy Frosting

Soft, pillowy sugar cookies bursting with vibrant colors, layered high with luscious creamy frosting. A perfect homemade treat that is fluffy, colorful, and delicious.
- Prep Time: 15 minutes
- Cook Time: 12 minutes
- Total Time: 27 minutes
- Yield: 24 cookie stacks 1x
- Category: Dessert
- Cuisine: American
Ingredients
- 2 ¾ cups (345 g) all-purpose flour (sifted for best texture)
- 1 teaspoon baking powder
- ½ teaspoon salt
- 1 cup (226 g) unsalted butter, softened
- 1 ½ cups (300 g) granulated sugar
- 2 large eggs, at room temperature
- 1 tablespoon pure vanilla extract
- Food coloring gels in red, orange, yellow, green, blue, and purple
- 1 cup (226 g) unsalted butter, softened (for frosting)
- 8 ounces (225 g) cream cheese, softened
- 4 cups (480 g) powdered sugar, sifted
- 2 teaspoons pure vanilla extract (for frosting)
- 2–3 tablespoons whole milk or dairy-free milk like almond
Instructions
- Preheat your oven to 350°F (175°C). Line cookie sheets with parchment paper or silicone mats.
- In a medium bowl, whisk together sifted all-purpose flour, baking powder, and salt. Set aside.
- In a mixer bowl, cream softened butter and granulated sugar on medium speed for 3-4 minutes until light and fluffy.
- Add eggs one at a time, mixing well after each addition. Stir in vanilla extract.
- Slowly add dry ingredients to wet mixture, mixing on low speed until just combined. Do not overmix.
- Divide dough into six equal parts. Tint each portion with different gel food coloring, kneading gently until colors are vibrant.
- Roll each colored dough to about ¼ inch (6 mm) thick on a lightly floured surface. Use a 2.5 inch round cookie cutter to cut circles.
- Stack one cookie of each color on the baking sheet, gently pressing down to stick but not flatten.
- Bake for 10-12 minutes until edges are just turning golden. Cookies will feel soft to the touch.
- Remove from oven and let cool on baking sheet for 5 minutes, then transfer to wire rack to cool completely.
- Prepare frosting by beating softened butter and cream cheese on medium speed for 2-3 minutes until smooth.
- Gradually add powdered sugar, mixing on low speed then increasing speed until fluffy.
- Stir in vanilla extract and milk one tablespoon at a time until spreadable consistency is reached.
- Once cookies are cool, spread or pipe frosting between each cookie layer and on top to finish stacks.
Notes
Cream butter and sugar until very light and fluffy to trap air for soft cookies. Do not overmix dough after adding flour to keep cookies tender. Use gel food coloring to avoid sticky dough. Cool cookies completely before frosting to prevent melting. If dough is sticky after coloring, chill for 10 minutes before rolling. Use a small dab of frosting as edible glue for stacking stability.
Nutrition
- Serving Size: 1 cookie stack
- Calories: 275
- Sugar: 22
- Sodium: 120
- Fat: 15
- Saturated Fat: 9
- Carbohydrates: 35
- Fiber: 0.5
- Protein: 3
Keywords: rainbow sugar cookies, fluffy cookies, cream cheese frosting, colorful cookies, homemade treats, kids party cookies, easy sugar cookies


