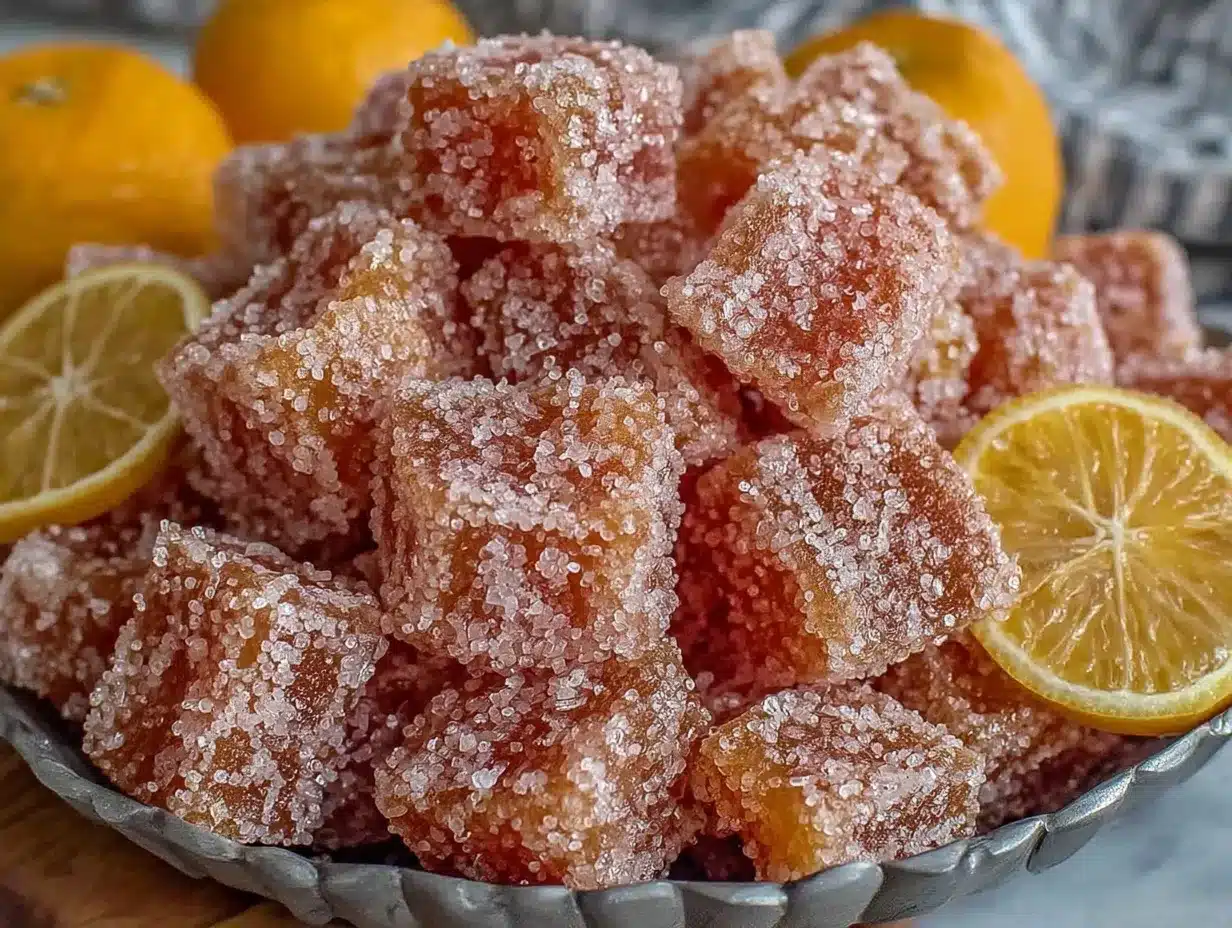
Just picture this: the zesty fragrance of fresh oranges swirling through your kitchen, so sweet and bright it practically tickles your nose. The glossy little orange gems glisten under your kitchen light, each piece promising a burst of citrusy goodness as soon as you pop one in your mouth. The first time I made these easy orange candies, I honestly couldn’t believe something so vibrant and cheery could come from just a handful of ingredients. That moment when I tasted my very first batch—soft, tangy, and just the right amount of sweet—was one of those rare moments where you pause, take a deep breath, and just smile because you know you’re onto something truly special.
My connection to orange candy goes way back to when I was knee-high to a grasshopper. My grandma used to keep a jar of sugary orange slices on her counter—always slightly sticky, always the best treat after a game of hide-and-seek with my cousins. Years ago, I tried to recreate those flavors, and let’s face it, store-bought candies just can’t compare to homemade. I stumbled upon this recipe during a rainy weekend, desperate for something fun (and honestly, a little nostalgic) to whip up for my kids. I wish I’d found it ages ago—it’s dangerously easy and results in pure, citrusy comfort.
My family couldn’t stop sneaking these orange candies off the tray before they’d even cooled (I can’t really blame them). Friends say they taste “just like sunshine in a bite,” and I’ve had more than one person ask for the recipe after a single taste. Whether you’re looking for something to brighten up your next potluck, a sweet treat for your kids, or a way to jazz up your Pinterest snack board, these homemade citrus treats fit the bill. I tested this easy orange candy recipe more times than I care to admit—in the name of research, of course—so trust me when I say it’s now a staple for family gatherings, gifting, and those moments when you need a snack that feels like a warm hug. If you love citrus treats, you’re going to want to bookmark this one.
Why You’ll Love This Easy Orange Candy Recipe
Let me give you the inside scoop—after years of kitchen trial and error (and a few sticky disasters), I’ve landed on this easy orange candy recipe that’s not just a winner, it’s a total game-changer. Here’s why it’s become my go-to for homemade citrus treats:
- Quick & Easy: You only need about 30 minutes from start to finish. Perfect for last-minute cravings or a spontaneous after-school treat.
- Simple Ingredients: Just five ingredients, all of which are probably hanging out in your pantry or fridge right now. No fancy grocery runs—thank goodness.
- Perfect for Any Occasion: These orange candies are a hit at birthday parties, holiday gatherings, or tucked into a lunchbox. I’ve even made them for bake sales and they disappear faster than you can say “citrus.”
- Crowd-Pleaser: Kids go wild for their color and tangy bite, while adults love the nostalgic flavor and homemade charm.
- Unbelievably Delicious: The combo of tangy orange, balanced sweetness, and a chewy (almost melt-in-your-mouth) texture—there’s just nothing like it.
What sets this recipe apart is the simple technique. Instead of boiling down fruit juices for hours, you use fresh zest and juice for maximum citrus flavor with minimal fuss. I even add a pinch of salt, just like my grandma did, to make the flavor pop. Some orange candy recipes rely on artificial flavors, but this one is all about real oranges—giving it a natural, sunshiny taste.
For me, this recipe isn’t just another candy—it’s the feel-good treat that makes you close your eyes after the first bite. It’s comfort food, but with a bright, citrusy twist that feels light, fresh, and (let’s be honest) a little bit fancy. You’ll impress guests without breaking a sweat, and you can turn a regular weekend into something memorable. I’ve made these easy orange candies for everything from teacher gifts to family movie nights. I can’t wait for you to experience that first “wow” moment.
What Ingredients You Will Need
This easy orange candy recipe keeps things simple, using just a handful of pantry-friendly ingredients to deliver bold citrus flavor and a satisfying, chewy texture. Nothing too fancy here—just pure orange goodness.
- Fresh Oranges – You’ll need 2 large oranges, preferably navel or Valencia (for zest and juice). The fresher, the better—the zest is the secret to big flavor.
- Granulated Sugar – About 2 cups (400g). This provides sweetness and structure. I like to use organic cane sugar when possible for a clean taste.
- Cornstarch – 1/4 cup (30g). This thickens the mixture, helping the candies set up with that perfect chewy texture.
- Water – 1/2 cup (120ml). Allows everything to dissolve and combine smoothly.
- Lemon Juice – 1 tablespoon (15ml), freshly squeezed. Just a splash for acidity to balance the sweetness and amp up the citrus punch.
Optional, for rolling/garnish:
- Extra Granulated Sugar – For coating the finished candies (adds sparkle and a little crunch).
- Pinch of Salt – Tiny dash to intensify the orange flavor. I use flaky sea salt sometimes for a gourmet twist.
For the oranges, I recommend choosing fruit that feels heavy for its size and has a bright, unblemished peel. Organic oranges are great because you’ll be using the zest (less worry about wax or pesticides). If oranges aren’t in season, you can swap in clementines or tangerines—just adjust the juice quantity to taste. Cornstarch is key for setting these candies, but you can use arrowroot powder if you’re sensitive to corn.
If you’re making these for someone gluten-free, good news—this recipe is naturally gluten-free! Want to avoid refined sugar? Try coconut sugar (though the color will be darker, and flavor a bit deeper). You can skip the lemon juice if you don’t have it, but I think it adds that little “something special.”
I always keep a little extra orange zest on hand for garnish—makes the candies look extra Pinterest-worthy. If you want to experiment, a drop of orange extract (totally optional) boosts the citrus punch. For those with allergies, this recipe is nut-free, egg-free, and dairy-free as written—just check your cornstarch brand to be safe.
Equipment Needed
- Medium Saucepan – Essential for cooking the sugar and orange mixture. Stainless steel works best for even heat.
- Wooden Spoon or Silicone Spatula – For stirring and scraping down the sides as everything thickens. I’ve melted a few plastic spatulas in my day, so stick with heat-safe!
- Microplane or Fine Grater – To zest the oranges. If you don’t have one, the fine side of a box grater works in a pinch (just watch your knuckles, trust me).
- Juicer – Handy for squeezing those oranges and lemons. You can use your hands if you’re feeling rustic.
- Square Baking Dish (8-inch/20cm) – To pour and set the candy. Line it with parchment for easy release.
- Sharp Knife – For cutting the candies into neat squares once set. If you want super clean edges, wipe the blade between cuts.
- Parchment Paper – Makes cleanup a breeze and keeps the candies from sticking.
- Mixing Bowl – For tossing candies in sugar if desired.
If you don’t have a microplane, a vegetable peeler can work to remove strips of zest, then chop them super fine. Glass baking dishes work if you don’t have metal—just avoid anything with a nonstick coating that can scratch. For budget-friendly options, I’ve used dollar store pans and thrifted spoons with great results. Just make sure everything is clean and dry before you start.
Keep your saucepan in good shape by soaking it right after cooking—sugar can be a monster to scrub off if it cools. If you’re making big batches, a silicone candy mold adds a fun twist (I’ve tried hearts and stars, and the kids go nuts for them!).
Preparation Method
-
Prep Your Oranges: Wash 2 large oranges well. Use a microplane or fine grater to zest both oranges (about 1½ tablespoons zest). Cut and juice the oranges—you’ll need about ½ cup (120ml) of fresh juice. Set zest and juice aside. Squeeze 1 tablespoon (15ml) lemon juice and have it ready, too.
Tip: If you’re short on juice, add water to reach ½ cup. -
Combine Dry Ingredients: In a medium saucepan, whisk together 2 cups (400g) granulated sugar and ¼ cup (30g) cornstarch until fully combined. This helps prevent lumps later.
Sensory cue: The mixture should look powdery and uniform. -
Add Liquids: Pour in the orange juice, lemon juice, ½ cup (120ml) water, and orange zest. Stir everything together with a wooden spoon or spatula until there are no dry pockets.
Preparation note: Scrape the bottom to catch any stubborn cornstarch. -
Cook the Mixture: Place saucepan over medium heat. Stir constantly as the mixture heats up—after about 5 minutes, it’ll start to look glossy and thick (like loose pudding).
Warning: Don’t walk away—the sugar can burn fast! -
Boil and Thicken: Once the mixture is bubbling, reduce the heat slightly and keep stirring for another 5-7 minutes. It should become very thick, almost gel-like and pull away from the pan sides.
Sensory cue: When a spoon dragged through leaves a clear line, you’re there.
Troubleshooting: If it’s too runny, keep cooking. If it seizes up, add a tablespoon of water and stir vigorously. -
Pour & Set: Quickly pour the hot mixture into your parchment-lined 8-inch (20cm) baking dish. Use a spatula to spread it evenly and smooth the top.
Preparation note: Work fast—this stuff sets up quickly! -
Cool Completely: Let the candy sit at room temperature for at least 2 hours, or until fully firm. For faster setting, pop it in the fridge for 45-60 minutes.
Tip: The candy is ready when it no longer feels tacky and holds its shape. -
Cut Into Pieces: Lift the candy from the dish using the parchment. Place on a cutting board and use a sharp knife to cut into 1-inch (2.5cm) squares or desired shapes.
Efficiency tip: Wipe the knife with a damp cloth between cuts for clean edges. -
Finish & Coat: If you like, toss the squares in extra granulated sugar for sparkle. Add a tiny pinch of flaky sea salt for a flavor boost.
Personal tip: Sometimes I skip the sugar coating for a softer bite—either way, it’s delicious. -
Serve & Enjoy: Arrange the candies on a plate, tray, or pop them into little gift bags for sharing.
Testing note: Don’t be surprised if half the batch disappears before you can take a photo!
Cooking Tips & Techniques
Making orange candy at home sounds simple, but I’ve learned a few lessons the hard way. Here’s what works (and what doesn’t):
- Stir Like You Mean It: Sugar burns easily, so keep that spoon moving. A silicone spatula helps scrape every bit from the pan—I’ve had a few batches scorch when I got distracted.
- Timing Is Everything: Don’t rush the thickening step. If you take it off too soon, the candy won’t set and will be gooey. If you cook it too long, it’ll turn rubbery. I always watch for the mixture to “hold its shape” when stirred.
- Prep Ahead: Measure and zest your oranges before you start. Once the sugar mixture is heating, you won’t have time to scramble for ingredients.
- Test for Doneness: Drop a small spoonful of the mixture on a cold plate—if it firms up in a few minutes, you’re good to go.
- Cutting Candy Cleanly: Use a sharp knife brushed with a little oil or water for neat edges. I used to get jagged pieces until I learned this trick.
- Consistency: For perfectly chewy candies, keep your ratios precise. If you want a firmer candy, add just 1 extra tablespoon cornstarch; for softer, reduce by a pinch.
- Multitasking: Set out your parchment and sugar for coating while the candy cools—makes the final step smoother.
- Flavor Boost: A drop of orange extract or a touch of vanilla makes the candies even more fragrant.
- Common Mistakes: Too much zest can turn the candies bitter—stick with what’s listed. If you use bottled orange juice, they’ll taste flat. Fresh is the way to go.
I’ve burned my share of sugar, undercooked a batch (result: sticky blobs), and even tried adding chocolate once (total fail). Learn from my kitchen adventures and you’ll have beautiful, Pinterest-worthy orange candies every time!
Variations & Adaptations
The beauty of this easy orange candy recipe is how flexible it is. Over time, I’ve tried all sorts of tweaks—here are a few favorites:
- Dietary Swap: For a vegan version, use coconut sugar instead of cane sugar (it’ll be darker and caramel-y). Arrowroot powder works in place of cornstarch for corn sensitivities.
- Seasonal Twist: In winter, swap oranges for blood oranges for a gorgeous ruby color and extra tang. In summer, go with tangerines or clementines for a sweeter, milder candy.
- Flavor Additions: Add a pinch of ground ginger or cinnamon for warmth. Or, toss in a tablespoon of chopped mint for a fresh herbal note—so refreshing!
- Cooking Methods: Instead of squares, pour the mixture into silicone molds for fun shapes (hearts, stars, flowers). I’ve done this for parties and the kids adore them.
- Customized Sweetness: For a less-sweet candy, reduce sugar by 1/4 cup (50g)—you’ll get a more tart, grown-up flavor.
- Allergen Friendly: This recipe is already nut-free and dairy-free, but always double check your cornstarch and sugar brands for cross-contamination.
My personal favorite adaptation? I add a tablespoon of finely chopped candied ginger to the mixture before pouring—adds zing and keeps things interesting. If you want to experiment, try rolling finished candies in powdered sugar or even cocoa for a fun twist. The possibilities are pretty endless!
Serving & Storage Suggestions
These easy orange candies are best served at room temperature, arranged on a pretty plate or tray. For parties, I like to pile them into colorful cupcake liners—makes for easy grabbing and a Pinterest-worthy presentation. They’re perfect alongside a mug of herbal tea or paired with lemon shortbread cookies for a full citrus snack spread.
To store, keep the candies in an airtight container lined with parchment paper. They’ll stay fresh at room temperature for up to 5 days (if they last that long!). For longer storage, you can freeze them—just layer the candies with parchment and seal tightly. Let them thaw at room temperature before serving. If you notice any moisture, toss them in fresh sugar to perk up the texture.
Reheating isn’t really needed, but if they get hard in the fridge, leave them out for 10-15 minutes before eating. Over time, the flavors mellow and deepen—so if you love a more intense orange kick, let them sit a day before serving. I’ve found they make fantastic edible gifts; just pop them into small bags or jars and tie with a ribbon.
Nutritional Information & Benefits
Each piece of homemade orange candy (about 1-inch square) contains roughly:
- Calories: 40
- Carbohydrates: 10g
- Sugar: 8g
- Fat: 0g
- Protein: 0g
The star ingredient, fresh oranges, is loaded with vitamin C—a little immune boost in every bite. Lemon juice adds extra antioxidants and helps balance blood sugar. This recipe is naturally gluten-free, nut-free, and dairy-free, making it friendly for most diets. If you use coconut sugar or reduce the amount, you can make it lower in refined sugars.
Potential allergens are minimal, but always check your cornstarch and sugar brands if you have sensitivities. From a wellness perspective, these candies provide a sweet treat with none of the artificial flavors or colors found in store-bought versions. They’re proof that something homemade can be both delicious and a touch healthier!
Conclusion
If you’re searching for a homemade treat that’s bursting with citrus flavor, dangerously easy to whip up, and genuinely loved by all ages, this easy orange candy recipe is your new kitchen best friend. With just a handful of ingredients and simple steps, you’ll have a batch of bright, tangy candies that taste like pure sunshine.
Don’t be afraid to play around—try different citrus, swap sweeteners, or create fun shapes for holidays and parties. I love this recipe because it’s fast, flexible, and brings back all those cozy childhood memories. I hope it brings a little bit of joy (and a lot of flavor) to your own family traditions.
Give it a try, and let me know how you make it your own—leave a comment with your tweaks, share your candy photos, or tag me on Pinterest! You deserve a treat that feels like a warm hug, so go ahead and make your kitchen smell like oranges today.
FAQs
Can I use bottled orange juice instead of fresh?
You can, but the flavor won’t be as bright or natural. Fresh juice really makes these candies shine—trust me, it’s worth the little extra effort!
How do I keep the candies from sticking together?
After cutting, toss the candies in a little extra sugar and store them in single layers between sheets of parchment paper. This keeps them separated and easy to grab.
Can I make these candies ahead of time?
Absolutely! They keep well for up to 5 days at room temperature or up to 2 weeks in the freezer. I often make them the night before a party for easy snacking.
Is this recipe safe for people with gluten allergies?
Yes—this easy orange candy recipe is naturally gluten-free. Just double check your cornstarch brand to be sure it’s processed without wheat.
Can I use other citrus fruits?
Definitely! Try tangerines, blood oranges, or even lemons for a tart twist. Adjust the sugar a bit if you’re using more sour fruit.
Pin This Recipe!

Easy Orange Candy Recipe: Make Homemade Citrus Treats With 5 Ingredients

These homemade orange candies are soft, chewy, and bursting with real citrus flavor. With just five simple ingredients and minimal prep, you’ll have a batch of vibrant, sunshiny treats perfect for gifting or snacking.
- Prep Time: 10 minutes
- Cook Time: 15 minutes
- Total Time: 2 hours 25 minutes
- Yield: 36 pieces (about 12 servings) 1x
- Category: Candy
- Cuisine: American
Ingredients
- 2 large oranges (for zest and juice, preferably navel or Valencia)
- 2 cups granulated sugar (400g)
- 1/4 cup cornstarch (30g)
- 1/2 cup water (120ml)
- 1 tablespoon lemon juice (15ml), freshly squeezed
- Extra granulated sugar, for coating (optional)
- Pinch of salt, for garnish (optional)
Instructions
- Wash 2 large oranges well. Zest both oranges (about 1½ tablespoons zest) using a microplane or fine grater. Juice the oranges to yield about ½ cup fresh juice. Squeeze 1 tablespoon lemon juice and set aside.
- In a medium saucepan, whisk together 2 cups granulated sugar and ¼ cup cornstarch until fully combined.
- Add the orange juice, lemon juice, ½ cup water, and orange zest to the saucepan. Stir until no dry pockets remain.
- Place the saucepan over medium heat. Stir constantly as the mixture heats up; after about 5 minutes, it will start to look glossy and thick.
- Once bubbling, reduce the heat slightly and keep stirring for another 5-7 minutes until very thick and gel-like. The mixture should pull away from the pan sides.
- Quickly pour the hot mixture into a parchment-lined 8-inch baking dish. Spread evenly and smooth the top.
- Let the candy sit at room temperature for at least 2 hours, or refrigerate for 45-60 minutes until fully firm.
- Lift the candy from the dish using the parchment. Cut into 1-inch squares or desired shapes with a sharp knife.
- If desired, toss the squares in extra granulated sugar for coating and add a tiny pinch of flaky sea salt for flavor.
- Arrange the candies on a plate or tray, or package in gift bags for sharing.
Notes
Use fresh oranges for best flavor; bottled juice will taste flat. Stir constantly to prevent burning. For firmer candies, add 1 tablespoon extra cornstarch; for softer, reduce slightly. Toss candies in sugar to prevent sticking. Store in an airtight container lined with parchment for up to 5 days, or freeze for longer storage. This recipe is naturally gluten-free, nut-free, and dairy-free.
Nutrition
- Serving Size: 1 piece (about 1-inc
- Calories: 40
- Sugar: 8
- Carbohydrates: 10
Keywords: orange candy, homemade candy, citrus treats, gluten-free candy, easy candy recipe, orange dessert, kid-friendly snack, edible gift, party treat, vegan candy


