Picture this: you walk into your kitchen and the aroma of sizzling beef, caramelized onions, and melting cheddar hits you right in the nose. The sound of the sheetpan crackling away in the oven is enough to make anyone’s stomach rumble. The first time I made these crispy sheetpan burger sliders, I knew I had found something special—the kind of recipe that makes you stop mid-prep, take a deep breath, and just grin. It’s not every day you stumble onto a party meal that’s this simple, this satisfying, and this fun to make.
Honestly, I wish I’d found these sheetpan sliders years ago. Back then, when I was knee-high to a grasshopper, my grandma would make burgers on an old griddle—messy, smoky, and always a little chaotic. These sliders are a total game-changer for hosting, whether you’re wrangling a pack of hungry kids for a birthday bash or feeding a crowd during a football game. I first whipped up a batch on a rainy Friday night for a last-minute get-together, and let’s just say the sheetpan barely made it to the table before hands started grabbing. My family couldn’t stop sneaking them off the cooling rack (and I can’t really blame them)!
There’s something dangerously easy about pressing everything into one pan and letting the oven do the heavy lifting. The crispy edges? Pure nostalgic comfort. The gooey cheese and soft buns? Like a warm hug on a plate. These sliders have become a staple at our house for family gatherings, gifting trays to neighbors, and those “just because” nights. They fit perfectly into busy lives, Pinterest boards, and any party menu you want to brighten up. Trust me, you’re going to want to bookmark this one and test it out for yourself—in the name of research, of course.
Why You’ll Love These Crispy Sheetpan Burger Sliders
Let’s face it, party food can be a hassle. But after dozens of batches (some almost too crispy, some just right), I can say these burger sliders are a cut above. They’re designed for real life: busy schedules, picky eaters, and folks who want big flavor without the fuss.
- Quick & Easy: Ready in about 35 minutes, making them ideal for last-minute gatherings or busy weeknights.
- Simple Ingredients: Nothing fancy here—just what you likely already have in your fridge and pantry.
- Perfect for Parties: These sliders are tailor-made for potlucks, birthday parties, game days, or even casual brunch spreads.
- Crowd-Pleaser: Kids love them, adults rave about them, and honestly, even the pickiest eater will reach for seconds.
- Unbelievably Delicious: The crisp edges and juicy center create a texture contrast you won’t get from regular burgers.
What makes these sheetpan burger sliders stand out? It’s the magic of baking everything together. The beef forms a thin, flavorful layer that crisps up beautifully, while the buns soak in just enough juicy goodness. Instead of grilling each patty separately, you get consistent results every time. I’ve tested these sliders for everything from birthday parties to midnight snacks—they always land right in the sweet spot of easy, cozy, and downright craveable.
This isn’t just another sheetpan recipe, folks. It’s my best version, with perfectly seasoned beef, a layer of melty cheese, and a finishing touch of buttery, golden buns. It’s comfort food that fits your lifestyle—faster, healthier, and way less mess. You’ll find yourself making these for guests (even when you’re short on time) and for those cozy family nights when only comfort food will do.
Close your eyes after the first bite, and you’ll know why I keep coming back to this recipe. It’s simple, satisfying, and perfect for making memories—one crispy slider at a time.
What Ingredients You Will Need
These crispy sheetpan burger sliders rely on a handful of familiar ingredients to pack in maximum flavor and crunch. Most are pantry staples, and you can easily swap things out to suit what you have on hand (because let’s be honest, sometimes you just want to use what’s in the fridge).
- For the Beef Layer:
- 1.5 pounds (680g) ground beef (80/20 for best flavor and juiciness)
- 1 teaspoon kosher salt
- 1/2 teaspoon ground black pepper
- 1 teaspoon garlic powder
- 1 teaspoon onion powder
- 1 tablespoon Worcestershire sauce (adds depth—skip if you’re out, but recommended)
- For the Slider Assembly:
- 12 slider buns or dinner rolls (soft and fluffy, split in half)
- 8 ounces (225g) cheddar cheese, sliced or shredded (I love Cabot or Tillamook)
- 1 small red onion, finely diced
- 1/2 cup (120g) dill pickle chips (optional, but adds crunch)
- 2 tablespoons ketchup (for layering)
- 2 tablespoons yellow mustard (classic, or swap for Dijon if you want a little kick)
- For the Topping:
- 4 tablespoons (56g) unsalted butter, melted
- 1 tablespoon sesame seeds (optional, but makes the buns look extra festive)
- 1 tablespoon dried minced onion (for that “classic burger” vibe)
- 1 teaspoon poppy seeds (optional, for extra crunch)
Ingredient Tips:
- Ground beef: Go for 80/20 for the best balance of flavor and moisture. You can substitute ground turkey or chicken for a lighter version—just add a little extra seasoning.
- Cheese: Cheddar is my go-to, but you can use American, Swiss, or even pepper jack for a spicy twist.
- Buns: Any soft dinner roll works. Hawaiian rolls are a crowd favorite for their sweetness, but standard slider buns work just fine.
- Pickles & Onion: These add brightness and crunch. If you’re not a fan, skip them (but honestly, the combo is classic).
- Ketchup & Mustard: Layering these on the beef before baking infuses those nostalgic burger flavors right into each bite.
If you’re gluten-free, swap in your favorite GF slider buns. Need dairy-free? Use vegan cheese and plant-based butter. Feel free to get creative with toppings—sometimes I add a thin slice of tomato or swap the ketchup for BBQ sauce if I’m feeling adventurous.
Equipment Needed
You don’t need a fancy kitchen setup to make crispy sheetpan burger sliders. Here’s what I use every time:
- Large rimmed sheetpan (18×13 inches or 45×33 cm—heavy-duty is best for even browning)
- Parchment paper or nonstick foil (makes for easier cleanup and prevents sticking)
- Mixing bowl (for seasoning the beef)
- Spatula or offset spatula (for spreading the beef evenly)
- Sharp knife or kitchen shears (for splitting buns and slicing finished sliders)
- Small brush (for buttering the tops of the buns)
- Measuring spoons
If you don’t have a large sheetpan, you can use two smaller ones and divide everything evenly. I’ve done this with basic supermarket pans and sturdy restaurant-grade ones—the heavy-duty option gives you better browning, but anything will do in a pinch. If you want super crispy edges, a metal pan works better than glass.
Maintenance tip: If you use nonstick foil, let the pan cool before cleaning to prevent warping. For the butter brush, I like a silicone version—it’s easier to wash and lasts longer (plus, no bristles left behind). Budget-wise, most of these tools are basics—I picked up my favorite sheetpan at a thrift store!
How to Make Crispy Sheetpan Burger Sliders
- Prep the Sheetpan: Preheat your oven to 425°F (220°C). Line your sheetpan with parchment paper or nonstick foil for easy cleanup.
- Season the Beef: In a large mixing bowl, combine 1.5 pounds (680g) ground beef, 1 teaspoon salt, 1/2 teaspoon pepper, 1 teaspoon garlic powder, 1 teaspoon onion powder, and 1 tablespoon Worcestershire sauce. Mix just until combined—don’t overwork it or the beef gets tough.
- Spread the Beef: Press the seasoned beef mixture evenly onto the prepared sheetpan. It should form a thin layer, about 1/2 inch (1.25 cm) thick. Use an offset spatula or your hands (washed, of course). Make sure it reaches the edges for those crispy bits.
- Layer the Flavors: Drizzle 2 tablespoons ketchup and 2 tablespoons mustard over the beef layer. Use a spatula to gently spread into a thin, even coating. This step infuses classic burger taste into every bite.
- Add Onion & Pickles: Sprinkle the finely diced red onion and pickle chips evenly across the beef. If you’re not a pickle fan, skip or substitute with thinly sliced jalapeños for some heat.
- Bake the Beef Layer: Place the pan in the oven and bake for 13-15 minutes, or until the beef is fully cooked and sizzling at the edges. If you notice excess fat pooling, carefully tilt the pan and spoon it off (I use a paper towel held with tongs—watch your hands!).
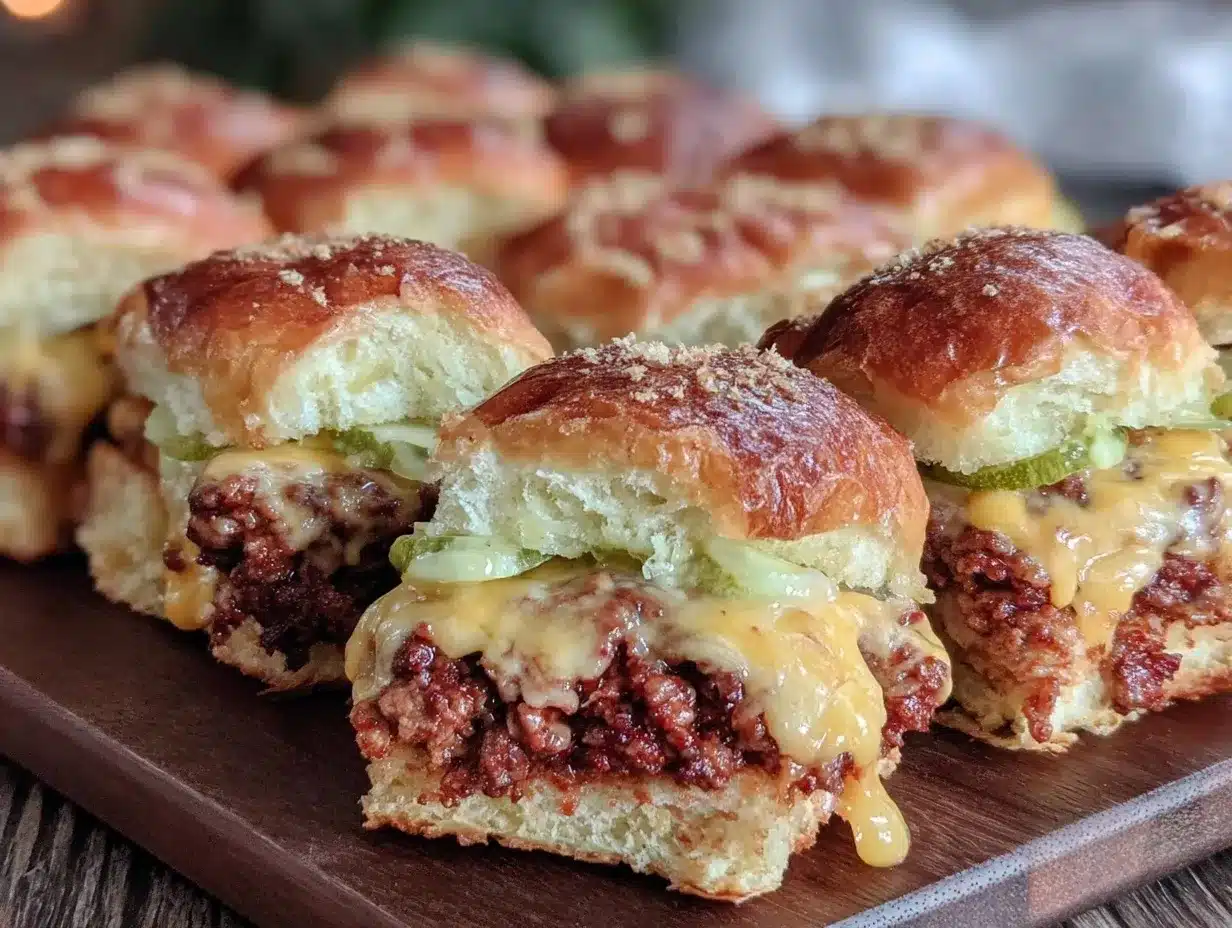
- Cheese Time: Remove the pan from the oven and immediately scatter the cheddar cheese (8 ounces/225g) over the hot beef. Return to the oven for 2-3 minutes until the cheese is melted and bubbly.
- Add the Buns: Split your slider buns and arrange the bottoms directly over the cheese layer. Place the bun tops over each bottom half, pressing down gently. If they don’t fit perfectly, just squeeze them together—it’ll work out.
- Butter & Top: Brush the tops of the buns with the melted butter (4 tablespoons/56g). Sprinkle sesame seeds, dried minced onion, and poppy seeds over the buttered buns for extra crunch and flavor.
- Final Bake: Return the sheetpan to the oven and bake for another 6-8 minutes, until the buns are golden brown and crisp at the edges. Keep an eye out—burnt buns sneak up fast!
- Slice & Serve: Remove from the oven and let the sliders rest for 2-3 minutes (the cheese needs to set!). Use a sharp knife or pizza cutter to slice into individual sliders. Serve hot for maximum crisp factor.
Prep Notes: If the beef shrinks and exposes some pan edges, don’t worry! Those crispy bits are gold. If your sheetpan is smaller, reduce the beef slightly for a thinner layer. For extra-crispy buns, broil for 1-2 minutes at the end, watching closely.
Personal Tip: I prep everything ahead—season the beef, dice onions, and pre-split buns. That way, when guests arrive, assembly is a breeze and you’re not stuck in the kitchen.
Cooking Tips & Techniques
Making crispy sheetpan burger sliders isn’t rocket science, but a few tricks can turn good into great.
- Even Layering: Press the beef mixture evenly into the pan. If one end is thicker, you’ll get uneven cooking. I learned this after my first batch came out half rare, half well-done—whoops!
- Don’t Overwork the Beef: Mix just until combined. Too much handling packs the meat down and makes it dense.
- Resting Time: Let the sliders sit for a few minutes after baking. This keeps the cheese from oozing everywhere during slicing.
- Watch the Buns: The final bake goes fast! I burned a whole batch once by answering the door—set a timer for those last few minutes.
- Fat Management: If you use fattier beef, spoon off excess fat before adding cheese. It keeps the buns from getting soggy.
- Toppings Matter: Don’t skip the butter and seeds on top. That extra layer of flavor and crunch makes these sliders taste like a real burger joint special.
Timing is key. While the beef is baking, prep your toppings and drinks so everything’s ready to assemble when the buzzer goes off. For perfectly portioned sliders, use the bun as a template to score the beef layer before baking—makes for easy slicing later.
Consistency is all about layering and oven heat. Sheetpans vary, so keep an eye on your first batch and adjust as needed. I’ve messed up plenty of party meals, but this one is forgiving if you check frequently.
Variations & Adaptations
What I love about these sheetpan burger sliders is their flexibility. You can switch things up to suit your crowd, dietary needs, or just your mood.
- Low-Carb Option: Replace the slider buns with halved mini bell peppers or large lettuce leaves. I’ve tried this for keto friends, and it’s surprisingly satisfying!
- Veggie Burger Sliders: Use a plant-based ground, like Impossible or Beyond Beef, and swap the cheese for vegan slices. Works great for vegetarian guests and tastes almost like the real deal.
- Seasonal Twist: In summer, add a thin layer of sliced tomatoes and fresh basil before baking. In fall, swap cheddar for Swiss and add sautéed mushrooms for a cozy, earthy vibe.
- Spicy Kick: Add pickled jalapeños and use pepper jack cheese. A touch of sriracha mixed with the ketchup and mustard gives extra zing.
- Gluten-Free Adaptation: Use gluten-free slider buns or rolls. Udi’s makes a great version that holds up well.
For personal flair, I sometimes add a layer of caramelized onions and a drizzle of BBQ sauce. My family loves the smoky sweetness, especially during backyard cookouts. There’s really no wrong way to build these—mix and match toppings, cheeses, and sauces to find your favorite combo.
Serving & Storage Suggestions
The best way to enjoy crispy sheetpan burger sliders is hot out of the oven, when the buns are golden and the cheese is oozy. I like to pile them onto a big platter lined with parchment and serve with extra pickles, ketchup, and mustard on the side.
For parties, pair these sliders with crunchy potato chips, coleslaw, or a big green salad. If you’re feeling fancy, try a pitcher of lemonade or iced tea—burger night meets backyard picnic!
Leftovers? Pop them in an airtight container and refrigerate for up to 3 days. To reheat, place the sliders on a sheetpan, cover loosely with foil, and bake at 350°F (175°C) for 10 minutes until warmed through. The buns stay pretty crisp, and the cheese remelts nicely.
If you want to freeze, wrap individual sliders in foil and store in a freezer bag. Defrost overnight in the fridge, then reheat as above. The flavors develop even more as they sit, making day-two sliders almost better than fresh (you know, if you have any left).
Nutritional Information & Benefits
Each slider packs about 220 calories, with 12g protein, 10g fat, and 18g carbs (based on standard ingredients). Using lean beef or turkey lowers the fat, and swapping in whole wheat buns boosts fiber.
Cheddar cheese provides calcium and protein, while onions and pickles add antioxidants, vitamin C, and a burst of crunch. If you opt for veggie ground, you’ll cut cholesterol and add plant-based nutrients.
These sliders can fit gluten-free, low-carb, or dairy-free diets with simple swaps. They do contain wheat, dairy, and eggs (if your buns have them), so check labels if allergies are a concern.
From a wellness perspective, I love that you can control the portion size and ingredients. One or two sliders plus a salad makes a balanced meal—no guilt, just good times.
Conclusion
If you’re looking for a fun, easy, and utterly crowd-pleasing party meal, these crispy sheetpan burger sliders are the answer. They’re quick to prep, packed with classic burger flavors, and guaranteed to bring smiles to any gathering. Whether you’re hosting a big bash or just want a cozy family dinner, this recipe fits the bill.
Don’t be afraid to mix up the toppings, play with cheeses, or customize for your crew. That’s the beauty of sheetpan sliders—they’re forgiving, flexible, and always delicious.
I keep making these because they remind me of family cookouts, last-minute celebrations, and the simple joy of sharing good food. So grab your sheetpan, round up some buns, and give these crispy sliders a try! Comment below with your favorite twists, share with fellow burger lovers, or pin to your party board. Let’s make every meal a little more memorable—one slider at a time.
FAQs About Crispy Sheetpan Burger Sliders
Can I make these sheetpan burger sliders ahead of time?
Yes! You can assemble everything up to the final bake, cover the pan, and refrigerate for up to 24 hours. When you’re ready, finish baking the buns as directed.
What kind of beef works best for crispy sheetpan sliders?
I recommend 80/20 ground beef for the juiciest results. Leaner beef is fine, but you might miss out on those crispy edges.
How do I keep the sliders from getting soggy?
Be sure to drain excess fat after baking the beef layer. Using parchment paper also helps keep the bottoms crisp.
Can I use different cheeses in the recipe?
Absolutely! Cheddar, American, Swiss, or pepper jack all work well. Mix and match to suit your taste buds.
Are these sliders freezer-friendly?
Yes. Wrap cooled sliders in foil and freeze for up to 2 months. Reheat in the oven at 350°F (175°C) for the best texture.
Pin This Recipe!
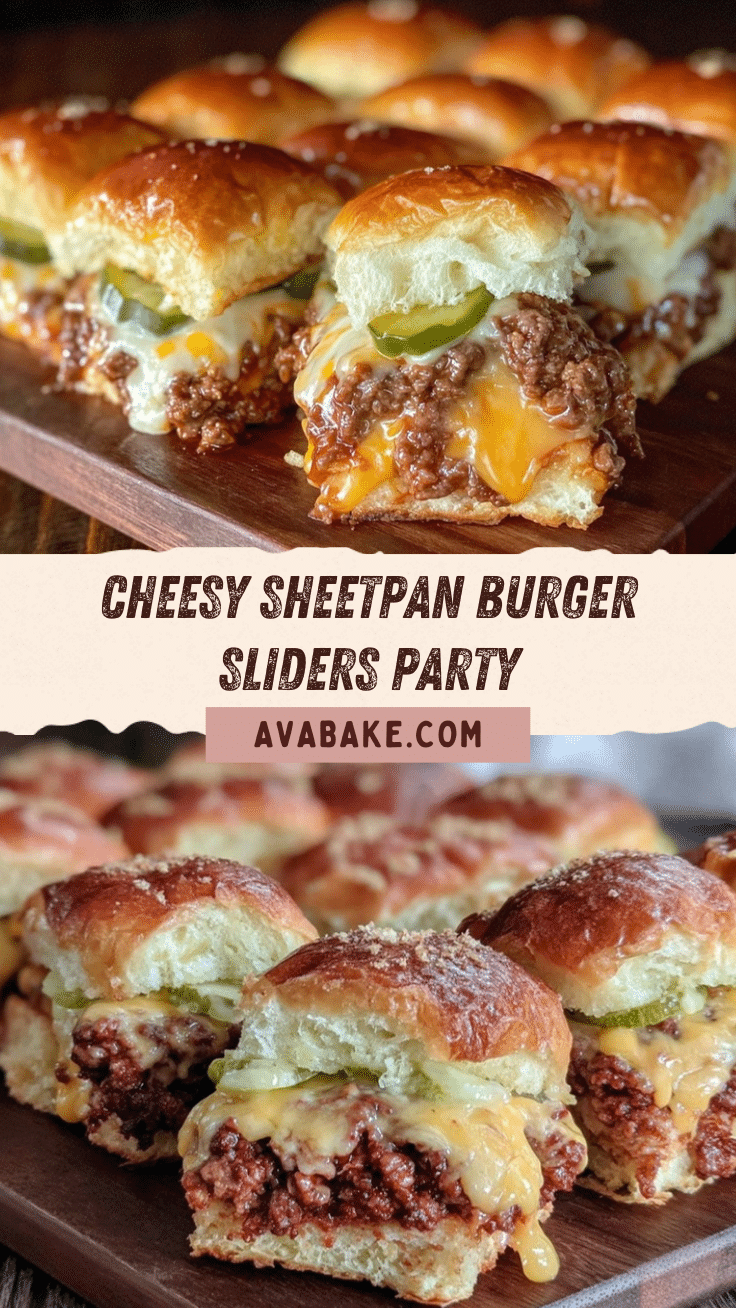
Crispy Sheetpan Burger Sliders
These crispy sheetpan burger sliders are a quick, easy, and crowd-pleasing party meal packed with classic burger flavors. Perfect for gatherings, game days, or cozy family dinners, they feature juicy beef, melty cheddar, and buttery golden buns all baked together for maximum flavor and minimal fuss.
- Prep Time: 15 minutes
- Cook Time: 25 minutes
- Total Time: 40 minutes
- Yield: 12 sliders 1x
- Category: Main Course
- Cuisine: American
Ingredients
- 1.5 pounds ground beef (80/20 for best flavor and juiciness)
- 1 teaspoon kosher salt
- 1/2 teaspoon ground black pepper
- 1 teaspoon garlic powder
- 1 teaspoon onion powder
- 1 tablespoon Worcestershire sauce
- 12 slider buns or dinner rolls, split in half
- 8 ounces cheddar cheese, sliced or shredded
- 1 small red onion, finely diced
- 1/2 cup dill pickle chips (optional)
- 2 tablespoons ketchup
- 2 tablespoons yellow mustard
- 4 tablespoons unsalted butter, melted
- 1 tablespoon sesame seeds (optional)
- 1 tablespoon dried minced onion
- 1 teaspoon poppy seeds (optional)
Instructions
- Preheat oven to 425°F (220°C). Line a large rimmed sheetpan with parchment paper or nonstick foil.
- In a large mixing bowl, combine ground beef, salt, pepper, garlic powder, onion powder, and Worcestershire sauce. Mix just until combined.
- Press the seasoned beef mixture evenly onto the prepared sheetpan, forming a thin layer about 1/2 inch thick.
- Drizzle ketchup and mustard over the beef layer and gently spread into a thin, even coating.
- Sprinkle diced red onion and pickle chips evenly across the beef.
- Bake the beef layer for 13-15 minutes, or until fully cooked and sizzling at the edges. Drain excess fat if needed.
- Remove pan from oven and scatter cheddar cheese over the hot beef. Return to oven for 2-3 minutes until cheese is melted.
- Arrange split slider bun bottoms over the cheese layer, then place bun tops over each bottom half, pressing down gently.
- Brush melted butter over the tops of the buns. Sprinkle with sesame seeds, dried minced onion, and poppy seeds.
- Return sheetpan to oven and bake for another 6-8 minutes, until buns are golden brown and crisp at the edges.
- Remove from oven and let sliders rest for 2-3 minutes. Slice into individual sliders and serve hot.
Notes
For gluten-free, use GF slider buns. For dairy-free, use vegan cheese and plant-based butter. For extra-crispy buns, broil for 1-2 minutes at the end. Prep ingredients ahead for easy assembly. Watch the buns closely during the final bake to prevent burning. You can freeze leftovers wrapped in foil for up to 2 months.
Nutrition
- Serving Size: 1 slider
- Calories: 220
- Sugar: 3
- Sodium: 420
- Fat: 10
- Saturated Fat: 5
- Carbohydrates: 18
- Fiber: 1
- Protein: 12
Keywords: sheetpan sliders, burger sliders, party food, easy sliders, oven burgers, crowd-pleaser, game day, family dinner


