Introduction
The moment you catch the aroma of melted chocolate and peanut butter swirling together in your kitchen, you just know something good is happening. That sweet, nutty scent mingling with the crunch of crisp cereal—and then, the unmistakable Butterfinger flavor—well, it’s the kind of snack that practically begs you to sneak a handful before it even cools down. The first time I whipped up this Butterfinger Puppy Chow recipe, I swear, my kitchen turned into a magnet for everyone in the house. Kids, teens, grownups—everyone hovered, waiting for permission to dig in. When I finally tasted that first piece, I was instantly hooked. It was one of those moments where you pause, close your eyes, and just savor the mix of nostalgia and pure candy bliss.
Honestly, I wish I’d stumbled on this treat years ago (maybe during those endless bake sales or rainy afternoons when nothing seemed to satisfy my sweet tooth). Growing up, my grandma made traditional puppy chow for every holiday, and we’d all gather around the table, sticky fingers and all. But this Butterfinger twist? It’s dangerously easy and brings a whole new level of candy-bar magic.
I’ve made this recipe more times than I can count—in the name of research, of course! My family couldn’t stop sneaking bites straight from the bowl, and my friends always ask for the recipe after just one taste. It’s become a staple for family movie nights, gifting, and honestly, just brightening up a gloomy day. If you’re looking for a snack that feels like a warm hug and tastes like pure childhood joy, you’re going to want to bookmark this Butterfinger Puppy Chow. Perfect for potlucks, sweet treats for your kids, or just adding a little wow to your Pinterest snack board. Trust me, this recipe is the kind you’ll come back to again and again.
Why You’ll Love This Recipe
You know, after all my kitchen experiments over the years, there are certain recipes that never let me down—this Butterfinger Puppy Chow recipe is absolutely one of them. I’ve tested it for texture, flavor, and that perfect candy crunch, and it always comes through. Honestly, it’s the kind of snack that makes you do a happy dance after just one bite. Here’s why it stands out:
- Quick & Easy: Comes together in under 20 minutes. Perfect for busy weeknights, impromptu parties, or when those candy cravings hit hard.
- Simple Ingredients: No fancy grocery trips. You probably already have everything in your pantry—especially if you’re a cereal lover or candy fan.
- Perfect for Any Occasion: Great for movie nights, classroom treats, potlucks, holiday gatherings, or just a pick-me-up snack for yourself.
- Crowd-Pleaser: Trust me, adults and kids (even picky eaters) rave about this snack. It never lasts long in my house!
- Unbelievably Delicious: The combination of creamy peanut butter, rich chocolate, and that signature Butterfinger crunch is next-level comfort food.
What makes this Butterfinger Puppy Chow recipe different from the rest? Well, I use real Butterfinger bars for the topping—not just candy flavoring or imitation bits. I also blend the peanut butter and chocolate until super smooth, which coats every piece perfectly. That way, every handful delivers the iconic taste you’re craving. Plus, using a gentle folding technique keeps the cereal crisp (no soggy pieces here).
This isn’t just another snack mix—it’s a celebration of candy love and childhood memories. Whether you want to impress guests (without breaking a sweat) or just treat yourself to something sweet, this recipe gives you that satisfying mix of nostalgia and bold flavor. It’s comfort food, the easy way, and with a Butterfinger twist you won’t find anywhere else. Close your eyes, take a bite, and let the candy magic do its thing!
What Ingredients You Will Need
This Butterfinger Puppy Chow recipe uses everyday ingredients to deliver bold, candy-bar flavor and a perfect, crave-worthy texture. Most of these are pantry staples, but you might want to stash a few Butterfinger bars for those last-minute snack attacks!
- For the Puppy Chow:
- Rice Chex cereal (8 cups / about 240g) – The classic base for puppy chow; keeps everything crispy.
- Semi-sweet chocolate chips (1 cup / 175g) – Melts smoothly and gives that rich flavor.
- Creamy peanut butter (1/2 cup / 120g) – Adds a nutty depth and helps the chocolate stick.
- Unsalted butter (1/4 cup / 56g) – A touch of richness (use vegan butter for dairy-free).
- Vanilla extract (1 teaspoon / 5ml) – Rounds out the flavors (optional, but highly recommended).
- Powdered sugar (2 cups / 240g) – Gives puppy chow its classic “snowy” coating.
- For the Butterfinger Crunch:
- Butterfinger candy bars (4 regular bars or 8 fun-size / 120g total) – Crushed for that signature candy flavor.
- Optional Add-ins and Substitutes:
- Milk chocolate chips – Swap in for semi-sweet if you want a milder taste.
- Almond butter – Works in place of peanut butter for a different twist (or for allergies).
- Gluten-free Chex – Use if you need a gluten-free version (most classic Rice Chex are gluten-free, but double-check).
- Coconut oil – Replace the butter for a dairy-free option.
- Extra crushed Butterfinger bits – For topping, if you want even more crunch and candy flavor.
- Ingredient Tips:
- I recommend using fresh, crisp cereal for best texture—stale cereal just won’t cut it.
- Look for Butterfinger bars with a good snap and bright color for maximum flavor.
- If you’re making this in summer, you can keep the mix chilled for a cool treat (just don’t store in a humid spot).
- Powdered sugar can clump—sift it first if you want a perfectly even coating.
Honestly, the ingredient list is as easy as it gets. Don’t stress if you need to swap something out—this recipe is very forgiving. That’s half the fun!
Equipment Needed
- Large mixing bowl – You want plenty of room to toss the cereal and coat everything evenly. I use my big glass bowl (makes cleanup easier).
- Microwave-safe bowl – For melting chocolate and peanut butter. If you prefer, a double boiler works too (just takes a bit longer).
- Rubber spatula or wooden spoon – For gentle mixing—keeps the cereal from crushing.
- Zip-top bag (gallon size) – For shaking the mix with powdered sugar. If you don’t have one, use a big paper bag or toss gently in the bowl.
- Measuring cups and spoons – Precision matters for the chocolate and peanut butter ratio.
- Small rolling pin or heavy glass – For crushing Butterfinger bars. You can also use your hands (just put the bars in a bag first).
If you don’t have a microwave, stovetop melting works fine—just use low heat and watch closely. For budget-friendly gear, dollar store bowls and spoons do the job, and they’re easy to wash up. I’ve used everything from old salad bowls to reusable freezer bags for tossing—honestly, it’s more about the method than fancy tools. Just keep your spatula flexible and your mixing bowl roomy!
Preparation Method
-
Prep the Butterfinger Crunch:
Place Butterfinger bars in a zip-top bag. Crush with a rolling pin or glass until you have small chunks and crumbs (not a fine powder). Set aside for later.
Tip: Leave some larger pieces for extra crunch! -
Measure and Pour the Cereal:
Add 8 cups (about 240g) of Rice Chex to a large mixing bowl. Make sure your bowl is big enough to toss everything without spilling.
Warning: Don’t use a small bowl—coating will get messy fast. -
Melt the Chocolate and Peanut Butter:
In a microwave-safe bowl, combine 1 cup (175g) semi-sweet chocolate chips, 1/2 cup (120g) creamy peanut butter, and 1/4 cup (56g) unsalted butter. Microwave in 30-second bursts, stirring in between, until smooth and completely melted (about 1–2 minutes total).
If using a stovetop, gently melt over low heat, stirring often.
Time Estimate: 2 minutes for melting. -
Add Vanilla Extract:
Stir in 1 teaspoon (5ml) vanilla extract to the chocolate-peanut butter mixture.
This step adds a little extra depth—skip if you prefer a more classic taste. -
Combine Chocolate Mixture and Cereal:
Pour the melted mixture over the cereal. Use a rubber spatula or wooden spoon to gently fold until all pieces are coated evenly.
Troubleshooting: If the chocolate seems too thick, microwave for 15 seconds to loosen it up.
Time Estimate: 2–3 minutes for careful mixing. -
Coat with Powdered Sugar:
Transfer the coated cereal to a large zip-top bag. Add 2 cups (240g) powdered sugar. Seal and shake until all pieces are covered.
Prep Note: Shake in batches if your bag is small.
Time Estimate: 1–2 minutes for shaking. -
Add Butterfinger Crunch:
Sprinkle crushed Butterfinger bars over the powdered chow. Toss gently in the bowl (or bag) to distribute chunks throughout.
Tip: Save a handful of Butterfinger crumbs for garnish if you want to make it pretty for serving. -
Cool and Serve:
Spread the puppy chow on a baking sheet or parchment paper. Let cool for 10–15 minutes so the coating sets.
Time Estimate: 10–15 minutes for cooling. -
Final Taste Test:
Sneak a piece (in the name of research). Adjust with a little more powdered sugar or Butterfinger if you want extra sweetness or crunch.
Sensory Cue: Look for even coating and visible Butterfinger bits.
I find that using gentle folding keeps the cereal crisp. If you notice any soggy pieces, your chocolate was too hot—let it cool a few seconds before mixing next time. And don’t hesitate to tweak the sugar or Butterfinger ratio until it’s just right for you!
Cooking Tips & Techniques
After a few rounds of making Butterfinger Puppy Chow (and, honestly, a couple of messy fails), I’ve picked up a handful of tips that really make a difference. Here’s what helps me get perfect results every time:
- Don’t Overheat the Chocolate: If the chocolate gets too hot, it’ll seize or burn. Use short microwave bursts and stir well—it should be just smooth and shiny.
- Gentle Mixing Is Key: Cereal crushes easily, so fold carefully. I use a flexible spatula and try not to rush this step.
- Use Fresh Cereal: Stale cereal can get chewy (yuck!). Always check the expiration date before starting.
- Shake in Batches: If your bag is crowded, the powdered sugar won’t coat evenly. Divide the mix for thorough coverage.
- Crush Candy Bars Just Before Adding: Butterfinger bars can get sticky if crushed too early. I do this step last for max crunch.
- Watch Out for Clumps: If the chocolate-peanut butter is too thick, you’ll get big globs instead of a light coating. Thin with a teaspoon of melted butter if needed.
- Chill for Extra Crunch: Pop the finished puppy chow in the fridge for 10 minutes before serving—makes the coating set and the chunks stay crisp.
I’ve learned (the hard way) that rushing leads to broken cereal and uneven flavor. Take your time with each step, and don’t be afraid to taste as you go. If you’re multitasking (like wrangling kids while making snacks), prep ingredients ahead so you can focus on mixing. Consistency is all about gentle handling, even coating, and using the freshest stuff you can find.
Variations & Adaptations
One thing I love about Butterfinger Puppy Chow is how flexible it is—you can switch things up to suit your taste, dietary needs, or whatever you have on hand. Here are some fun twists I’ve tried and recommend:
- Gluten-Free Variation: Use gluten-free Chex or similar cereal (just double-check labels). All other ingredients are naturally gluten-free, so it’s an easy swap.
- Dairy-Free Adaptation: Substitute coconut oil for butter, and use dairy-free chocolate chips. Almond butter works for peanut allergies, and the result is just as delicious.
- Seasonal Flavor Boosts: Add a pinch of pumpkin spice in fall, or swap the Butterfinger bars for holiday-themed candy (like crushed peppermint bark or mini peanut butter cups) for a festive twist.
- Extra Crunch: Toss in salted pretzel sticks or mini marshmallows for more texture. My kids love this version for after-school snacking.
- Less Sugar: Cut the powdered sugar to 1 cup (120g) for a lighter version—just know the coating won’t be quite as thick.
- Personal Favorite: I tried adding a drizzle of melted white chocolate and a sprinkle of sea salt once—total game-changer! The sweet-salty combo is addictive.
If you’re feeling adventurous, you can even bake the coated mix for 5 minutes at 350°F (175°C) for a slightly toasted flavor. Just keep an eye out so it doesn’t burn. Whatever your vibe—classic, indulgent, or allergy-friendly—there’s a Butterfinger Puppy Chow combo for you!
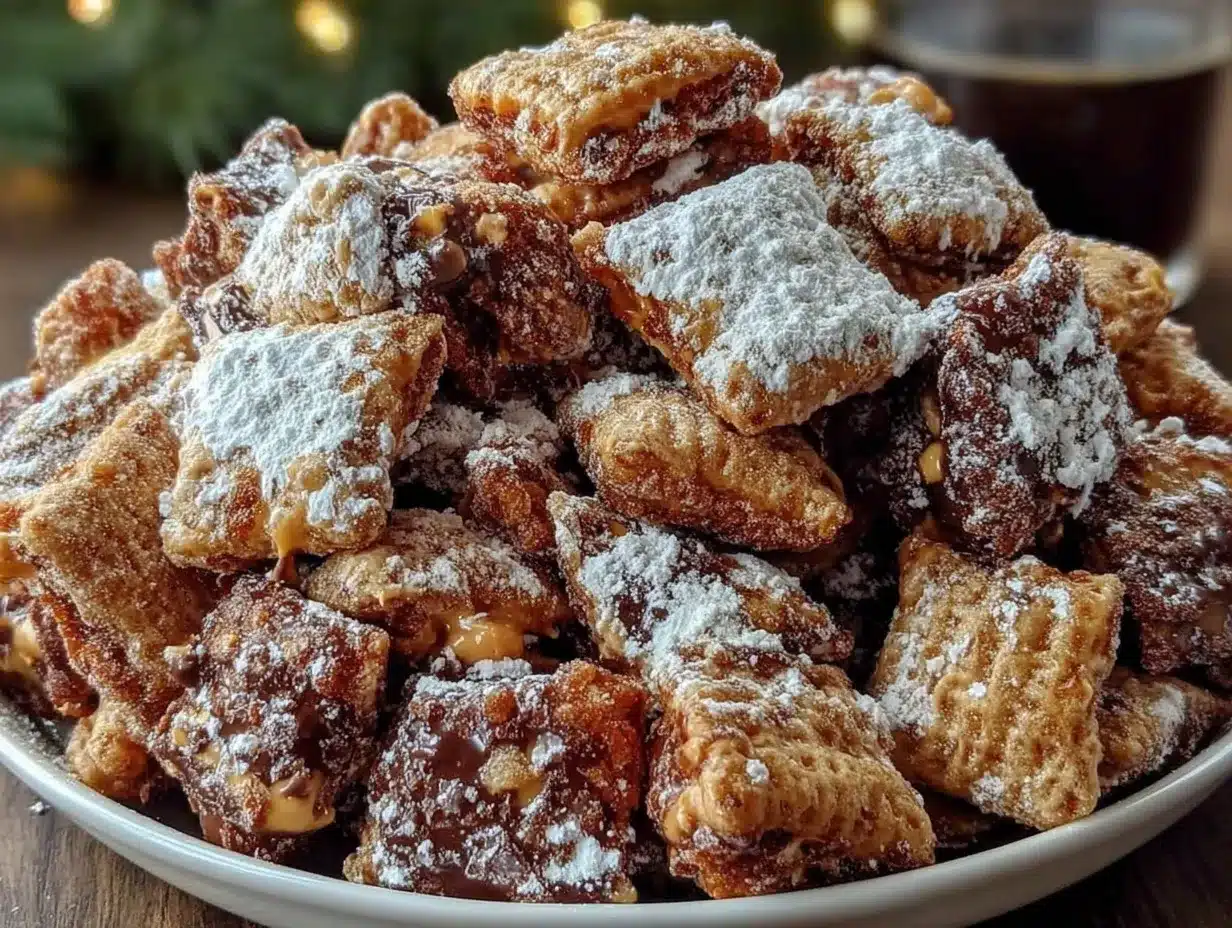
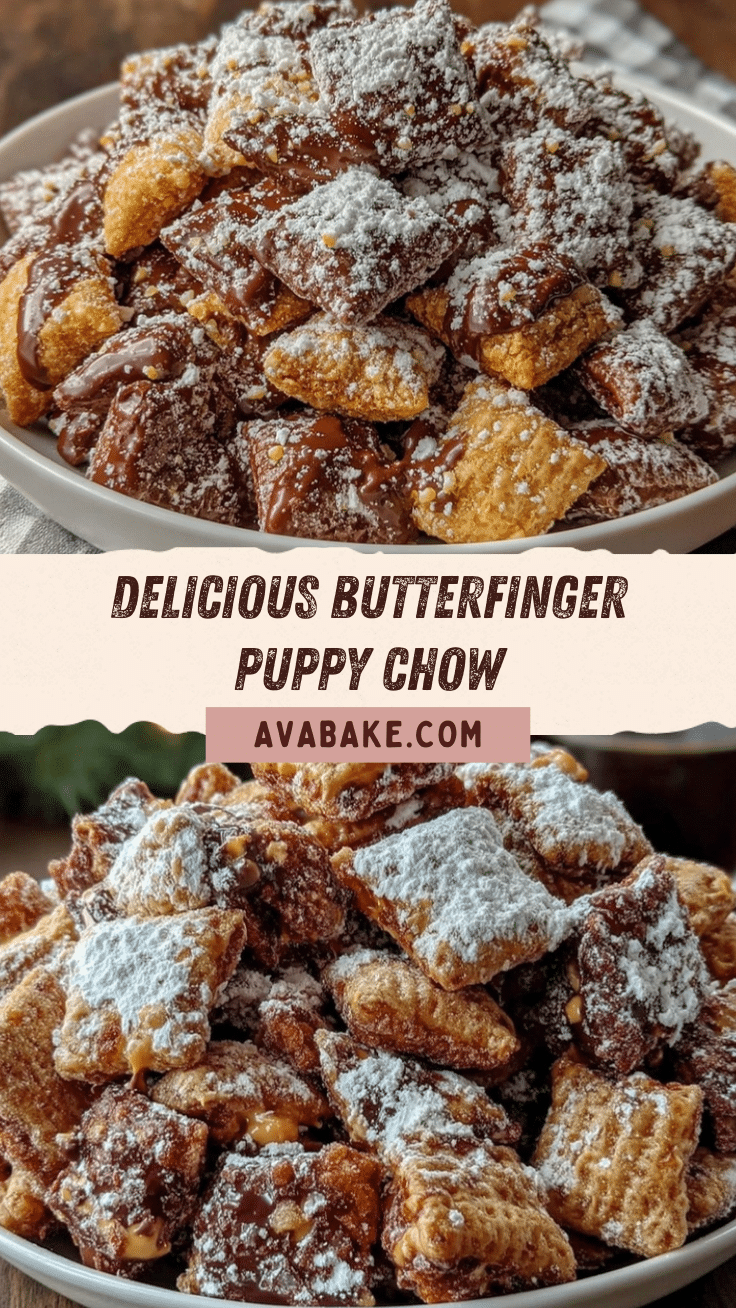
Serving & Storage Suggestions
The best way to serve Butterfinger Puppy Chow is fresh and cool, right after the coating sets. I like to pile it high in a big bowl for parties or scoop it into cute mason jars for gifts. If you’re sharing with kids, cupcake liners or snack bags make portioning a breeze.
- Serving Temperature: Room temperature is perfect, but a quick chill in the fridge makes everything extra crisp.
- Presentation: Sprinkle with extra Butterfinger crumbs for a pretty finish. For a Pinterest-worthy look, use colorful bowls or tie snack bags with ribbon.
- Pairings: Goes great with cold milk, hot cocoa, or coffee. For parties, I pair with salty snacks like pretzels or popcorn.
- Storage: Keep in an airtight container at room temp for up to 1 week. For longer storage, freeze in zip-top bags for up to 2 months—just thaw before serving.
- Reheating: If things get a little soggy, spread on a baking sheet and let sit at room temp for 10 minutes, or pop in the fridge for 15 minutes. Do not microwave—it melts the coating!
You’ll notice the flavors deepen over a day or two, so sometimes I make a batch ahead for parties. It’s one of those snacks that only gets better with time (if you have any left to store).
Nutritional Information & Benefits
A quick nutrition rundown for this Butterfinger Puppy Chow recipe (per 1/2 cup serving, approx.):
- Calories: 210
- Fat: 9g
- Carbs: 31g
- Sugar: 18g
- Protein: 3g
The key ingredients—peanut butter and cereal—offer a small boost of protein and fiber. Butterfinger bars add that irresistible candy flavor, but they do bring sugar, so enjoy in moderation. If you opt for gluten-free or dairy-free swaps, the recipe fits most dietary needs.
Allergens: Contains peanuts, dairy, and soy (from candy bars and chocolate chips). Always double-check packaging if you’re serving friends or family with sensitivities. From a personal wellness perspective, I treat this as a “fun food”—it’s meant for celebrations, sharing, and occasional cravings. And honestly, it’s worth every bite.
Conclusion
So, why should you try this Butterfinger Puppy Chow recipe? Because it’s nostalgic, candy-packed, and just plain fun to make. Every handful is a trip down memory lane, but with a Butterfinger twist that’ll have you reaching for seconds (or thirds, let’s face it).
What I love most is how easy it is to customize—whether you want gluten-free, dairy-free, or a seasonal spin, the basic method stays the same. It’s perfect for gifting, parties, or just treating your inner candy lover to something special.
If you give it a try, let me know how you tweak it! Share your batch on Pinterest, drop a comment below, or send me your favorite adaptation. I’m always excited to see how others make this recipe their own. Happy snacking—and remember, sometimes the best treats are the easiest ones.
FAQs
Can I use a different type of cereal for Butterfinger Puppy Chow?
Absolutely! Rice Chex is classic, but corn or wheat Chex work fine. Just make sure it’s a sturdy, unsweetened cereal for the best crunch.
How do I make Butterfinger Puppy Chow gluten-free?
Use certified gluten-free Chex cereal and double-check your chocolate chips and Butterfinger bars for hidden gluten. Most versions are naturally gluten-free, but always check labels.
Can I make Butterfinger Puppy Chow ahead of time?
Yes! It stores great in an airtight container for up to a week, and the flavors actually get better after a day or two. For parties, make it the day before for max flavor and convenience.
What’s the best way to crush Butterfinger bars?
Pop them in a zip-top bag and use a rolling pin or heavy glass to gently crush them into chunks and crumbs. Don’t crush too fine—bigger pieces add great texture.
Can I freeze Butterfinger Puppy Chow?
You sure can! Freeze in zip-top bags for up to 2 months. Let thaw at room temp before serving, and give a quick toss for even texture.
Pin This Recipe!
Butterfinger Puppy Chow Recipe: Easy Homemade Snack for Candy Lovers
This Butterfinger Puppy Chow is a quick, crowd-pleasing snack that combines crispy Chex cereal with rich chocolate, creamy peanut butter, and crushed Butterfinger bars for a nostalgic, candy-packed treat. Perfect for parties, gifting, or satisfying your sweet tooth, it’s dangerously easy and irresistibly delicious.
- Prep Time: 5 minutes
- Cook Time: 10 minutes
- Total Time: 20 minutes
- Yield: 12 servings 1x
- Category: Snack
- Cuisine: American
Ingredients
- 8 cups Rice Chex cereal (about 240g)
- 1 cup semi-sweet chocolate chips (175g)
- 1/2 cup creamy peanut butter (120g)
- 1/4 cup unsalted butter (56g)
- 1 teaspoon vanilla extract (5ml, optional)
- 2 cups powdered sugar (240g)
- 4 regular Butterfinger candy bars or 8 fun-size (120g total), crushed
- Optional: milk chocolate chips (swap for semi-sweet)
- Optional: almond butter (swap for peanut butter)
- Optional: gluten-free Chex cereal
- Optional: coconut oil (swap for butter)
- Optional: extra crushed Butterfinger bits for topping
Instructions
- Place Butterfinger bars in a zip-top bag and crush with a rolling pin or glass until you have small chunks and crumbs. Set aside.
- Add 8 cups Rice Chex cereal to a large mixing bowl.
- In a microwave-safe bowl, combine chocolate chips, peanut butter, and butter. Microwave in 30-second bursts, stirring in between, until smooth and melted (about 1–2 minutes).
- Stir in vanilla extract to the melted mixture.
- Pour the melted chocolate-peanut butter mixture over the cereal. Gently fold with a spatula or wooden spoon until all pieces are coated evenly.
- Transfer the coated cereal to a large zip-top bag. Add powdered sugar, seal, and shake until all pieces are covered.
- Sprinkle crushed Butterfinger bars over the powdered chow. Toss gently to distribute chunks throughout.
- Spread the puppy chow on a baking sheet or parchment paper. Let cool for 10–15 minutes so the coating sets.
- Taste and adjust with more powdered sugar or Butterfinger if desired. Serve and enjoy!
Notes
Use fresh, crisp cereal for best texture. Gentle folding keeps the cereal from crushing. Sift powdered sugar for even coating. For gluten-free or dairy-free, use appropriate substitutes. Chill finished puppy chow for extra crunch. Store in an airtight container at room temperature for up to 1 week or freeze for up to 2 months.
Nutrition
- Serving Size: 1/2 cup
- Calories: 210
- Sugar: 18
- Sodium: 110
- Fat: 9
- Saturated Fat: 4
- Carbohydrates: 31
- Fiber: 1
- Protein: 3
Keywords: Butterfinger puppy chow, snack mix, candy, easy dessert, party treat, Chex mix, chocolate peanut butter, homemade puppy chow, gluten-free option, dairy-free option


