“Hey, you have to try making those berry tarts for the picnic,” my friend texted me one steamy July afternoon. Honestly, I was skeptical. Mini tarts, with a cream cheese filling and a flag design? Seemed like a lot of fuss for a casual backyard get-together. But the idea stuck in my head, especially when the smell of fresh berries at the market reminded me of summer’s sweetness.
That evening, with the kitchen quiet except for the hum of the fridge and the occasional crackle of the crust baking, I gave it a shot. The first tart came out perfect—golden crust with just the right balance of tangy cream cheese and juicy berries. I found myself making them over and over that week, each batch a little better, a little more perfect.
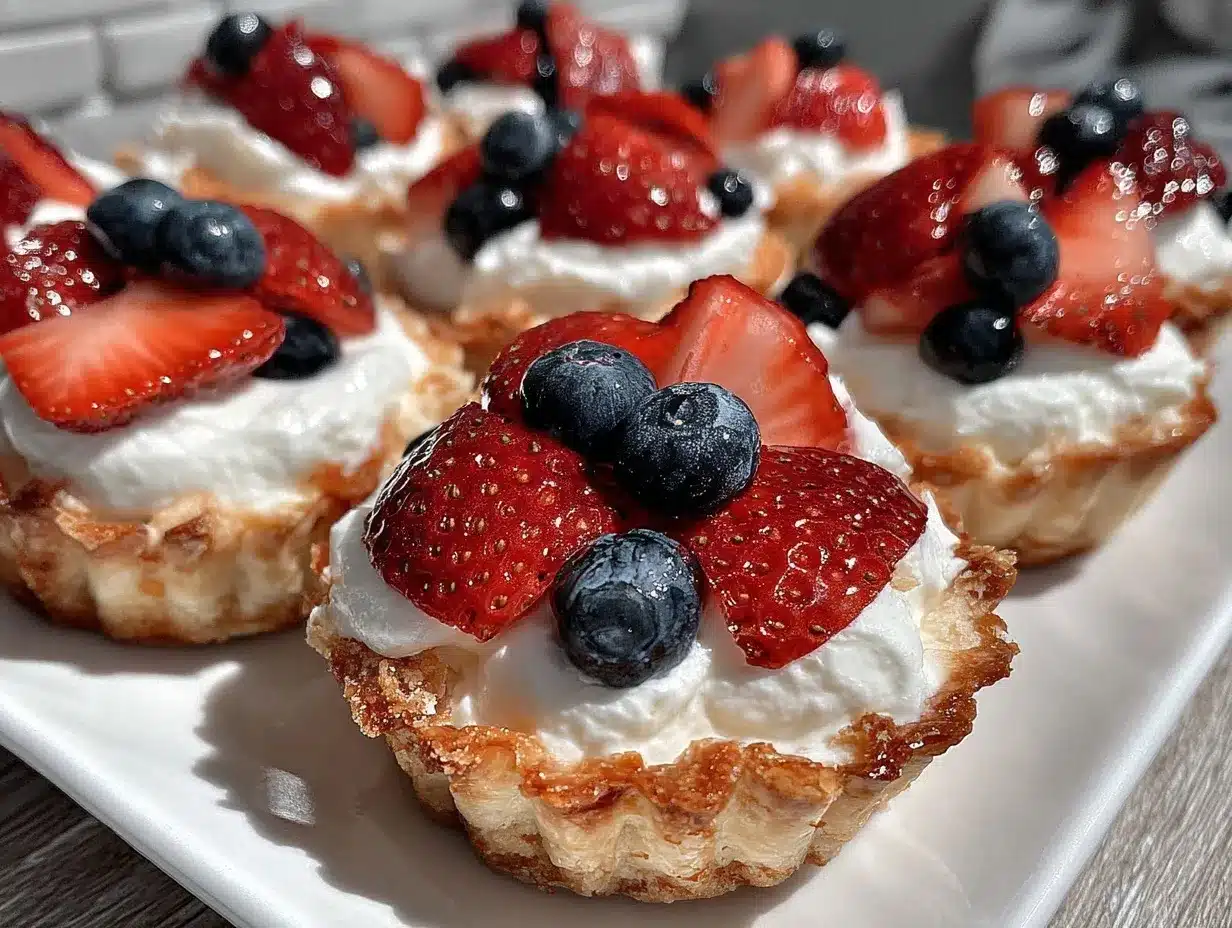
What surprised me most was how these mini American flag berry tarts instantly brought a burst of celebration to the table. Simple ingredients, but done right, made them stand out. They’re not just a dessert; they’re a nod to summertime, to family gatherings, and to those quiet moments when you realize a little effort can make a big memory. And that’s why this recipe stuck with me—it’s an easy homemade treat that feels special without being complicated.
Why You’ll Love This Perfect Mini American Flag Berry Tarts Recipe
This recipe isn’t just another dessert to throw together; it’s a tried-and-true favorite that’s been tested multiple times in my kitchen (sometimes on a whim, sometimes with company). Here’s why it’s a winner:
- Quick & Easy: The entire process takes under an hour, making it perfect for last-minute 4th of July celebrations or spontaneous summer get-togethers.
- Simple Ingredients: Pantry staples like cream cheese, a few fresh berries, and store-bought pie crust make this recipe accessible and convenient.
- Perfect for Patriotic Occasions: Whether it’s Independence Day, Memorial Day, or a neighborhood BBQ, these tarts bring festive flair without the hassle.
- Crowd-Pleaser: The mix of creamy, tart, and sweet flavors has kids asking for seconds and adults impressed by the presentation.
- Unbelievably Delicious: The creamy filling balances the fresh berries’ brightness, while the buttery crust adds that perfect crunch.
What sets this recipe apart? For one, I blend the cream cheese filling until it’s ultra-smooth, which gives these tarts a silky texture that feels indulgent but not heavy. Also, the berry arrangement mimics the flag’s stripes and stars in a way that’s fun and approachable—no need for piping bags or fancy tools. I’ve seen recipes that use complicated meringues or elaborate decorations, but this one keeps it real, focusing on fresh flavors and straightforward steps.
Honestly, it’s the kind of dessert you can trust to bring smiles without sweating the details, making your holiday—or any summer day—a little more memorable.
What Ingredients You Will Need for Perfect Mini American Flag Berry Tarts
This recipe uses simple, wholesome ingredients to deliver bold flavor and that satisfying balance of creamy and fruity textures without much fuss. Most are pantry staples or easy to find at your local store.
- Pie Crust: 1 package (about 14 oz / 400 g) of store-bought refrigerated pie dough (I like Pillsbury for consistent flakiness)
- Cream Cheese Filling:
- 8 oz (225 g) cream cheese, softened (full fat for best flavor)
- 1/4 cup (50 g) granulated sugar
- 1 teaspoon pure vanilla extract
- 2 tablespoons sour cream (adds a nice tang and smoothness)
- Fresh Berries:
- 1 cup (150 g) fresh strawberries, hulled and thinly sliced (for red stripes)
- 1 cup (150 g) fresh blueberries (for blue star section)
- 1 cup (150 g) fresh raspberries (for red stripes)
- Optional Glaze: 2 tablespoons apricot jam, warmed and strained (for a glossy finish)
Look for firm berries without bruises to keep the tarts looking fresh and vibrant. If strawberries aren’t in season, frozen but thawed berries work well too, just drain any excess liquid. You can swap sour cream with Greek yogurt if you prefer a lighter tang or want a dairy-free option using coconut yogurt. For a gluten-free crust, almond flour crusts are a nice alternative.
Equipment Needed
- Mini tart pans or a standard muffin tin with removable bottoms (mine are 3-inch / 7.5 cm diameter)
- Mixing bowls (one medium for cream cheese filling, one small for glaze)
- Hand mixer or stand mixer (to whip the cream cheese filling smooth)
- Rolling pin (for rolling out pie dough evenly)
- Sharp paring knife (for slicing berries neatly)
- Small pastry brush (for applying glaze)
- Cooling rack (to let tarts cool evenly)
If you don’t have tart pans, a regular muffin tin works fine—just press the dough in carefully and remove the tarts gently after baking. A hand mixer definitely speeds up the cream cheese filling prep, but a sturdy whisk and some elbow grease can do the trick. I’ve found that lightly dusting the rolling surface with flour helps prevent sticking without toughening the dough.
Preparation Method
- Preheat your oven to 375°F (190°C). This ensures the crust gets golden and crisp without overbaking the filling.
- Roll out the pie dough. On a lightly floured surface, roll the dough to about 1/8 inch (3 mm) thickness. You want it thin enough to be tender but thick enough to hold the filling.
- Cut and line the tart pans. Use a 4-inch (10 cm) round cookie cutter to cut circles from the dough. Gently press each circle into the tart pans, smoothing the edges. Prick the dough bottoms with a fork to prevent bubbles.
- Blind bake the crusts. Place parchment paper and pie weights (or dried beans) on each tart shell. Bake for 10 minutes, then carefully remove the weights and paper. Bake for another 5 minutes until golden. Let cool completely on a rack.
- Prepare the cream cheese filling. In a bowl, beat the softened cream cheese with sugar and vanilla extract until smooth and fluffy. Add sour cream and mix until fully combined. Taste and adjust sweetness if needed.
- Fill the tart shells. Spoon the cream cheese mixture evenly into each cooled crust, smoothing the tops gently with a small spatula or back of a spoon.
- Arrange the berries to create the flag design.
- Place blueberries in the upper left corner to form the “stars” section (about 1/3 of the tart surface).
- Alternate rows of sliced strawberries and raspberries for the red and white stripes—use the cream cheese as the white stripes.
- Optional glaze. Warm the apricot jam until it’s liquidy, then brush lightly over the berries for a glossy, fresh look.
- Chill the tarts. Refrigerate for at least 30 minutes before serving to let the filling set and flavors meld.
Watch the crust edges during baking—they can brown quickly, so tent with foil if necessary. When arranging the berries, a small offset spatula helps with precision. If you accidentally drop a berry, just swap it out—presentation matters, but it’s okay if it’s not perfect! I’ve found that chilling the tarts really makes a difference—the cream cheese filling firms up and the flavors brighten.
Cooking Tips & Techniques for Perfect Mini American Flag Berry Tarts
Here’s some hard-earned advice to make sure your berry tarts come out picture perfect every time:
- Blind baking the crust is key to avoid soggy bottoms. Don’t skip the pie weights—they keep the crust from puffing up.
- Softened cream cheese blends easier and creates a smoother filling. Take it out of the fridge 30 minutes in advance.
- Keep your berries dry. Excess moisture can make the crust soggy. Pat them gently with a paper towel if needed.
- Use a sharp knife for slicing strawberries thinly and evenly—it helps with neat rows and uniform stripes.
- Glazing helps with appearance but isn’t necessary if you want a more rustic look or prefer less sweetness.
- Timing matters: Prepare crusts and filling ahead, then assemble and chill right before serving to keep berries fresh.
Once, I forgot to chill the filling enough and ended up with a runny tart—not fun. Now I always give it a good 30 minutes in the fridge before filling the crust. Also, I usually prepare these alongside other festive dishes, like an easy honey garlic butter chicken sheet pan dinner, which lets me manage my time efficiently while keeping the kitchen organized.
Variations & Adaptations for Your Mini American Flag Berry Tarts
Switch things up depending on your taste, dietary needs, or what’s fresh at the market:
- Berry swap: Use blackberries or sliced kiwi for a colorful twist while keeping the flag theme.
- Crust alternatives: Try a graham cracker crust for a sweeter, crumbly base or a gluten-free almond flour crust for dietary needs.
- Flavored cream cheese: Add a teaspoon of lemon zest or a splash of almond extract to the filling for subtle flair.
- Vegan version: Use dairy-free cream cheese and coconut yogurt with a plant-based crust.
- Mini tartlet bars: Bake the filling in a rectangular pan and arrange berries on top for easier slicing and serving.
Personally, I once made these with a lemon cream cheese filling, adding a fresh zing that complemented the berries beautifully. For a less traditional but equally delicious take, check out my no-bake Oreo cheesecake recipe—it’s a great companion dessert for summer parties.
Serving & Storage Suggestions
Serve these tarts chilled or at room temperature. They’re perfect as a light, refreshing dessert after a grilled meal or as a sweet snack for picnic baskets. Garnish with a sprig of mint or a dusting of powdered sugar for a touch of elegance.
Pair them with iced tea, lemonade, or a sparkling rosé for a festive vibe. They also go well alongside savory dishes like a crisp green salad or even something like my easy one-pot St. Patrick’s Day salmon with quinoa, which balances the meal with protein and grains.
Store leftovers covered tightly in the refrigerator for up to two days—though honestly, they rarely last that long. For longer storage, you can freeze unbaked tart shells or the cream cheese filling separately, but assembled tarts don’t freeze well because of the fresh berries.
When reheating, avoid the microwave (berries turn mushy!). Instead, let tarts come to room temperature naturally, or enjoy chilled. The flavors actually deepen if left refrigerated for a few hours, making them even more satisfying.
Nutritional Information & Benefits
Each mini tart contains approximately 180 calories, mainly from the cream cheese and crust, with a good dose of vitamin C and antioxidants from the fresh berries. The cream cheese provides protein and calcium, while the berries add fiber and natural sweetness.
This recipe can be modified for gluten-free or dairy-free diets as mentioned earlier. Keep in mind that the fresh berries make these tarts a lighter, less sugary dessert choice compared to many traditional sweets, making them a thoughtful option for those watching their sugar intake.
From a wellness perspective, incorporating fresh fruit into desserts adds nutritional value without sacrificing flavor, which is something I appreciate when balancing indulgence with health-conscious choices.
Conclusion
These Perfect Mini American Flag Berry Tarts with Cream Cheese are a sweet, festive treat that’s as fun to make as they are to eat. Whether you’re hosting a 4th of July party or just craving a colorful summer dessert, this recipe fits the bill with its straightforward steps and delicious results.
Feel free to play with the berries or the filling to suit your taste, but keep that flaky crust and creamy center—they’re the heart of why this recipe works so well. I love how these tarts bring a little patriotic spirit and fresh flavor to the table, making every bite a celebration.
If you try these out, I’d love to hear how you customize them or what memories you create around this recipe. Sharing food stories and tweaks is the best part of cooking, don’t you think?
Happy baking and happy summer!
Frequently Asked Questions About Perfect Mini American Flag Berry Tarts
Can I make these tarts ahead of time?
You can prepare the crust and filling a day ahead, but it’s best to assemble and add fresh berries just before serving to keep them looking fresh.
What if I don’t have tart pans?
A muffin tin works well—just press the dough carefully into each cup and remove the tarts gently after baking.
Can I use frozen berries?
Yes, but thaw and drain them thoroughly to avoid soggy crusts.
How do I store leftover tarts?
Cover and refrigerate for up to two days. They’re best enjoyed chilled or at room temperature, not reheated.
Is there a vegan version of this recipe?
Definitely! Use dairy-free cream cheese and yogurt alternatives, plus a plant-based crust. The berry design remains the same and is just as festive.
Pin This Recipe!
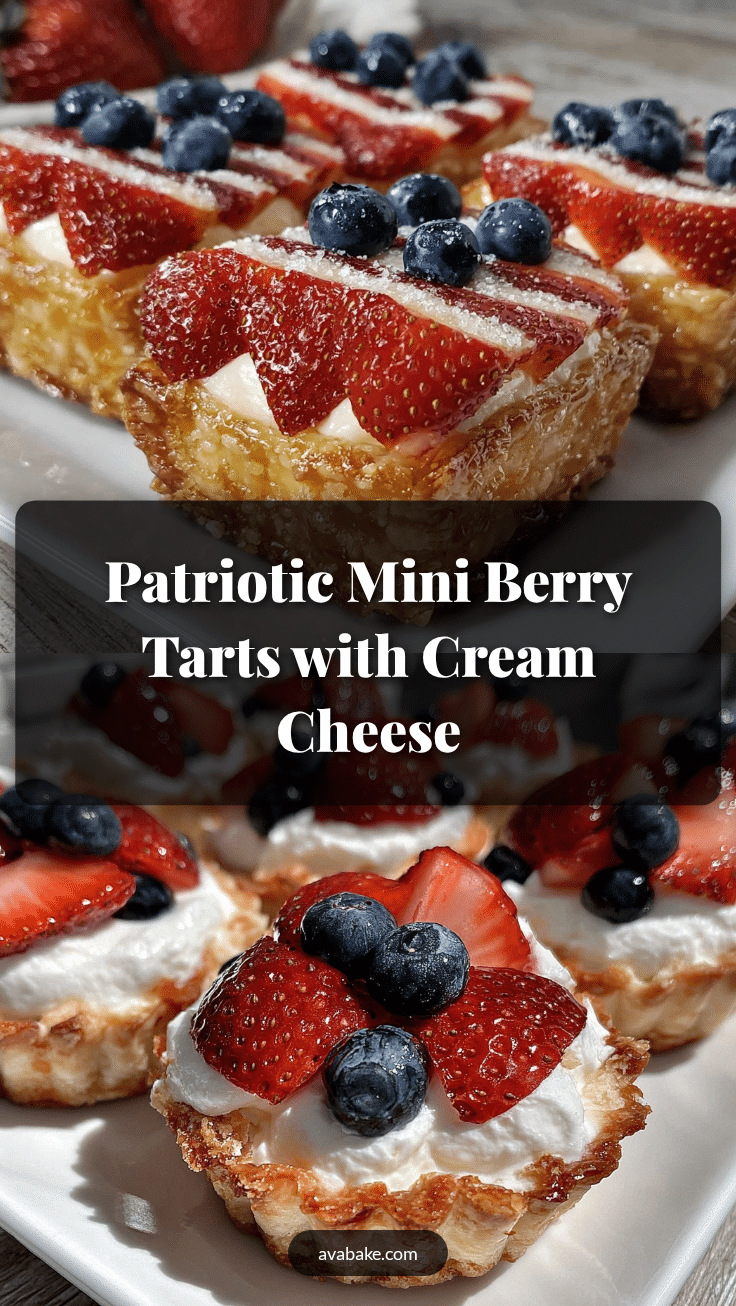
Perfect Mini American Flag Berry Tarts
These mini American flag berry tarts feature a creamy cream cheese filling and fresh berries arranged in a patriotic flag design, perfect for 4th of July celebrations or any summer gathering.
- Prep Time: 20 minutes
- Cook Time: 15 minutes
- Total Time: 45 minutes
- Yield: 12 mini tarts 1x
- Category: Dessert
- Cuisine: American
Ingredients
- 1 package (about 14 oz / 400 g) store-bought refrigerated pie dough
- 8 oz (225 g) cream cheese, softened (full fat for best flavor)
- 1/4 cup (50 g) granulated sugar
- 1 teaspoon pure vanilla extract
- 2 tablespoons sour cream
- 1 cup (150 g) fresh strawberries, hulled and thinly sliced
- 1 cup (150 g) fresh blueberries
- 1 cup (150 g) fresh raspberries
- Optional: 2 tablespoons apricot jam, warmed and strained
Instructions
- Preheat your oven to 375°F (190°C).
- Roll out the pie dough on a lightly floured surface to about 1/8 inch (3 mm) thickness.
- Use a 4-inch (10 cm) round cookie cutter to cut circles from the dough. Press each circle into mini tart pans or a muffin tin, smoothing edges and pricking bottoms with a fork.
- Blind bake the crusts with parchment paper and pie weights for 10 minutes. Remove weights and paper, then bake for another 5 minutes until golden. Let cool completely on a rack.
- In a bowl, beat softened cream cheese with sugar and vanilla extract until smooth and fluffy. Add sour cream and mix until combined.
- Spoon the cream cheese filling evenly into each cooled crust, smoothing the tops gently.
- Arrange blueberries in the upper left corner to form the ‘stars’ section (about 1/3 of the tart surface).
- Alternate rows of sliced strawberries and raspberries for the red stripes, using the cream cheese filling as the white stripes.
- Optional: Warm apricot jam and brush lightly over the berries for a glossy finish.
- Refrigerate the tarts for at least 30 minutes before serving to let the filling set and flavors meld.
Notes
Blind baking the crust is essential to avoid soggy bottoms. Use softened cream cheese for a smooth filling. Keep berries dry to maintain crust crispness. Glazing is optional but adds a nice glossy finish. Chill tarts for at least 30 minutes before serving for best texture and flavor.
Nutrition
- Serving Size: 1 mini tart
- Calories: 180
- Sugar: 10
- Sodium: 150
- Fat: 10
- Saturated Fat: 6
- Carbohydrates: 20
- Fiber: 2
- Protein: 4
Keywords: mini tarts, berry tarts, 4th of July dessert, patriotic dessert, cream cheese filling, fresh berries, easy summer dessert


