“You really think pink is the right color for this?” my friend asked, eyeing the layers cooling on the counter. Honestly, I wasn’t sure either. I’d been fiddling with this pink ombré layer cake recipe for days, trying to get the shades just right without turning it into a neon disaster. Late nights in the kitchen, with soft jazz playing and a faint vanilla scent lingering in the air, became my new routine. There’s something oddly calming about measuring, mixing, and whisking away the day’s noise.
This cake wasn’t planned—it sort of happened during a quiet weekend when I needed a break from the usual. I had a bag of flour, fresh eggs, and a jar of vanilla bean paste that I’d been itching to use. While the idea of a perfect pink ombré layer cake sounded fancy (and maybe a bit intimidating), I wanted something that felt special but still approachable. The vanilla bean buttercream came together like magic, smooth and fragrant, wrapping those soft, gradually shifting pink layers in a dreamy hug.
What stuck with me most wasn’t just how it looked (though that’s a showstopper, no doubt), but how it felt—like a little celebration, even if it was just for me. The kind of cake that makes you pause, maybe close your eyes for a second, and savor the moment. It’s not about perfection, but the quiet joy of creating something lovely in an ordinary kitchen. That’s why this recipe has a permanent spot in my collection, ready whenever I need a bit of sweetness with a side of calm.
Why You’ll Love This Recipe
I’ve made countless cakes over the years, but this perfect pink ombré layer cake with vanilla bean buttercream hits a sweet spot between impressive and doable. After several rounds of testing, tweaking, and more than a few taste tests (okay, maybe a lot), here’s why it’s become a go-to:
- Quick & Easy: This recipe comes together in about 1 hour and 30 minutes total, including baking and assembly—perfect for last-minute celebrations or spontaneous baking moods.
- Simple Ingredients: No need for weird extracts or fancy decorations. You probably have everything in your pantry, and the star is that real vanilla bean paste which adds a rich flavor punch.
- Perfect for Special Occasions: From birthdays to bridal showers, this cake’s pink ombré effect always gets oohs and aahs without you breaking a sweat.
- Crowd-Pleaser: The buttercream is creamy but not too sweet, and the cake layers stay moist and tender, winning over kids and adults alike.
- Unbelievably Delicious: The vanilla bean buttercream is silky, with those tiny specks of real vanilla that add authenticity you don’t find in most store-bought frostings.
What makes this recipe stand apart is the layering technique—gradual color blending for that dreamy ombré look, without artificial dyes that taste funny. Plus, the buttercream is whipped just right to be spreadable and stable, a little trick I picked up from years of baking and even a stint helping with wedding cakes. If you want a cake that’s as beautiful as it is comforting, this one fits the bill perfectly.
What Ingredients You Will Need
This recipe uses simple, wholesome ingredients to deliver bold flavor and a satisfying, tender crumb without fuss. Most are pantry staples, with a couple of special touches to make the vanilla bean buttercream truly shine.
- For the Cake Layers:
- 2 ½ cups (312g) all-purpose flour, sifted (for best texture, I use King Arthur brand)
- 2 ½ tsp baking powder
- ½ tsp salt
- 1 cup (226g) unsalted butter, softened (room temperature is key for smooth batter)
- 1 ¾ cups (350g) granulated sugar
- 4 large eggs, room temperature
- 1 tbsp pure vanilla bean paste (real specks in every bite!)
- 1 cup (240ml) whole milk, room temperature
- Pink gel food coloring (I recommend AmeriColor gels for vibrant, clean colors)
- For the Vanilla Bean Buttercream:
- 1 cup (226g) unsalted butter, softened
- 4 cups (480g) powdered sugar, sifted
- 2 tbsp heavy cream or whole milk (adjust for desired consistency)
- 1 tbsp pure vanilla bean paste
- Pinch of salt (to balance sweetness)
If you want to swap the all-purpose flour for almond flour, that’s a nice gluten-free option, but the cake texture will be a bit denser. Also, if you prefer a dairy-free version, use coconut milk and vegan butter alternatives—though keep in mind the buttercream consistency might shift slightly. In summer, a few fresh raspberries tucked between layers add a lovely tart contrast.
Equipment Needed
- Three 8-inch (20 cm) round cake pans (non-stick or lined with parchment paper for easy release)
- Electric stand mixer or hand mixer (makes the buttercream silky smooth)
- Mixing bowls, preferably glass or metal
- Rubber spatula for folding and scraping down bowl sides
- Measuring cups and spoons (for precise measurements)
- Cooling racks to cool cake layers evenly
- Offset spatula or butter knife for spreading frosting evenly
If you don’t have three cake pans, you can bake in batches, but I find that having all three ready cuts down on total time and keeps layers evenly moist. For frosting, a stand mixer is a dream for whipping up fluffy buttercream, but a good hand mixer works just fine too. Keeping your butter at room temp is a small but crucial step—too cold and it lumps, too soft and it melts.
Preparation Method
- Preheat and Prep: Preheat your oven to 350°F (175°C). Grease and flour three 8-inch round cake pans, then line the bottoms with parchment paper circles for easy release. This step saves frustration when your layers are baked.
- Mix Dry Ingredients: In a medium bowl, whisk together 2 ½ cups (312g) all-purpose flour, 2 ½ tsp baking powder, and ½ tsp salt. Set aside.
- Cream Butter and Sugar: In a large bowl, using a stand or hand mixer, beat 1 cup (226g) softened unsalted butter with 1 ¾ cups (350g) granulated sugar on medium speed until light and fluffy—about 3-4 minutes. This step is what gives your cake that melt-in-your-mouth texture.
- Add Eggs and Vanilla: Beat in 4 large eggs, one at a time, incorporating fully before adding the next. Then mix in 1 tbsp vanilla bean paste for that beautiful vanilla flavor with natural vanilla flecks.
- Alternate Adding Dry Ingredients and Milk: Reduce mixer speed to low. Add the dry ingredients in three additions, alternating with 1 cup (240ml) whole milk, starting and ending with flour mixture. Mix just until combined, avoiding overmixing which can make the cake dense.
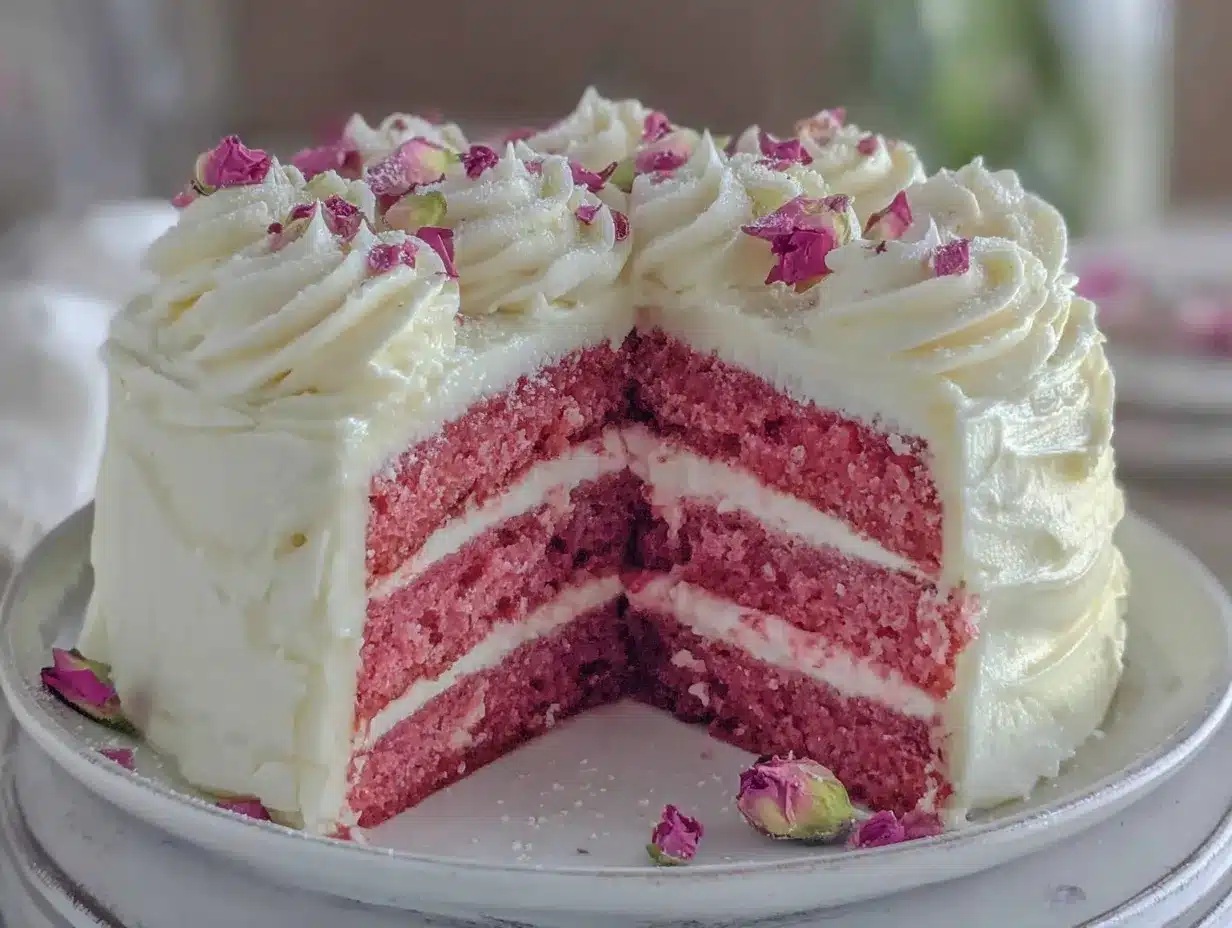
- Divide and Color Batter: Divide the batter evenly into three bowls. Leave one bowl plain (this will be your lightest pink). Add a small amount of pink gel food coloring to the second and more to the third bowl, mixing until you get a gradient from pale pink to vibrant pink. Remember, gel color is concentrated—start with a tiny dab and add more as needed.
- Bake Layers: Pour each colored batter into its own prepared pan. Bake at 350°F (175°C) for about 25-30 minutes or until a toothpick inserted in the center comes out clean. Rotate pans halfway through baking for even cooking.
- Cool Completely: Let cakes cool in pans for 10 minutes, then turn onto wire racks to cool completely before frosting. Trying to frost warm cake is a recipe for meltdown! I sometimes chill layers briefly to firm them up.
- Make the Buttercream: Beat 1 cup (226g) softened butter on medium speed until creamy (about 2 minutes). Gradually add 4 cups (480g) powdered sugar, mixing on low to avoid a sugar cloud, then increasing speed until fluffy. Add 2 tbsp heavy cream, 1 tbsp vanilla bean paste, and a pinch of salt. Beat for another 2-3 minutes until light and spreadable. Adjust cream quantity if frosting feels too stiff or runny.
- Assemble the Cake: Place the darkest pink layer on your serving plate. Spread a generous layer of buttercream on top, then add the medium pink layer, followed by more frosting. Top with the lightest pink layer and coat the entire cake with a thin crumb coat. Chill for 20 minutes, then finish frosting smoothly or with swirls using an offset spatula.
Cooking Tips & Techniques
One trick I learned the hard way: never skip sifting your powdered sugar for the buttercream. It prevents gritty frosting and gives you that silky smooth finish everyone loves. Also, when mixing batter, scraping down the bowl with a spatula ensures no pockets of flour hide, which can throw off texture.
Coloring batter can be intimidating, but remember: less is more. You can always add more gel color, but you can’t take it out once it’s mixed. I recommend using gel colors instead of liquid—they won’t thin your batter.
When baking the layers, watch your oven closely. Even a few extra minutes can dry the cake out, especially with thinner layers. I like to use an oven thermometer—it makes a surprising difference because sometimes the dial doesn’t tell the full truth.
For the buttercream, if it feels too stiff, add cream a teaspoon at a time until you reach a spreadable consistency. Too soft? Chill the bowl for 10 minutes.
Finally, chilling the crumb coat is key. It locks in crumbs so your final frosting looks clean and professional. I often chill my finished cake for at least an hour before serving to let flavors meld.
Variations & Adaptations
- Flavor Twists: Add 1 tsp almond extract to the batter for a subtle nutty flavor that pairs beautifully with vanilla bean buttercream.
- Seasonal Berries: In spring or summer, layer fresh raspberries or strawberries between cake layers for a fresh, fruity pop.
- Chocolate Pink Ombré: Swap half the flour for cocoa powder to make a chocolate version with the same ombré effect; the vanilla bean buttercream balances the rich cocoa perfectly.
- Dairy-Free Version: Use coconut oil instead of butter and coconut milk instead of heavy cream. Use a dairy-free powdered sugar brand to keep it vegan-friendly.
- Mini Cake Version: Halve the recipe and bake in 6-inch pans for a petite cake perfect for intimate gatherings or anniversaries.
Once, I tried swapping vanilla bean paste with lavender syrup—interesting, but I prefer the classic vanilla bean for this cake’s delicate flavor. Feel free to experiment, though; that’s the fun part of baking!
Serving & Storage Suggestions
This cake is best served at room temperature, giving the buttercream a soft, luscious texture that melts in your mouth. I like to slice it with a warm knife (dip it in hot water, then dry) for neat layers.
Pair with a light cup of Earl Grey tea or a chilled glass of sparkling rosé for special occasions. If you’re serving brunch, it’s a lovely sweet contrast to savory dishes like a savory sheet pan dinner or an herbaceous salad.
Store leftover cake covered loosely with plastic wrap in the refrigerator for up to 4 days. For longer storage, wrap individual slices tightly and freeze for up to 2 months. Thaw frozen slices in the fridge overnight and bring to room temp before serving.
Flavors actually deepen over a day or two, so if you can resist, letting the cake rest enhances the vanilla bean notes and moist crumb.
Nutritional Information & Benefits
Each slice (assuming 12 slices) contains approximately 350-400 calories, with a good balance of fats and sugars that make it a rich treat rather than an everyday snack. The real vanilla bean paste offers antioxidants and has a wholesome, natural flavor without artificial additives.
This recipe isn’t low-calorie, but it’s made with simple, real ingredients—no preservatives or artificial dyes—so it’s a cleaner indulgence. For those sensitive to gluten, swapping to almond flour or a gluten-free blend works well, just expect a slight texture change.
From a wellness angle, I appreciate that this cake avoids overly processed ingredients. The buttercream’s homemade quality beats store-bought frosting hands down in taste and ingredient transparency.
Conclusion
This perfect pink ombré layer cake with vanilla bean buttercream is one of those recipes that feels like a little gift to yourself or your guests. It’s pretty without being fussy, flavorful without being overwhelming, and a joy to make whether you’re baking for a big party or a quiet afternoon treat. The gentle gradient of pink layers paired with that rich, speckled vanilla buttercream is honestly a crowd favorite in my house.
Feel free to play with colors, flavors, or sizes to make it your own. I love baking this cake because it reminds me that sometimes, the simplest ingredients—when handled with a little care—can create something truly special.
If you’ve enjoyed this recipe, I’d love to hear how your ombré cake turned out or what creative twists you tried. Baking should be fun, so don’t hesitate to experiment and make it yours!
FAQs About Perfect Pink Ombré Layer Cake
How do I get the perfect ombré effect in the cake layers?
Divide your batter evenly into three bowls and add pink gel food coloring incrementally—start with a tiny amount and increase for each bowl to create a gradient. Using gel colors prevents thinning your batter.
Can I make this cake ahead of time?
Yes! Bake the layers up to two days ahead and store tightly wrapped at room temperature. Frost and assemble on the day you plan to serve for best freshness.
What if I don’t have vanilla bean paste?
You can substitute with 2 tsp pure vanilla extract, but the flavor won’t have those lovely vanilla flecks or the same intensity.
How do I store leftover cake?
Keep the cake covered in the refrigerator for up to 4 days. For longer storage, freeze slices individually wrapped for up to 2 months.
Can I use this recipe for cupcakes?
Absolutely! Adjust baking time to about 18-22 minutes and use cupcake liners. The vanilla bean buttercream works perfectly as a frosting swirl on top.
Pin This Recipe!
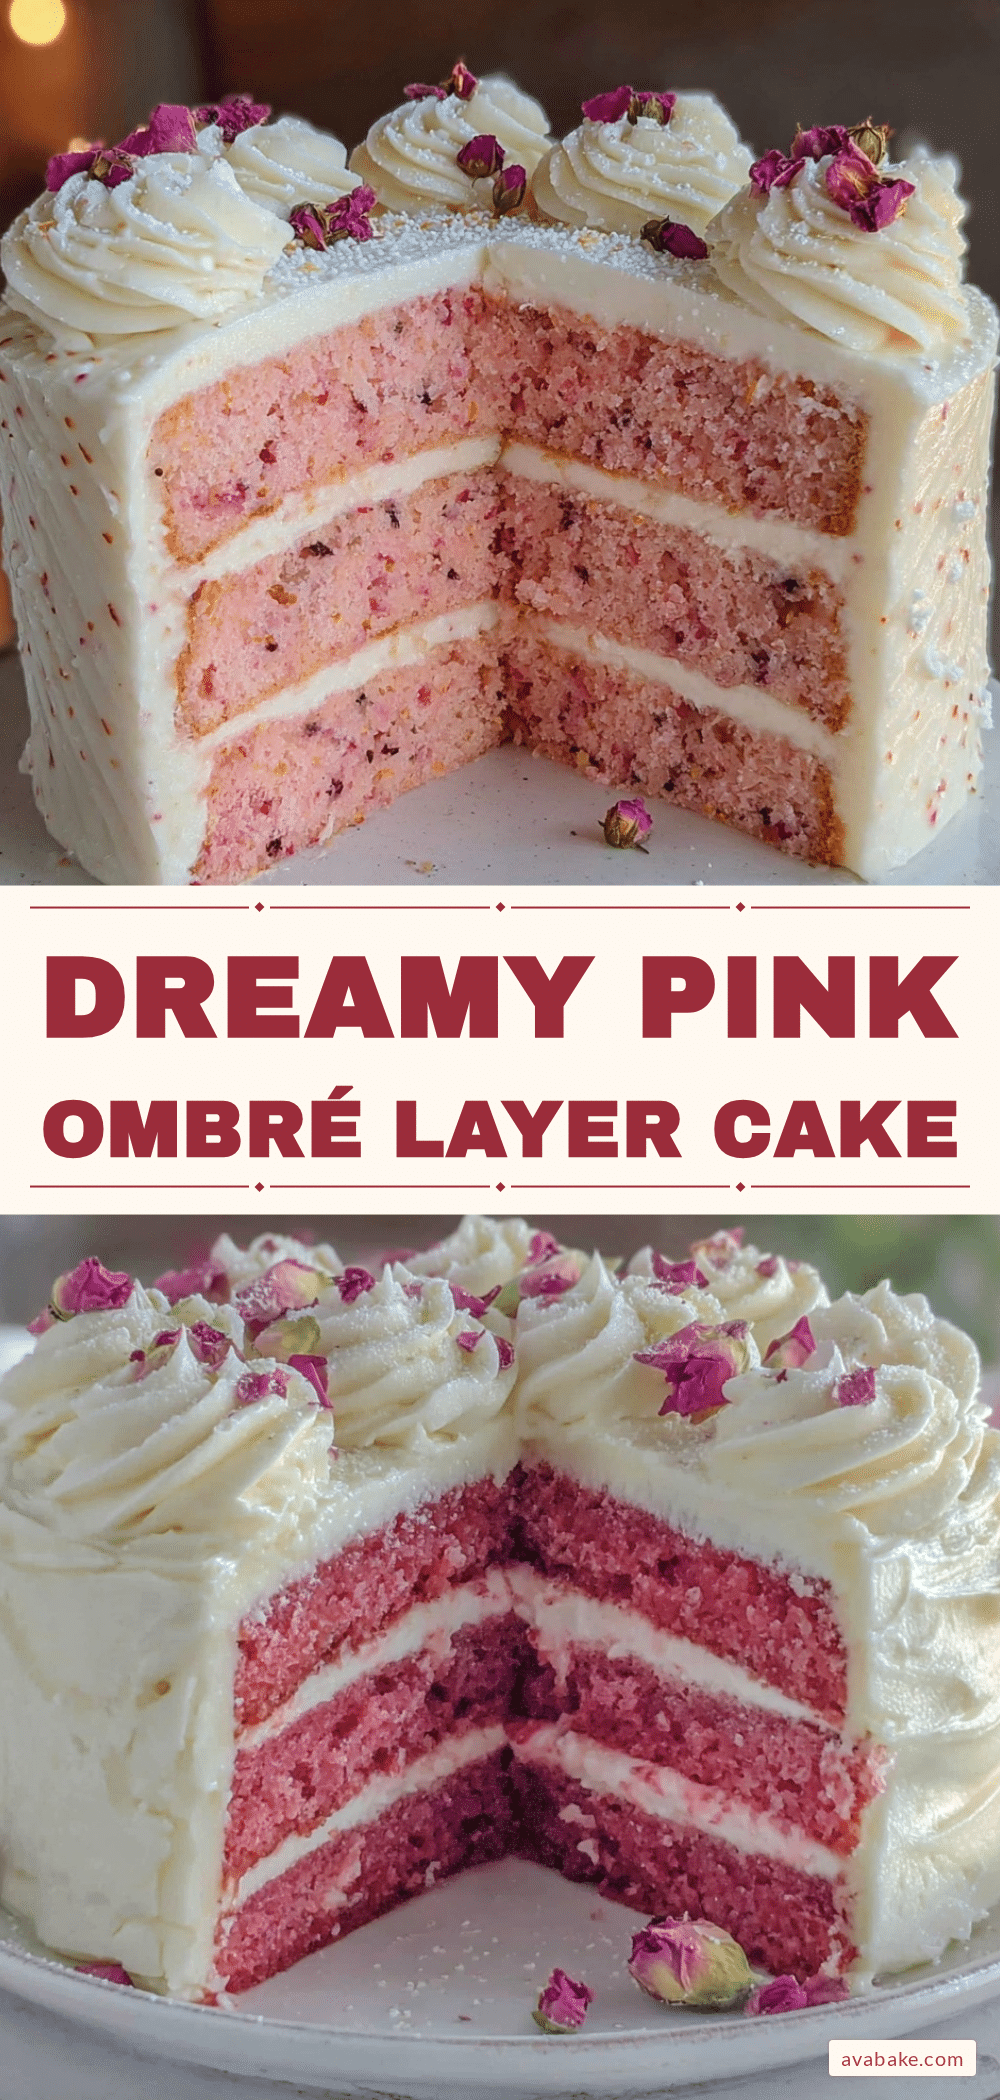
Perfect Pink Ombré Layer Cake with Vanilla Bean Buttercream
A beautiful and approachable pink ombré layer cake with silky vanilla bean buttercream, perfect for special occasions and celebrations.
- Prep Time: 30 minutes
- Cook Time: 30 minutes
- Total Time: 1 hour 30 minutes
- Yield: 12 servings 1x
- Category: Dessert
- Cuisine: American
Ingredients
- 2 ½ cups (312g) all-purpose flour, sifted
- 2 ½ tsp baking powder
- ½ tsp salt
- 1 cup (226g) unsalted butter, softened (room temperature)
- 1 ¾ cups (350g) granulated sugar
- 4 large eggs, room temperature
- 1 tbsp pure vanilla bean paste
- 1 cup (240ml) whole milk, room temperature
- Pink gel food coloring (AmeriColor gels recommended)
- For the Vanilla Bean Buttercream:
- 1 cup (226g) unsalted butter, softened
- 4 cups (480g) powdered sugar, sifted
- 2 tbsp heavy cream or whole milk (adjust for desired consistency)
- 1 tbsp pure vanilla bean paste
- Pinch of salt
Instructions
- Preheat oven to 350°F (175°C). Grease and flour three 8-inch round cake pans, line bottoms with parchment paper.
- Whisk together flour, baking powder, and salt in a medium bowl; set aside.
- Beat softened butter and granulated sugar on medium speed until light and fluffy, about 3-4 minutes.
- Add eggs one at a time, fully incorporating each before adding the next. Mix in vanilla bean paste.
- Reduce mixer speed to low. Add dry ingredients in three additions, alternating with milk, starting and ending with flour mixture. Mix just until combined.
- Divide batter evenly into three bowls. Leave one plain, add small amounts of pink gel food coloring to the other two bowls to create a gradient from pale to vibrant pink.
- Pour each colored batter into prepared pans. Bake 25-30 minutes or until a toothpick comes out clean. Rotate pans halfway through baking.
- Cool cakes in pans for 10 minutes, then transfer to wire racks to cool completely.
- For buttercream: Beat softened butter on medium speed until creamy (~2 minutes). Gradually add powdered sugar on low speed, then increase speed until fluffy.
- Add heavy cream, vanilla bean paste, and salt. Beat 2-3 minutes until light and spreadable. Adjust cream if needed.
- Assemble cake: place darkest pink layer on plate, spread buttercream, add medium pink layer, more frosting, then lightest pink layer.
- Coat entire cake with thin crumb coat. Chill 20 minutes, then finish frosting smoothly or with swirls using an offset spatula.
Notes
Use gel food coloring to avoid thinning batter. Keep butter at room temperature for smooth batter and buttercream. Chill crumb coat before final frosting for clean finish. Sift powdered sugar for silky buttercream. Rotate pans halfway through baking for even layers.
Nutrition
- Serving Size: 1 slice (1/12th of c
- Calories: 375
- Sugar: 38
- Sodium: 210
- Fat: 18
- Saturated Fat: 11
- Carbohydrates: 52
- Fiber: 0.5
- Protein: 4
Keywords: pink ombré cake, vanilla bean buttercream, layer cake, easy cake recipe, celebration cake, birthday cake, ombré cake, vanilla cake


